Please note:
The solution is based on the American version of the game, so there may be differences for the Spanish version.
MISSION 1
After the training mission here you are at the first mission, stirring up the war between the Kowloon Triads.
The goal is:
- Eliminate the Red Dragon negotiator
The necessary equipment is the Blaser Jugowaften R93 Sniper, the sniper rifle you will use to take down the negotiator.
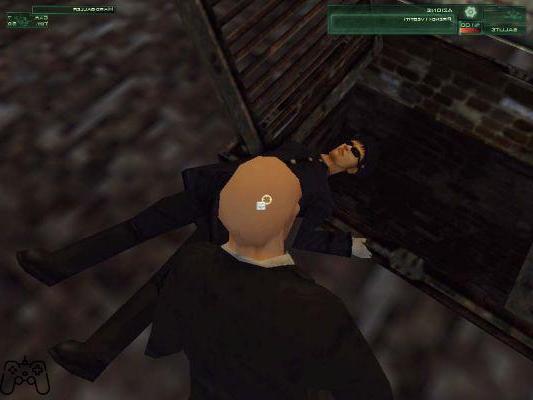
As soon as you get out of the car, you will be in front of the garden where the two Triads will soon meet. In the area there are three buildings to climb up to be able to shoot calmly. The best point, however, is the one to the north. Reach the building, climb the ladder and position yourself with your eyes towards the garden. Soon, the two negotiators will start talking behind the statue and from your position you will see the head of your target, the Red Dragon negotiator, calmly and precisely aim for the head, if you make a mistake you still have a few seconds to try again. With the target killed, put the rifle away in the briefcase and run down the building.
WARNING: If you spend too much time on the roof, you will be attacked by a patrol helicopter, so be careful.
Quickly return to the car and leave the scene to successfully complete the mission.
MISSION 2 - WALKWAY AT WANG FOU RESTAURANT
The mission objectives are:
- Eliminate the emissary of the Blue Lotus
- Eliminate all members of the Blue Lotus Triad
The equipment to bring on this mission is the piano string, the bomb to put in the car and the Beretta with silencer. Go to the restaurant that is north of the map and you will see many guards patrolling the area, you absolutely cannot enter and therefore you will have to find some other solution.
Stand in front of the restaurant and rest assured, after a while you will be warned that the target is coming and after a while a car will park in front of the restaurant, disregard the Boss and concentrate on the driver, he will have an urgent need after a while. Follow him down the alley and when he stops to "unload", wait for the two civilians to pass and strangle the driver with the piano rope.
Quickly throw the corpse into the manhole and go down too, change your clothes (with the driver's one) and go back to the car, when the guard is turned around, equip the bomb and throw it in the driver's side.
Now go back to the sewers and grab your dress, then head to your car, when you see the limo coming to the right and it will pass by the guards patrolling the area, take the remote control and blow it up. Go there to take out any survivors then go back to your car to finish the mission.
MISSION 3 - MASSACRE AT THE CHENG CHAU RESTAURANT
The objectives of the sixth mission are:
- Eliminate the Red Dragon Negotiator
- Hide the body
- Eliminate the chief of police
- Put the Red Dragon amulet on the table on the table
- Go back to the car
The first thing to do is to go to the Cheng Chau restaurant and talk to the bartender, after the dialogue take the key from the counter and use it to open the toilets, once inside select the silenced Beretta and drop it on the floor.
Exit the restaurant and take the road to the right: the Red Dragon Negotiator will arrive from the upper right road and to be able to kill him, you will have to wait for him to reach the main road to the north. The best way to take out the Negotiator is to wait for him to pass the manhole (which is nearby) and stab him in the back with the Oyabun Knife. Drag the corpse into the manhole as fast as possible and throw it into it. When you manage to do it (and it won't be easy), go down the sewer, take the medallion and change your clothes.
Exit the manhole and return to the restaurant where you will be intercepted by the guards outside who will deprive you of all weapons. At this point, you will be seated at a table with the Blue Dragon Negotiator and the Chief of Police.
Talk to the latter and after the dialogue ask to go to the bathroom, take out the amulet and put it on the table and then go to the bathroom. Grab the gun, go out and shoot the Chief of Police and the bartender, break the windows and quickly exit to your car to complete the mission.
MISSION 4 - THE MURDER OF LEE HONG
The objectives of the fourth mission are:
- Find the combination of the safe
- Find the location of the safe
- Give the Jade statue to the herbalist
- Eliminate Lee Hong
- Rescue the captured agent
The recommended equipment is an Oyabun knife and beretta with silencer.
Reach the restaurant and enter, on the right there are two guards guarding the brothel, one patrols the area from here to the bar and another guards a warehouse.
Go to the latter, open the door behind her and stop at the door, get down, wait for the guard to make his round of control and then kill the guard in front of you and quickly take him to the closet. Put on the dead man's clothes and then go to the bar, talk to the barman for the brothel flyer and talk to him again to find out the location of the hostage.
Go back to the entrance and then go to the door on your left, continue until you reach an internal garden with three doors. Talk to the fat man and then go through the newly opened door to reach the prostitutes. Talk to the old woman and after the dialogue you will be told to follow Ling Mei, follow her into the room and after the dialogue (she will give you the combination of the safe) she will escape. Follow her to the roof, after the scene, escort the girl to the gate and she will escape (not without thanking you!).
Now go to the guard and enter the kitchen through one of the doors in the courtyard, as soon as you enter go left and go down the cellar stairs. Now looking at the map you will have to go up to a door with a guard in front of a door who will chase you away.
Now you have to eliminate all the moving guards in the area (it's not easy), in one room you will find a sniper rifle that can help you. When all is quiet, go back to the guard and take him out with the knife. Enter the door and you will find the agent, after the cutscene go out and take the corpse of the guard, take him inside.
Now if you look at the map, you will find a new marked area, it is the safe area, go back to the kitchen and then in the indicated area (there are 4 random areas, I will show you all).
- Brothel safe:
Go through the door on the left and you will find a room with a sentry and the old woman, go through the next door, kill the Red Dragon and take the figurine from the safe (put it away so as not to arouse suspicion).
- Safe on the first floor:
Reach the brothel area and walk into the open restaurant area, at the back there will be a door leading to the warehouse with the safe, kill the guard, hide the body behind the crates and take the figurine.
- Safe in the VIP area:
The safe is located in the center of a room manned by a single sentry, plus two guards who make the rounds, first eliminate these two and then take your time to the third, open the safe and take the statuette.
- Safe in the guard area:
The area can be reached by using the lift in the VIP area. In any case, there are so many guards around, try to make as little noise as possible and rely on luck, take the statuette and go away.
Go to the herbalist, passing the bar first and the restaurant then, when the guy comes to the counter, talk to him and give him the statuette, in exchange you will have some poison.
To poison the boss, you have to dress as a waiter, go to the two guys dressed in yellow and green, go to the restroom and wait for one of the two waiters to arrive. Kill him and then immediately hide the body, when the other waiter arrives, kill him too. Put on your waiter uniform and go out, go to the kitchen and after the cutscene use the poison with the soup (be careful that the cook doesn't look at you) and take it. Exit the kitchen from the two white doors and go all the way to where Lee Hong will be, after the cutscene and the death of the bodyguard, Lee Hong will escape.
Now you should be in the Chinese garden and crossing the bridge you will come near a door with a Red Dragon on guard, eliminate him and take his clothes.
With the new disguise go back to the basement and then look in one of these rooms for the AK-47. Follow the corridor to the north and you will come to an elevator, go up and you will be in Lee Hong's apartments.
The situation is this, a lot of guards downstairs and Lee Hong upstairs. Go up the stairs and wait in the office, when Lee Hong arrives shoot him in the head, then eliminate all the guards that arrive (they will not go to you but to Lee Hong). After the guards, take the letter from the corpse of the boss and go down, eliminate the guard who is above the grate, open it and you will be outside. Go down to the dock using the lift and then use the boat to leave Hong Kong (Watch out for the guards).
MISSION 5 - IN SEARCH OF THE U'WA TRIBE
The objectives of the fifth mission are:
- Retrieve the idol
- Bring the idol to the Indians
Recommended equipment is an AK-47, Kevlar vest, binoculars and compass.
The first thing to do is to get to the place where the plane crashed before the military gets there. On your way you can run into a patrol, just slip into the jungle to not get noticed.
Reached the point of the accident, examine the surroundings to take possession of the statuette, now you have to bring it back to the Indians in the village to the Northeast.
Beware of the many patrols and at a certain point, you will find two lone guards, eliminate them and take the uniform (also take the ammo). Continue until you reach the village, here show them the figurine and a cutscene will start, then go Northeast to give the statue to the village chief.
You will now have a new mission (marked on the map), recover the boss's brother. Walk along the river in a southwestern direction and pay attention to the two patrols that line the shore, you will soon arrive near a bridge, manned by three guards and on the right a guard on a turret.
Kill (staying among the vegetation) the guard on the turret and when the others go to see what happens, freeze them too. Then go up the turret and take the sniper rifle and ammo. Now look across the bridge and you will see a sniper, kill him and then get ready for a great action, the hostage is between two guards, you will have little time between shots and you cannot hurt the hostage .. ...
After killing the two men, reach the Indian, watch out for a helicopter that is in the area, follow the Indian who will return to the village and once there, talk to the chief to finish the mission.
MISSION 6 - THE GOD OF THE JUNGLE
The objectives of the sixth mission are:
- Find the secret passage that leads to Campo di Pablo.
Start by going to the bridge, staying away use the sniper rifle to take out the guards on the bridge, now you have to go West to a temple with a pig pen. Kill one of these beasts, take it and go to the southern point of the map (marked), to the altar of the God of the jungle. Here give the pig to the God of the Jungle (a big Jaguar) and go to the opening that he has left free (take the AK-47 and remember to be dressed as a mercenary).
MISSION 7 - THE END OF PABLO
The mission objectives are:
- Kill Pablo
Start by going left to get one of the knives left there (inside a chest).
Proceed down the street with the main gate, in the tent to the east of the laboratory there is a Beretta and a Kevlar vest. Now you will need a bomb (to destroy the laboratory) which is inside the house in the eastern part of the camp, beware of the snipers and the guards, after the cutscene, go to the western part and kill the guard with the knife, go inside and much silently eliminate all the guards of Pablo, after that you can go to the first floor, first kill all those who are on the right side of the area, from here it should not be difficult to eliminate all the inhabitants of the house (have them run there and then shoot). Once the area is cleared, go and get the M16 outside, inside a tent (watch out for snipers). Also examine the guards inside the house until you find the Desert Eagle (a very powerful weapon), now go up to the first floor and you will have to face Pablo, dump everything you have (he is a very resistant Boss) and when you have killed him take the bomb and the M60.
Make a massacre outside the camp until you clear a way to the laboratory, enter the underground passage on the right, eliminate the guards (do not make noise) and you will arrive at the warehouse, here eliminate all the guards and then put the bomb near the crates .
Now looking at the map you will see a corridor to the right, it is the area where you will have to take the plane, run towards the area eliminating only the guards in front of you and arrived at the Hangar use the M60 to defeat all the guards, then take the plane to finish the mission.
MISSION 8 - THE TRADITION OF THE TRADE
The mission objectives are:
-Kill Frantz Fuchs
- Retrieve the bomb
The recommended equipment is the piano string.
Start by passing the two metal detectors, inside the hotel talk to the man at the receptionist to find out where your man is. Climb the stairs and go to the second floor, observe the porters in charge of cleaning, in their work they will use a pass partout that they will leave outside the door, as soon as no one sees you, steal it from them and then go to room 202 (there will be a bodyguard in front ).
Enter room 201 and here go to the balcony, wait for the guard to come back and then jump to the other balcony, here by stealth kill the guard who has his back to you. Now take all the items on the table (even the gun), then go to the bathroom and kill Frantz Fuchs. Open the door, strangle the guard and drag him inside (make sure no one sees you).
Inside the room, take the part of the bomb near the cabinet, change your clothes, go out and put the "Do Not Disturb" sign on the doorknob.
Now you will have to reach the second part of the bomb, it is in the X-ray room in the dental office on the third floor, but to access it you will have to take the key from Fritz. Go there and talk to his secretary, at this point you will have to ambush Fritz, follow him discreetly until he goes to the sauna, reach the pool by entering to the right of the staircase on the ground floor, change clothes (or if you want to kill the lifeguard ) and then dive into the sauna.
Talk to Fritz, then go out and turn up the heat in the sauna, Fritz will die and you can get the key.
Now you will have to reach the roof of the building and go through part of the left ledge and you will arrive in front of the study window. Enter and kill the guard, exit and avoid alerting the guard in front of the studio entrance, go down the corridor and you will find the bomb, put it in the suitcase and exit.
To get out of the hotel I recommend a nice run to the exit and even if the guys start shooting at you, you will have plenty of time to get out, where your car will be waiting outside.
MISSION 9 - THE PARADISE OF ARMS TRAFFICERS
The purpose of the mission will be to put the GPS transmitter inside the gang's car, to discover the meeting point. Then take them all out and put the GPS in the briefcase to give to Ivan.
The recommended equipment is the silenced Beretta, the MP5, the piano string and the bulletproof vest.
As soon as it starts, go left, kill the enemy guard, take him to a dark place and switch clothes.
Now you have to head into the room which is marked with a yellow dot on the map (follow the tracks south, until you find a hole in the net).
In front of the room there is the car in which you will put the GPS, to do so, however, you will have to distract the guard.
Enter the club and talk to the bartender to have an appointment with the dancer, enter the door to the left of the stage and wait for the girl, then talk to her.
Now follow her out and while she distracts the guard you put the GPS in the car.
After a while the two guards will get into the car, you can follow them by opening the inventory.
The three possible destinations are three warehouses, South, East and West. Now go to the docks at the far north of the map and wait beside the platform to the right with the change. What you need to do is move the gears so that the train passes through the locked gates of the warehouses and break through to reach the goal.
When the train has destroyed the barriers, go to the warehouse, get the GPS from the car again (watch out for the dogs). Once the dogs are killed, enter the warehouse and with the MP5 kill all six guards. Hide the corpses and wait for Ivan. Put the GPS inside the briefcase with the money and when Ivan arrives, the mission will be over.
MISSION 10 - PLUTONIUM DISPERSE
The mission objectives are:
- Kill Boris
- Defuse the nuclear warhead
- Take the ship to international waters
The recommended equipment is the silenced Beretta, the MP5, the piano string, the bulletproof vest and the knife.
Go up the stairs of the pier and you will find in front of two warehouses, there will be two guards to make the patrol, wait for the one in the second building to pass beyond that of the first and eliminate the latter. Repeat the operation for the second one (hide the corpses), grab the uniform and then go North.
You will come to a fence with two guards, get behind the patrol and when it gets close to the door, advance with them pretending to be with them.
Do the trick again until you get to the north of the dock, now take out the two guards circling around here. Now you will be in front of the ship, stand behind the guard dressed as a sailor, kill him and change his clothes. Now get on the ship (no one will bother you), go right and then through the door on the left, go down the stairs to the right and at the end turn left.
Now you have to kill three guards, follow the guard, when he reaches the area after the walkway it will be time to kill. The first guards to be eliminated are the two side ones at the bottom, then you have to kill the two guys on the bridge, wait for them one at a time and kill them in the same room where you just finished the two soldiers from before. Now go into the corridor with the two guards in front of the door, kill them (you need timing and good aim), Boris will still activate the detonator and escape.
Now wait for him and when he arrives (from one of the two corridors), hit him with the MP5, now run to the catwalk and go down the stairs (in the center), then turn and go up the other stairs, go down to the engine room and kill the guards.
Killed everyone, go to the back of the room and go up the ladders, defuse the briefcase you will find (the one on the right) and that's it. Now go to the main deck, follow the road south and when you find some red paint on the floor, go up the stairs, open the door and kill the captain. Go to the control panel and start the engines, the mission is over.
MISSION 11 - THE COVERAGE
Run inside the villa, talk to the guy from the reception (this will cause a mess). Go up the stairs behind the secretariat and then continue to the operating room, go north, avoid the doors and go straight to the bathroom, on the left there is a medicine box, take the syringe.
Go back and enter the door on the left, get behind him and after the dialogue plant the syringe in the neck of the doctor. Take the key on the wall and change clothes with the doctor, put the syringe away and head into the basement. Go to the TV room and talk to the guy sitting on the chair, now go to the locker room and get the syringe on the table behind the chair.
Use it on the man and then follow him (use the key every time the man stops). Arrived at the elevator (you must have recovered at least one gun), take the ladder and you will arrive at the grand finale.
MISSION 12 - THE END
Advance down the hall and just around the corner hit the doctor, grab his gun and open the locker to get the shotgun. You will now need to kill ten of your own MP5-armed clones, so be careful and reload often. After this phase, continue, attentive to the sensor on the ground, use to press the body of a clone. Enter the room and kill your father to finish the game.
Solution Video - Mission 1