Premise
If you have opened this guide you will have already understood it, Demon's Souls is a decidedly difficult game, with complicated and dark mechanics, sometimes frustrating, but at the same time also satisfying and damn fun.
The task of this guide is precisely to prepare you for the journey you are about to embark on, a journey made up of heroes, friends and enemies, apparently insurmountable obstacles, in short, a journey through the ancient kingdom of northern Boletaria.
The character
Here we are finally at the favorite part of every lover of the RPG genre: the creation of the character.
After taking care of the appearance of our "avatar" we will have to decide the class and it is here that Demon's Souls begins to distinguish itself from the classic games of the genre; the class that we will initially choose will only affect the first hours of the game, in fact we will have no limit in the expenditure of soul points (which represent the classic experience points) and we will be able to have access to all skills, this allows you to develop practically all sorts of characters and as the levels progress you will be able to make use of any weapon and any magic.
But let's get to the characteristics of our character:
• Vitality: increases hit points and the maximum weight you can carry in your inventory.
• Intelligence: increases magic points and slots for storing spells.
• Resistance- Increases Stamina, Maximum Equipment Weight, Fire Resistance, Poison Resistance, and Bleeding Resistance.
• Force: increases the physical damage dealt.
• Dexterity: Increases physical damage dealt and decreases damage from falls.
• Magic: increases the damage caused by spells.
• Fede: increases the effect of miracles, the slots for storing miracles and increases the magical defense.
• Fortuna: Increases the chance that enemies will drop better items when killed and increases resistance to disease.
The characteristics of strength, dexterity, magic and faith are also necessary in order to equip certain weapons and armor, the required value of one or more of these characteristics is indicated in the description of the object.
The classes
As previously mentioned, in Demon's Souls we have no limits in the development of our character, the skills are all accessible, the same goes for the weapons, at very high levels we can use very powerful spells and slash worthy of the best warrior. Consequently, the choice of class will significantly affect only the first few hours of the game.
Each class starts with different characteristics, equipment and skills.
• Cavaliere: Vit 10, Int 11, Res 11, For 14, Des 10, Mag 10, Fed 11, Fortuna 7.
The knight is a great class if you decide to play the typical hand-to-hand character; he will start the game with heavy armor, two types of weapons and a shield.
• Priest: Vit 13, Int 11, Res 12, For 13, Des 8, Mag 8, Fed 13, Fortuna 8.
The priest is a good class if we decide to immediately rely on miracles such as healing, moreover he starts with good armor, a club and a shield.
• Thief: Vit 10, Int 13, Res 10, For 9, Des 14, Mag 10, Fed 8, Fortuna 15.
The thief is one of the hardest classes to start the game with, he only has a knife as a weapon (so very low damage) and a bow whose arrows will run out soon, great if we want to set our game on hit and run strategy, thanks in light armor you will have a minimum of protection and will still be very fast. Moreover, thanks to his high luck it will be very easy for the enemies once killed to leave objects of great value.
• Mago: Vit 9, Int 15, Res 10, For 9, Des 11, Mag 15, Fed 6, Fortuna 11.
The magician is the right class if we want to immediately set our style of play on spells, in fact you will immediately know a fire spell and a protection spell, but keep in mind that in the very first levels of the game the enemies will not leave potions to recover the magic points, but being also equipped with a sword and shield we could alternate the melee with some devastating magic.
• Knight of the temple: Vit 11, Int 8, Res 13, For 14, Des 12, Mag 6, Fed 13, Fortuna 7.
The Knight of the Temple is another great choice for a melee character, equipped with an excellent heavy armor and a weapon with a great range, unlike the Knight, moreover, we will start with the miracle of healing.
• Soldier: Vit 14, Int 9, Res 12, For 12, Des 11, Mag 8, Fed 10, Fortuna 10.
Soldier is the third best choice for a melee character, great armor right out of the box and great weapons including a long-range spear that will keep your enemies away.
• Traveler: Vit 10, Int 10, Res 11, For 11, Des 15, Mag 9, Fed 7, Fortuna 13.
The traveler, like the thief, is a great character if we want to opt for speed, but unlike the latter, he starts with slightly better armor and a sword.
• Barbarian: Vit 15, Int 7, Res 13, For 15, Des 9, Mag 11, Fed 8, Fortuna 11.
The barbarian is the character who starts with the highest vitality and strength, immediately you will kill most of the enemies with a few hits (sometimes even just one), but you will leave without armor.
• Noble: Vit 8, Int 12, Res 8, For 9, Des 12, Mag 13, Fed 12, Fortuna 7.
The noble is a very fast class thanks to the rapier and immediately makes use of excellent remote magic (much more powerful than the spells supplied to the magician), moreover he is the only character who starts with a rare ring that will make you slowly recover the magic points.
• Cacciatore: Vit 12, Int 10, Res 13, For 11, Des 12, Mag 8, Fed 8, Fortuna 12.
The hunter is the ideal character for those who love the use of bows, in fact we will start with a good bow to weaken the enemies, and then finish them with a mighty ax always supplied, also good leather armor.
Now, it is always difficult to establish which is the ideal character for our game needs, what I can suggest is to try the first level (Palazzo di Boletaria) with different characters, perhaps very different from each other (example: Noble and Knight ) and then decide which style of play we want to adopt. Demon's Souls can be decidedly frustrating in some situations, especially when you are not yet an expert, so it is essential to understand what our style of play is, start with a wizard and then realize after tens of hours of gameplay that we have instead developed practically only. the body-to-body characteristics, may not be pleasant.
However whatever your class, remember to spend the soul points very wisely, you can go back, but not in an easy and painless way and to do so you will have to waste a lot of time, but how to do it I will explain it to you in another moment.
Resistances and negative statuses
Your character has different resistance values that can be raised by increasing the statistics and equipping different weapons and armor, the value of the specific resistance bonus is indicated in the description of the object.
The resistances are:
• Physics: in turn divided into normal damage (swords), impact (hammers), slash (katane) and piercing (stalks).
• Magica: indicates the ability to take less damage from enemy spells.
• Fire: indicates the ability to take less damage from fire-based attacks.
• Bleeding- Indicates the ability to take less damage once we start bleeding from a slash-type attack.
• Poison: indicates the ability to take less damage once we have been poisoned.
• Disease: indicates the ability to suffer less damage from the disease.
Negative Status
Negative statuses are effects that you will receive following a certain attack and are:
• Bleeding: negative status inflicted by slash-type attacks, you will start to receive bleed-type damage every second, plus you will receive a penalty to the effect of healing items such as herbs.
• Illnesspestilence: negative status inflicted by the Death Cloud spell and some weapons, you will begin to receive disease-type damage every second, plus you will receive a penalty to the effect of healing items such as herbs.
• Poison: negative status inflicted by the Posion Cloud spell and some weapons, you will start receiving poison damage every second, plus you will receive a penalty to the effect of healing items such as herbs.
Negative statuses can be cured with lotuses (consumable objects) and with certain miracles, but each status has its own duration, after which the effect disappears.
Weapon damage bonus
Each weapon has some bonus values given by the statistics; these bonuses range from a maximum of S to a minimum of D, where no stat bonus is applied instead we will have no value.
The stats that give bonus damage are: Strength, Dexterity, Magic, and Faith.
Let's take the butcher's sword as an example: the bonuses given by the statistics are the following: For S, Des S, Mag D, Fed A, this means that we will get the maximum bonus from the strength and dexterity statistics, no bonus from the magic value and a great bonus from faith. Checking the bonuses is a great way to choose your melee weapon.
However, there are weapons that are an exception to this rule and get bonus damage from other factors, for example the northern sign, gets a significant bonus depending on the tendency of our character.
Shield protection stats
Each shield, once raised to guard position, has defense stats:
• Harm reduction: the shield grants three different types of protection, physical (to melee damage), magical (to magical damage) and fire (to fire damage); the higher the value in these protections and the less stamina will be lost in parry, if instead the protection is too low, in addition to losing stamina you will also lose hit points.
• Guard break reduction: The higher this stat, the more difficult it will be for our parry to be broken by very powerful attacks.
Durability of weapons and armor
Each weapon and piece of armor has a durability value; receiving hits or using a weapon often this value will decrease, once the weapon is reached zero or the piece of armor will break making the latter less effective.
To repair equipment, just visit one of the game's blacksmiths, but the more deteriorated an item is, the higher the soul point cost to repair it.
The equipment
The slots to equip our character are different and can be divided into the following categories:
• Armor: four slots, divided into helmet, body, gloves and legs.
• Weapons: four slots, two for the main hand and two for the secondary hand.
• Quiver: you will have two slots to equip arrows or darts.
• Rings: two slots to be able to equip two rings that must necessarily be different.
• Consumables: five slots to equip items such as herbs, magic potions and various stones.
Weight of active and passive objects
The weight of active objects is the maximum weight of objects that we can equip (weapons, armor), exceeding this value we will practically no longer be able to move, if instead we can keep the weight below half the maximum value we will be more agile and faster .
To increase the weight of the active objects we have to raise the resistance value. Equipped consumables do not count towards the weight of active items.
Weight of passive objects
The weight of passive objects is the value that indicates how many objects we can carry in our inventory, once we have reached the maximum transportable weight we will no longer be able to collect the objects.
The game interface
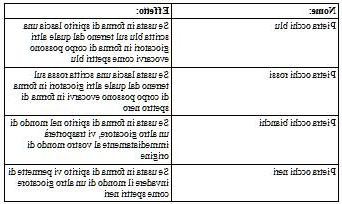
The game interface is simple and minimally invasive; in the upper left we have three bars, the red indicates our hit points, the blue indicates the magic points and the green our stamina. To the left of the bars we have a sort of circle with a sort of eye in the center, this strange symbol represents the tendency of our character; it is difficult to interpret, as the difference in colors is very small, the best way to know if we are completely white or black is to equip a weapon that receives damage bonuses depending on our tendency. At the top right instead we find a symbol identical to that of the tendency of the character, but much larger, this is the symbol of the tendency of the world in which we find ourselves, here too the same discourse of the tendency of the character applies, the best way to understand whether the world is black or white is to see if the various events given by the trend have been unlocked.
At the bottom right instead we will have the number of soul points that we have collected up to that moment and have not yet been spent.
At the bottom left we have four boxes arranged in a cross, the one on the right indicates what we are using in the main hand, the one on the left what we are using in the secondary hand, the one at the top the spell or miracle we have memorized, the one at the bottom instead the object we can use.
World trend
Each world has its own tendency which can vary from pure black to pure white depending on your actions; With the different trends you can unlock various events, such as the appearance of a special character or the presence of Black Specters.
• Pure white trend: Enemies will do less damage, but drop fewer soul points when killed, leave fewer stones for weapon upgrades, but more healing items. Special characters will appear.
• Pure black trend: Enemies do more damage, have more hit points, but once killed they give more soul points and increase the chance that they will drop rare items. Enemies will appear in the form of Black Ghost and in some locations the Black Ghosts of the various special characters in the game.
The primeval demons will appear.
The hit point ceiling in spirit form decreases. To reach the white trend, you just need to kill the bosses and the Black Specters of the special characters, to reach the black trend instead you will have to die several times in that particular world in the form of a body, or you can kill the various special characters.
The events of the world trend will be described later.
Character trend
Depending on the character's tendency we will have different effects, some direct on the character himself and some instead in the form of events within the Nexus. With pure white trend the monumental will give us the friend's ring, moreover our attack will be increased in spirit form.
With pure black tendency, once you kill Yurth in world 3-2, Mefistofeles will appear in the Nexus, in addition we will have fewer hit points in spirit form.
To reach the white trend, it will be enough for us to kill the players who invade us, to kill the black ghosts of the special characters.
To reach the black trend, we can invade a world and kill the player, we can kill the various merchants and special characters within the game.
Play online
Online gaming is one of the core components of Demon's Souls; you are not in any way obligated to play online, but it is advisable to do so to make the gaming experience unique and much more enjoyable.
• Red messages: the red messages are warnings that any player can leave along the various levels; these messages act as warnings, such as traps or the proximity of very difficult enemies, you can leave yourself red messages. To know if a message is valid or not, there is a scoring system, so you can always be sure of its validity.
• Summon other players or be invaded: in body form we can summon other players to help us, you can summon up to two players who will appear in your world in the form of a blue spectrum; to be able to summon you just need to press the X button on the blue stone left on the ground by the player himself, before summoning you can check the various evaluations received by the player.
To be able to be summoned instead you just need to enter a level in spirit form and use your blue stone, perhaps in a fairly visible point, by killing the end-level boss you will come back to life and you will receive soul points based on the evaluation you will receive.
At the same time, however, you can also be invaded, when a player invades you you will receive a message at the bottom of the screen, the invader will appear at the beginning of the level, in the form of a red spectrum and will in effect be your enemy, if you kill the Black Ghost you will receive (in addition to glory) several soul points.
To invade a world in turn, you will have to enter a level in the form of a ghost and use the black-eyed stone, if you succeed in the task of killing the player you invaded you will come back to life and if in the meantime you have killed some blue ghost as well you will receive too many soul points.
If you love duels you can use the red-eyed stone, similarly to the blue-eyed stone, you will leave a red message, any player can at that point summon you in his world as a red spectrum, if you come out victorious in the duel you will get the necessary soul points to be able to increase a characteristic, if you are defeated you will lose a level.
• Evaluation of the players: at the end of each game session together with some other player, you will be asked to rate him, the votes range from a maximum of S to a minimum of D, the same thing he will have to do towards you. The votes have the function of indicating the actual skill of a player when you decide to summon him by pressing on his blue stone. Furthermore, after defeating a boss, the vote you give yourself will also affect the distribution of the soul points, depending on the vote you both give each other the soul points will be more or less numerous, for example if you both give each other S the points distributed will be the maximum. .
Game controls
• Left analog stick: control movement of the character, also by pressing it you will target the enemy.
• Left analog stick: control of the view.
• Directional cross
To the right: I change the object in the main hand.
To the left: change object in the off hand.
Downward: change consumable item (herbal potions etc .. etc ...)
Upward: change of spells and memorized miracles.
• Select: a menu will open in which you can leave red messages, rate a message you have just read or rate another player.
• Start: the game menu will open, but be careful that you do not pause the game, so the enemies can continue to attack you.
• X button: button to interact with other players' objects, messages, and blue or red stones. Holding it down will bring up the emoticons menu.
• Square button: you will be able to use the consumable item selected.
• Circle button: hold it down to run (consumes stamina). Press it together with the left stick to perform a roll (consumes stamina). Press it alone to dodge back (consumes stamina).
• Triangle button: Changes the weapon grip setting in the main hand from one to two hands.
• R1: standard attack button, if you equip a weapon you will strike a blow, if you equip a catalyst you will cast the selected spell.
• R2: Powerful attack, you will deal more damage, but you will consume more stamina and will be slower.
• L1: button to use whatever you have equipped in the off hand, if you have a shield you will raise it in parry, if you have a weapon you will strike a blow, if you use a catalyst you will cast the spell or miracle.
• L2: with some types of shield instead of parrying you will make an attack, if you manage to carry out this attack at the exact moment that the enemy strikes the blow you can immediately respond with a devastating blow; using a bow you will enter Sniper mode and if you are using a two handed weapon you will make a parry.
Second episode
Welcome back to the official Spanish guide of Demon's Souls, in this episode we will deal with everything related to the objects of the game, from consumables to equipment, plus we will analyze every single spell and miracle, good reading.
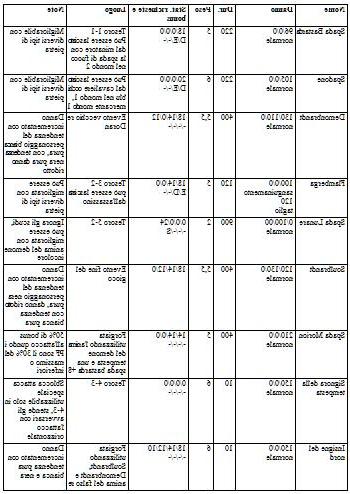
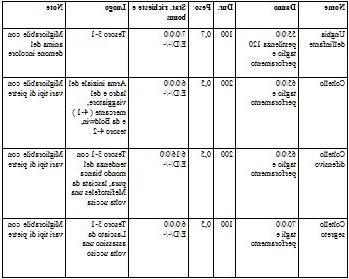
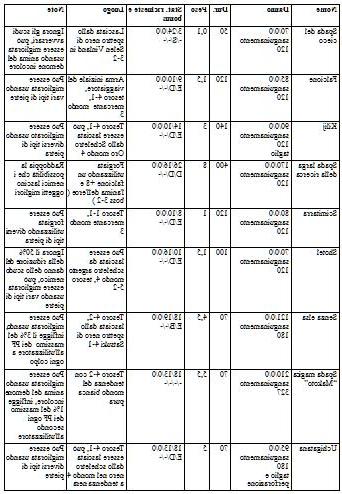
Weapons
There are different types of weapon, each type must be known how to use; depending on the character we have decided to play we could find ourselves better with a good impact weapon with considerable damage, but with absurd slowness, or with a good Katana with little damage, but with an incredible speed with which we can displace our opponents for then hit them from behind with a lethal attack.
As we said in the previous episode, each weapon may or may not have bonuses given by the characteristics, it is important to evaluate these bonuses in order to maximize the damage, moreover many of these weapons also require the characteristics necessary to be equipped, apart from strength. , the lack of which can be remedied by holding the weapon with two hands, all the other characteristics are essential to be able to use the weapon to the fullest; take a good look then before throwing yourself on a weapon that meets your tastes, wasting hours and hours to take a fantastic sword and then realizing that it will take as many hours to reach the necessary characteristics is not a good thing.
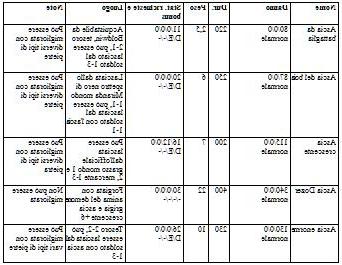
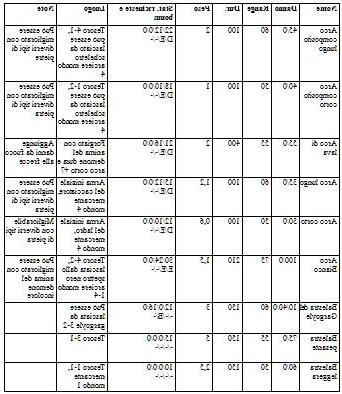
The following tables are divided into seven columns, name, damage and type, duration of the weapon before breaking, weight, required stats and stat damage bonus, location where the weapon can be obtained and special notes.
Spade third
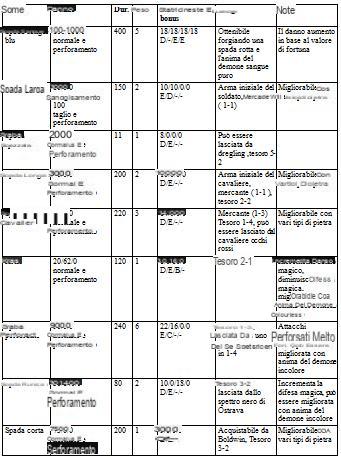
Wide swords
Knives
Very large swords
Piercing swords

Asian swords
Spears and rods
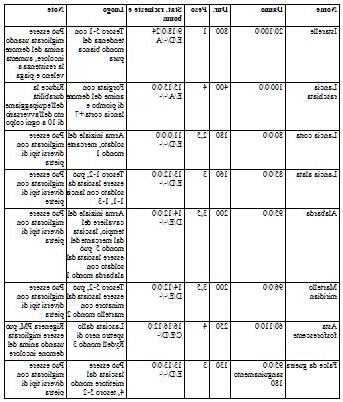
Axes
From impact and punches
Bows and crossbows
For bows and crossbows I add the range column, i.e. the distance from which you can hit your target.
Arrows and darts
Arrows and darts are the ammunition for your bows and crossbows, they must be equipped in the appropriate slots of the character's equipment, each of them has three types of physical, magical and fire damage.
Arrows:
Dardi:
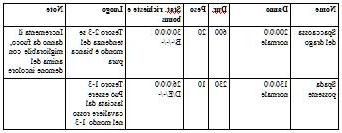
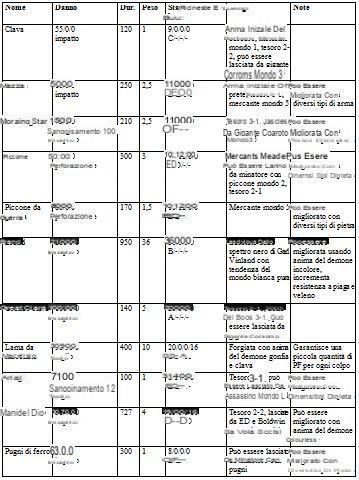
Catalysts and talismans
In the table of catalysts, instead we will add two columns, that of the magic adjustment (MAG.) And the miracle adjustment (MIR.), Both of these values have an effect on the effective power of a spell or a miracle cast, whether it is damage or treatment.
Shields
The shields table, on the other hand, has two different columns, the first is that of damage reduction (RID.), The damage is physical, magical, and from fire, the second is that of the reduction of the possibility that they will break your guard following of the hits received (WATCH), also the shields have no bonus related to the characteristics.
Weapon and Shield Improvements
Almost any weapon can be improved by consuming special consumables, such as hard stones and blade stones, each of these stones can be found or purchased in the form of a splinter, piece, or pure. The list of consumables needed to upgrade the weapon will be provided by the blacksmith (Ed or Boldwin).
• Hard Rock: base upgrade for weapons and shields.
• Sharp stone: base upgrade for weapons and shields.
• Pietrachiara: Increases the damage bonus of the Strength and Dexterity characteristics.
• Greystone: Increases the damage bonus of the Strength characteristic and eliminates the Dexterity bonus.
• Pietralama: Increases the damage bonus of the Dexterity characteristic lowers the strength bonus.
• Pietradrago: Adds fire-type damage and eliminates any stat bonuses.
• Pietrardente: Adds bleed-type damage, increases Dexterity characteristic bonus, lowers Strength bonus.
• Pietramercurio: adds the possibility of poisoning the enemy.
• Pebble stone: Increases critical damage by rear hit, decreases base damage.
• Pietraragno: bows only, greatly increases the dexterity damage bonus, increases the arc range by +5 for each upgrade step and decreases the strength bonus.
• Pietraluna: Adds magic-type damage based on your magic characteristic.
• Shadowstone: adds magic type damage based on magic characteristic, adds slow MP regeneration, eliminates dexterity and strength bonus.
• Pietrasacra: adds magic type damage based on faith characteristic, adds slow HP regeneration, dexterity and strength bonus are lowered.
• Pietranuvola: shields only, decreases damage taken by opposing spells, restores guard break reduction to the initial value.
• Pietrasciolta: Returns an improved weapon to its initial state.
• Colorless demon soul: consumable used to upgrade unique equipment.
The souls of the colorless demon can only be found in certain events and only 10 can be acquired per game, 2 with the missions of Mephistofeles, 2 by exchanging a talisman of the god and a golden mask with the raven on the tree in world 4 -1 and the rest by killing primordial demons that appear in all pure black-leaning worlds.
Armor set
There are different sets of armor, each armor providing physical resistance (normal, impact, slash and piercing) from magic, fire, bleed, poison and disease. Every single piece of every single set can be mixed, remember that it is important to keep the weight under 50% of the maximum weight of the active objects, so mixing the various pieces of the set, in addition to being an interesting aesthetic choice, allows you to travel more light, and to have different resistances. Not all armor sets can be worn by both genders.
Unisex:
Only men:
Only women:
Rings
There are several rings in the game, each one has its own special effect, two rings of the same type cannot be equipped at the same time.
Boss souls
Each time you kill a boss at the end of the level, by touching the archstone that appears you will receive the soul of the demon you just beat; with souls you can do various things, if used they earn a good number of soul points, they can be used to forge unique weapons (as long as you also have the materials) and to learn spells and miracles.
Spells
Spells are direct damage spells and some of protection, they can be learned from Freke's disciple, from Yuria the witch and from Freke the sage, each spell needs a variable number of memory slots to be used, the characteristic of intelligence increases slots, while magic increases damage, you need a catalyst or a beast talisman to cast miracles.

Miracles
Miracles are generally healing and enhancement spells, as spells need memory slots, to increase these slots you need to raise the faith characteristic; miracles also consume MP, to cast them you will need the talisman of the god or the talisman of the beast.
Consumables
Consumables are special items that can be used at any time in the game; the effects of these items can range from healing HP, to immediate return to the nexus with all soul points.
Special items
There are some special items in the game that can be traded with various characters or have a particular use.
Stones of the eyes
These special stones have a very important use for online play, they can always be used and are never consumed.
Third episode
Welcome back to the guide of Demon's Souls, as I promised you in this episode we will analyze the first two levels of the game; the guide will be as generic as possible, so you will be able to follow it with any type of character.
At the beginning of each level guide, I will describe the events given by the world trend.
You are not obliged to follow the levels in order, in this guide I will describe them in order only for convenience, feel free to tackle the levels as you like, perhaps giving precedence to those you think are easier.
This solution is obviously designed for single player play, always keep in mind that at any time (as long as you are in body form) you can summon other players using the blue signals that are usually left at the beginning of a level or before of a boss, the game played in co-op is much easier and more fun, so don't get down on yourself if you can't pass a certain level or a certain boss, ask your friends for help, or rely on some other unknown player; remember that Demon's Souls is a game with a very important and well-built online component, so why not take advantage of it?
Level of introduction
Here we are, we have just passed through the strange fog that surrounds the kingdom of Boletaria.
The very first level you will have to deal with will be an introductory level, the various red messages on the ground will explain the game controls.
There isn't a whole lot to explain in this level, just work your way up to the Vanguard encounter.
Boss Vanguard
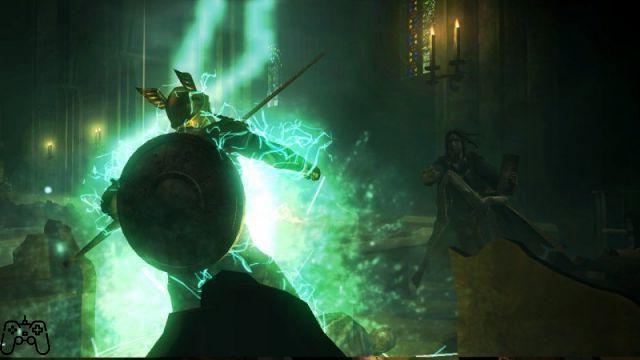
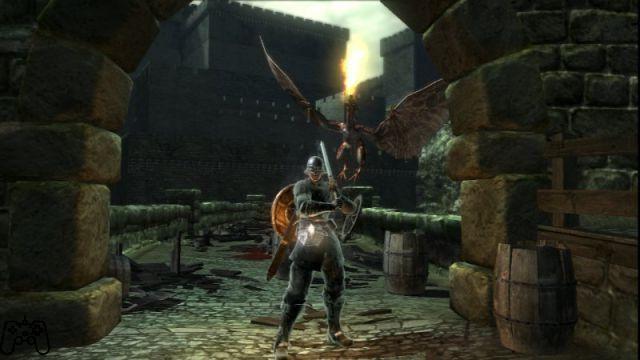
A sort of giant winged monster with a very disreputable snout will appear in front of us, armed with a huge sword, I must tell you right away, the purpose of this meeting is for you to die, but there is a method to defeat Vanguard, if you beat it and you will immediately get a gray demon soul, which when consumed will give you 1500 soul points, a really big number for the start of the game.
However, if you decide to kill him, get ready to sweat the proverbial seven shirts, first of all undress until the weight of the active objects is below half the maximum total, run towards Vanguard, as soon as you are almost on him wait for the exact moment in which he raises the 'weapon and immediately roll him behind his shoulders, start hitting him with the weapon from hand to hand in the back, almost immediately he will turn towards you, and as soon as he raises the weapon and is about to vibrate, roll back to him again; every now and then he will take off for a few seconds and then fall back to the ground with a devastating shock wave. It is very important to get away quickly and take a great distance as soon as you see it rising from the ground. Repeat these steps until Vanguard is defeated. You will not have another chance to face this boss (excluding the one in 4-1), but if you die don't get too much trouble, 1500 soul points are convenient at the beginning, but they are not essential.
Nexus
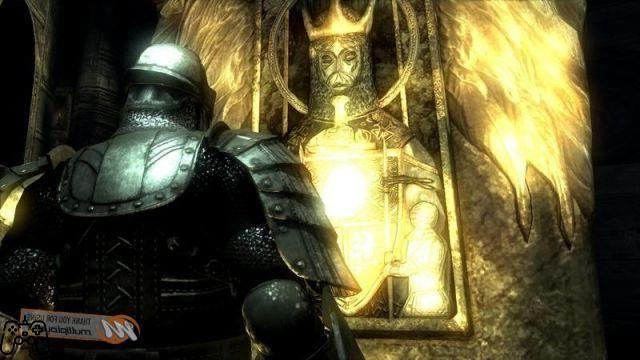
At this point we will find ourselves in the Nexus, look at the cut-scene. The Nexus is the place from which you can access the various levels, here will be the girl in black from which you can spend the soul points to level up (but only after beating the first boss Falange), Thomas who will keep you all the objects in addition, the blacksmith Boldwin who will improve your normal weapons and repair your equipment, and on the right side Freke's apprentice who will teach you the first basic spells, and on the left side the disciple of God who will teach you the first miracles . Now approach the Little King's Archstone and tap it to enter the first level.
Boletaria Palace
Events with a pure white trend:
The gate that you can find going down the stairs to the left of the start of the level will be open, in the garden behind the gate you will face some black ghosts of Dregling, entering the tower on the left you will meet Miralda the Executioner, kill her to get the set of the tied armor and the master's ring. Killing her will bring the world trend to neutral, but the character's trend will remain unchanged.
Going down the stairs attached to the wall you will reach a corpse from which you can collect the entire set of wooden armor. Jumping on the rafters being very careful not to fall, you can find a colorless demon soul on a corpse. Also the dragons will no longer be present, this allows you to access their nest in the first level.
Events with pure black trend:
The gate that you can find going down the stairs to the left of the start of the level will be open, in the garden behind the gate you will face some black ghosts of Dregling, entering the tower on the left you will meet the black specter of Miralda the Executioner, kill her to get the ax of the executioner. By killing it, the character's bias will shift to white, and the world bias will return to neutral.
Black ghosts will appear after the red-eyed knight in level 1.
Black ghosts will appear in front of the mist portal for the boss in level 2.
Black ghosts of fat officers will appear, after the small passage where the red-eyed knight is, and in the square below the primordial demon will appear.
Boletaria Palace - Level 1
To welcome you to the first real level of the game, there will be a nice cut-scene of the red dragon eating some corpses. In front of you you will have a long path that leads to a huge gate, which will be closed at this moment, on the path you will be attacked by some Dreglings, they are not too difficult enemies but be careful not to get surrounded, they know how to be very fast. The best way to kill them is to hit them before they can attack you, or give them a good blow while they're jumping on you.
Reached the huge gate, go up the stairs on your left, turn left again, here you will have to face two more Dreglings, pay attention to the open chasm on the left of the square, if you fall into it you will die, on a platform on your right there will be a soldier with a crossbow, watch out for his darts. As soon as you have killed the two enemies, run up the ramp and kill the soldier too, enter the door in front of you, immediately turn right and kill the Dregling before he can attack you from behind. Go to the other door in front of you, another enemy will come out almost immediately, cross the passage enter the next room, kill the umpteenth enemy and exit the room, go up the stairs go straight and turn left, waiting for you in front of the first portal of fog there will be two soldiers armed with swords and shields, keep them at a distance and as soon as they strike them hit them.
Go through the portal of fog, turn right and go up the flight of stairs, right at the end of the stairs there will be a soldier who will throw a fire bomb at you as soon as he sees you, let yourself be seen and wait for him to throw the bomb, hit him immediately after, go up the other stairs, as soon as you arrive on the ramp you will be attacked by a Dregling with a firearm, avoid his shots and as soon as he stops kill him, go up the stairs again, waiting on the ramp there will be another soldier with a sword and shield, continue to the next stairs, do not run up them, as a fire bomb will be thrown at you from above, wait for the bomb to be thrown and then run up the stairs, you will meet two more Dreglings equipped with firearms, try to kill the first one before the other reaches you, go on and go out the door on your left, on the ramps another Dregling will attack you, kill him being careful not to fall below, when you reach the upper door pay attention ion the soldier, kill him and watch out for the enemy behind him who will throw a fire bomb at you almost immediately. At this point, take a good look at the stairs that go up to the upper level, you will notice that at the end of the stairs there is a huge metal sphere, slowly go up the stairs and as soon as you see that it is thrown at you avoid it, go back downstairs , and look where the huge metal sphere has stopped, you can now access a section under the stairs where you can pick up a bastard sword from a corpse.
Go back upstairs, eliminate the soldier who threw the sphere at you, at this point if you turn behind you, you will face a soldier with a crossbow and immediately after a soldier with a spear and another soldier with a crossbow, if you enter the portal immediately after you you will find on the wall of the castle, after all the red-eyed knight will be waiting for you, don't even dream of facing him, it's too early. Retrace your steps, continue after the stairs from which the ball was thrown at you, face the blue eyes knight, wait for the blow to vibrate and stop for a few moments and attack him, if you are not fast enough he will heal.
Do not immediately enter the portal of fog on your left, go straight instead, and enter the door in front of you, going down the stairs you will immediately notice two Dreglings with firearms, do not attack them but wait for them to explode the two barrels, they will die alone. Shortly after on your left there will be a portal, go out and break the two chains.
Go down the stairs and face the other enemies with a firearm, reached the lower floor use the lever to the right of the gate, go through the arch and pick up the sticky ring, equip it immediately. Exit the arch to the outside, turn left and collect the rag armor set, and the jade hair ornament, re-enter the arch and go up the stairs, to the portal of mist, enter, turn to right and go down the stairs, as soon as you go down jump the wall on your left, trying to fall on the lower balcony, here you will find the thief's ring, equip it immediately, on the edge of the balcony you will meet Ostrava di Blotaria, if you decide to kill it to immediately have the key to the mausoleum hit him from the back, he will fall among the enemies, let them do the dirty work for you, and as soon as Ostrava has killed them all go down and attack him, if you decide not to kill him, throw yourself off the balcony and eliminate the Dreglings, he Doubtful will come down afterwards and give you the brass telescope, and will follow you for a while giving you a hand in the fighting, continue, on your right a door will open and you will be attacked by a soldierwith sword and shield. Go forward towards the arched door, try to reach the blue-eyed knight as soon as possible to hit him from behind, go back and exit the arch, immediately turn left, go through the alley, and kill the two enemies in the square, on the on your left you will notice a flight of stairs, go down slowly and equip a fire bomb, try to hit the barrels, in this way you will kill all the enemies in one hit. Go back and pass the arch under which the blue-eyed knight was, go and kill the soldier with sword and shield, turn right destroy the wooden furniture and face the four Dreglings in the square. Climb the stairs in front of you, turn left and ignore the wooden stairs on your right, you will face four soldiers, two of which will jump from above, continue and make your way upstairs, you will find yourself in a sort of patio where you will face two other soldiers, eliminate them, continue to the left, break the barricade and you will access a room where the first merchant of the game will be seated, from him you can buy the entire set of plate armor. Go back where you came from, continue towards the wooden stairs, face the first Dregling, and continue up the stairs, reached the first ramp pay attention to the soldier with the crossbow, continue your ascent, waiting for you at the end of the stairs there will be a blue-eyed knight, take him out just being careful of the soldier with the crossbow to your left, take care of him too and go through the portal of fog.
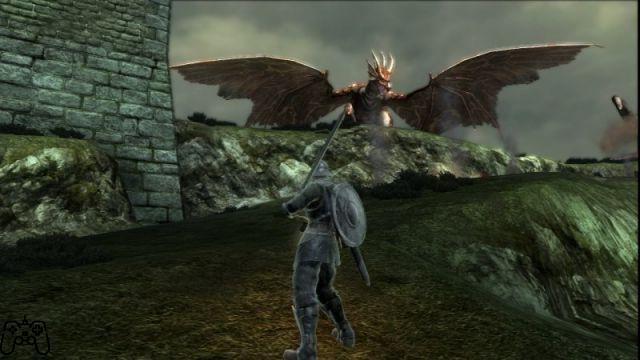
Go straight on, hit the mega wooden structure in front of you, letting out numerous metal spheres that will make a clean sweep of the enemies, go straight on the wall, turn right, on your left you will be attacked by two soldiers with spears, continuing to the left you will arrive at the nest of the two dragons, forget it for now. Climb the stairs, and face the first enemies, slowly advance on the wall until you hear the flapping of the dragon's wings, as soon as the dragon will reveal itself at the end of the wall and start to blaze immediately go back to the dragons' nest, collect all the treasures watching out for the blue dragon's tail.
Go back to the wall, and let the dragon take care of the remaining enemies, as soon as the dragon has passed, start running, avoid the last enemies and as soon as you are safe from the dragon's attacks, finish them. Enter the arched door, turn right and pull the lever, finally the huge gate at the beginning of the level will open, enjoy the small cut-scene, and continue behind you, as soon as you exit the arch immediately turn left, kill the Dregling, turn around and do the same thing with his buddy before he can attack you, continue down the small street to the left of the arch, destroy the wooden structures and collect the turpentine. Turn around and go to the opposite side, head from the door to the right, but beware of the two soldiers with spears that will reveal themselves as soon as you are near the door, enter the room and beware of the soldier on your right who will throw fire bombs at you, continue and start to go down the stairs, here you will meet numerous Dreglings with firearms, and on each ramp of the small phalanges, practically invulnerable if attacked from the front, but really fragile if hit on the back, after the first small phalanx on the right there will be a door which leads to an external balcony, go out and collect the treasure from the corpse, continue down the stairs, at the end use the lever to the right of the gate, exit and you will find yourself in front of the huge gate.
Equip the bastard sword, hold it in both hands, and place the turpentine as an active consumable.
Enter the fog.
Boss Phalanx
As soon as you cross the portal of fog, immediately use the turpentine on the bastard sword held in two hands, throw yourself on the boss, paying attention to the attacks of the small phalanxes in the room, once you reach the boss, start slashing as hard as you can and heal yourself when you have any need. After the first 2 or 3 of your blows many of the small phalanges that cover the real boss will die, start hitting the body of Phalanx always from the uncovered side, do so until you have defeated him.
In case you are a character who uses magic, perhaps eliminate some of the mini phalanxes with fire bolts, and then attack the boss with the weapon enchanted by the turpentine.
At this point, touch the archstone and you will receive the soul of the lead demon.
Nexus
Go immediately to the girl in black, she will tell you to talk to the Monumental, go up the stairs until you find an arched portal on your right, pass it and you will find yourself on a balcony full of monuments of children, on the left there will be a monument with a lighted candle in front of you, talk to the Monumental, and accept the mission.
Go back from the stairs and go up to the top, touch the door and you will find yourself in the room of glory, here you can see all the monuments of the best online players, pass the first row and continue left to find a stone with ephemeral eyes. Go back to the first floor and talk to the girl in black, and finally you can spend the soul points to level up.
When you're done with your business, tap the Little King's rockstone again to enter the second level of the first world.
Boletaria Palace 2
Go through the arch and go down the stairs, eliminate all the small phalanxes in the room, go out on the bridge, advance slowly, the red dragon will appear behind you, let it start to blaze and as soon as it is halfway across the bridge, rush out of the bridge. opposite side, reached the safety of the first observation tower, go to the exit to your right, you will find some stairs, if you go up you will reach the roof of the tower, eliminate the soldier with the spear and the two soldiers with the crossbow. From here you can kill the red dragon, waiting for it to start blazing on the bridge you can hit it with arrows, or with magic rays, or an even easier method is to throw a poisonous cloud on the wall of the tower, taking the right time so that the dragon passes through it, but know that it could take up to half an hour to kill it. If you kill the red dragon you can continue the level above the bridge, making your way between barricades and the usual Dreglings and soldiers.
If, on the other hand, you decide to kill the dragon at a later time (which is desirable considering your low level) you have to go down the stairs to access the inside of the bridge, as soon as you go down continue to the left, make your way between the enemies, and reach Ostrava, talk to him and he will give you black grass. Continue straight ahead, kill the Dreglings and at a certain point you will find yourself in front of a barricade, break it and be careful of the dogs that will come out of the gate in front of you, they are really difficult and fast try to stay on parade with the shield initially and not as soon as they have carried out their attack hit them, go on and kill the soldier with the crossbow, a little further on on the right there will be some stairs, if instead of going up immediately you decide to continue you will find the merchant. Go up the stairs and you're back on the bridge, kill the four crossbow soldiers behind you, and go through the mist portal.
Advance slowly, and kill the first enemies, the red dragon will appear again, let it be halfway and run after it to reach the end of the bridge, beware of the arrows that will be thrown at you from above, eliminate the three shield soldiers and take on one blue-eyed knight at a time. When you have killed them you will find yourself in front of the portal of fog behind which there will be the second boss, turn around and enter the passage on the left, go up the stairs to reach the top floor, kill the soldiers with crossbow and collect the stone from the eyes ephemeral.
Go back downstairs and go through the mist portal.
Boss Knight Tower
As soon as the cut-scene is over, immediately run to the stairs to your right or left, go up the ramparts and take out all the soldiers.
Go back to the square below and roll behind the boss, start hitting him in the ankles, paying attention to his footsteps and his shield shots, also when you see that his frontal attack begins, immediately move away to avoid the shock wave, always look for to keep up with him, keep hitting his ankles until he falls to the ground, move away to avoid being crushed, at this point start hitting his head. A couple of shots will not be enough to eliminate him, when he gets up, do as above, until the Knight Tower will be a memory too.
If you are a character who uses magic, you can also stay on the ramparts hitting the boss's head with soul rays, but this will take much longer, but you will be safe.
At this point you will not be able to continue further in the first world, a fog prevents you from passing to the next level, and to dispel this fog you will have to beat the last boss of world 2.
Touch the Archstone and you will receive the Iron Demon Soul.
Nexus
Spend your soul points as you like, never forget to repair your equipment, when you are ready touch the archstone of the Under King to access world 2, the Stonefang tunnel.
Stonefang tunnel
Enemies at this level take a lot of puncture damage.
Events with a pure white trend:
In level 2, Scirvir the traveler will appear and ask you to retrieve the dragon's Bonecrusher sword.
When you face the dragon god in level 3, the rubble on the left as you enter the boss area will not be there, allowing you to reach the dragon bonebreaker sword.
Events with pure black trend:
The primeval demon will appear, under the walkways you activated to reach the roof of the tower from where the boulders are thrown at you at the beginning of level 1.
Several black specters of miners will appear within level 1.
The black specter of Scirvir the traveler will appear in level 2.
Several black bearbug ghosts will appear within level 2.
Stonefang Tunnel - Level 1
Go up the stairs to your left, you will immediately meet the merchant of this world, who sells stones to improve weapons. At the end, be careful of the boulders that are thrown from the roof of the tower in front of you, take the right time and cross the square, enter the arched passage, turn right and look for the mechanism with which you will activate the platforms that will take you to the roof, exit the passage in front of you and go up thanks to the catwalks, here you will meet one of the most difficult enemies of the whole game, the fat officer, be very careful when the movement he makes before throwing a dart of fire, avoid the dart at the very last moment, start hitting him and move away after two or three shots, avoid his shots and always pay attention to the darts, when you have killed him, go out on the balcony, kill the two miners and pick up the weapon from the ground. Go back downstairs using the walkways again, advance inside the room and kill the miners, enter the second room and slowly approach the pile of pots with the shield in parade position, dogs will come out, try to move from the door to avoid the darts of the fat officer who is in the room, kill the dogs enter and kill the officer too.
As soon as you enter the closet on the right there will be a passage, kill the miner and turn left, as soon as you finish climbing the stairs you will be attacked, be very careful and turn the corner with the shield on parade, exit the narrow elbow corridor, exit and turn left, go up the flight of stairs until you arrive in front of a closed gate with a portal of fog behind it, forget the fat officer, it is a trap, continue towards the gate and when you are in front of it jump down to yours left, pull the lever, eliminate the miners and throw yourself on the main floor of the room, retrace the path to the gate through the portal of fog. Go up the two wooden walkways, on your right you will find a passage to a circular room, fire lizards will fall from the walls, you decide if it is worth risking your life for a splinter of Pietradrago.
Continuing on the right there will be an area invaded by lava. Go ahead and go up the stairs, kill the miners with firearms, and leave the fog portal alone for now, go forward until you exit the cave, turn right forward until the mechanism that activates the platforms to reach the blacksmith Ed, this it is also a shortcut in the case of death.
Return from the portal of fog and go through it, go up the stairs and advance with the shield in parade, around the first corner you will be attacked by a miner, continue to the end of the corridor enter the forge and kill all the enemies, enter the passage in the part opposite the room, also exit this corridor, at this point in front of you there will be a wooden bridge, run across it, the bridge will split, collect the treasures and try to throw yourself against the wall so as to fall on the ledge, retrace the road until you pass the forge again, only at this point instead of going over the bridge turn right, smash the barrels and go up the stairs, go to the end where you will find a corpse with a treasure, look at the end of the floor below you and jump on the balcony, go down and pick up the steel shield that is under the structures you smashed when you fell. Turn left (forget the miners), cross the bridge and go up the stairs, and continue on the wooden walkway, beware of the fire lizards that fall from the wall, go around the stone column and go down the other walkway, just reached the lower floor you will be attacked by three dogs, continue and go down yet another walkway, kill the miners and use the mechanism that will activate a mill that will make water flow into the area invaded by lava.
Go straight down in front of you, go past the mill and turn right, go up the walkway, until you reach the area previously invaded by lava, go down the stairs and go up the staircase that is in front of you, go upstairs and cross the rock arch, go down the stairs very slowly, you will find yourself in a room full of explosive barrels with a fat officer at the bottom, wait for him to throw a bolt of fire at you, and immediately move away from the barrels, when you have managed to get him to destroy them everyone face it in the usual way.
Go through the portal of fog, and continue towards your way watching out for a miner who will fall from above, reach the elevator and activate the mechanism to make it go down.
You will find yourself in front of the portal of fog behind which the next boss is hidden.
Armored Spider Boss
Approach the boss with the shield in the parry position, until you are in front of him, stay exactly central, and always in the parry position. At some point the spider's body will start vibrating, wait for it to hit the ground and start attacking it, do this until you see that the boss starts charging the blaze, as soon as it does, run to the mist portal behind you , as soon as the flame is over, go back to the spider and continue with the same strategy.
Once this boss is also killed, touch the rockstone to receive the soul of the tough demon.
If you are a character who uses magic you can stay at the beginning of the boss tunnel to cast damage spells.
Nexus
Return to the Nexus, repair your equipment, spend your soul points, and learn the water veil spell that increases fire resistance when cast.
Touch the Archstone of the Under King again.
Stonefang Tunnel - Level 2
Go through the tunnel and take the left tunnel, run through to avoid the explosions of the carts, at the end of the tunnel kill the fat officer on the right, go up the elevator and activate the descent mechanism, reached the lower floor enter the gallery behind of you, kill the two black ghosts and collect the stones with ephemeral eyes.
Return from the elevator and enter the tunnel in front, watch out for an explosive fireball, and the attack of a miner who will attack you from behind, exiting the tunnel you will find yourself in a large area with a river of lava flowing underneath. , on your left you will see Patches the hyena beckoning you, reach him and talk to him, pass under the giant Bearbug, the latter will fall blocking your way, to get out of this trap just throw yourself on the left side just before the back of the Bearbug.
Go to Patches the hyena who will give you a fire resistance ring.
Continue down the road that goes down, kill the two small winged Bearbugs, kill the three rock worms, and continue to the left, here you will meet again the merchant of world two, who will now also sell the pieces of various stones to enhance the equipment. At this point you can continue the small road after the rock worms and enter the labyrinthine tunnels, but I strongly advise against it, instead go back from the elevator and go back to the upper level, go back to the beginning and this time take the tunnel on the right, run and avoid the miners, you will arrive in an area with a chasm, follow the ledge to the right, until you reach some wooden crates, break them and go down the walkway below them, at this point you will have to jump from one walkway to another, look well below before throwing yourself and identify the next catwalk, after the second jump, you will find yourself in front of a gallery with a blind bottom, here you will find Scirvir the traveler either normal or in the form of a black spectrum depending on the trend of the world.
Keep going down, until you find yourself on a walkway that ends in a wall with some empty Bearbug suits attached, take the run up and throw yourself just before the end of the walkway on a ledge on the wall, heal yourself and throw yourself downstairs , avoid the rock worms and slip into the luminous tunnel, cross it and you will find yourself in the dragons' cemetery, on the right is the mist portal that separates us from the level boss.
Equip the ring of fire resistance and throw a veil of water, enter the portal of fog.
Flaming Boss
You will be charged instantly by the boss, try to avoid his attacks, and hit him only afterwards, when the flame is about to charge, move away quickly, when you are short of life or you have expired veil of water, move away and try to heal yourself and cast the magic as fast as possible, try never to get stuck in a dead end.
If you are a character who uses magic, equip the thief's ring and throw the magic cloak at yourself, hit the boss from a distance, and seek cover among the bones and columns, as soon as Flaming is on you run away to the opposite side, and keep casting damage spells.
Beat even flaming touch the archstone and you will receive the soul of the red demon.
Nexus
Repair the equipment, and spend your soul points as you like, now in the Nexus there will also be Patches the hyena, take the opportunity to buy some herbs, and some spice.
Touch the archstone of the Underground King and go back to the first level of the Stonefang Tunnel, as soon as you enter the stairs, enter the small house behind the merchant, go down using the platforms and talk to the blacksmith Ed, keep talking to him until he mentions you. soul of the red demon, at this point ask for the dialogue menu and talk to him again, now he will ask you for the soul of the red demon, give it to him, from this moment you will be able to forge the unique weapons.
Stonefang Tunnel - Level 3
Equip a very large melee weapon and hold it with both hands, also don't forget to equip the thief's ring as well.
Enter the long corridor and reach the portal of fog.
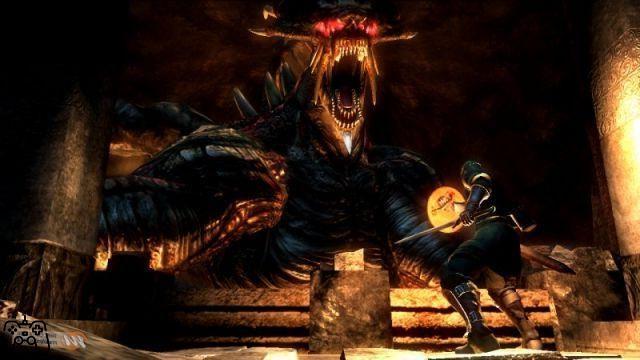
Boss God Dragon
Slowly approach the boss, let him give the first blow in the air, as soon as he raises his hand, turn right (with pure white tendency if you turn left you can retrieve the dragon's bone breaker), approach the first rubble and hit them, as soon as the rubble they will be knocked down backward and wait for the dragon god to strike again in front of you, as soon as he raises his paw destroy the second rubble, backward and wait for the boss to give another blow, at this point approach slowly, the dragon will give a third shot after which you will be free to pass.
Activate the strange mechanism, enjoy the cut-scene.
Go down the stairs and collect the stone with ephemeral eyes, advance and make your way through the rubble to reach the opposite side of the area, if the dragon should roar watch it well, but be quick, if it should use the blaze immediately run towards the stairs from which you came from.
By destroying the last of the rubble you will access the second mechanism, activate it and enjoy the other cut-scene.
Now the dragon god will be in agony, go down and go towards his head, wait for the dragon not to breathe and hit the bone that protrudes from his chin, move away let him breathe again and repeat the operation.
Congratulations you have beaten an archfiend, now tap the archstone to receive the soul of the dragon demon.
Nexus
Spend your soul points, repair your items, and touch the Little King's rockstone.
Boletaria Palace - Level 3
The fog that blocked the passage to the third level of the Boletaria palace will disappear and you will be free to pass. Enter the square with the fountain with the shield in defense position, you will be attacked by two dogs, slowly climb the staircase, leave the treasure alone, and continue to climb looking upwards, as soon as the burning spheres discarded will be thrown at you. left and hide behind the wall, go up the stairs to the end and watch the cut-scene.
Examine the corpse under the gate and take the ephemeral eyed stone, go down the stairs and slowly approach the wooden crates on the left, three soldiers with sword and shield will come out, they may also throw fire bombs at you, go through the narrow corridor, kill quickly the other soldier, before the one with the spear goes up the stairs, eliminate him too and go down.
Enter the underpass slowly, suddenly a killer will appear, exit the tunnel, turn left and go up the stairs, smash the tables on the fly and kill the soldier with the crossbow, go up the stairs and immediately turn left in the small alley kill the assassin, approach the stairs and climb them until a burning sphere is thrown at you, take cover in the alley.
Keep going up the stairs and turn right, kill the soldier with the crossbow, keep going up and try to attract the soldier waiting for you at the end of the stairs, once killed enter the third alley on the right and kill the other killer, finished to go up the stairs watch out for the archers and turn right, lure the red-eyed knight, who is inside the room, to a point where the arrows cannot reach you, eliminate him and enter the door, kill the two soldiers and split the bookcase at the back of the room, go upstairs and you will find the merchant of world 1.
Go back outside, turn left and pass the fog portal, you will find yourself in a long corridor in the middle of which you will find a red-eyed knight without a shield, try to hit him immediately. Exit the corridor and enter the square, lure the fat officer away from the crossbow soldiers and kill him, collect the keys and eliminate the crossbow soldiers on the balcony. Going up the stairs you will find yourself in another square with two soldiers with sword and shield, two soldiers with spears and two soldiers with crossbows, try to immediately eliminate those with the crossbow, then make sure to attract individual enemies to a point where they are away from others.
Go up the other stairs, be careful of the killer who will appear on your left, kill the two soldiers with a crossbow on the balcony, approach the stairs and climb them slowly, as soon as the sphere is thrown, discard it and kill the soldier who threw it at you . Cross the ramparts, and wait halfway for the red-eyed knight without a shield, go ahead and kill the three crossbow soldiers.
Continue to a balcony with two stairs that go down, take the stairs on the left, as soon as you turn the corner you will find yourself in front of a soldier with a spear, after him there will be a soldier with a crossbow, continue and finish going down the staircase, attack the fat officer from behind and pick up the hat.
Open the gate on the fly and help Ostrava, at this point follow him until he gives you a pure crystal stone. Go through the gate and go back to the beginning of the level, cross the square where you faced the knight tower, kill the knight with blue eyes, and open with the keys collected previously the door on the right, go down to the prisons, immediately turn left and kill yet another fat officer, collect the other pair of keys, continue down the corridor to find the tower shield, return to the prisons and free Biorr. Go back to the square with the fountain, behind the cart on its right you will find an alley, open the gate with the keys, go along the alley to the end, turn left, split the wooden crates and take the stone with the ephemeral eyes, go back and turn at the first alley on the right, reach the tower, go up the stairs, as soon as you are on the last ramp put on the hat collected from the fat officer's corpse, a second flight of stairs will be lowered, go up and hit the other one in the back officer and kill him, take off your hat and talk to Yuria the witch.
Go back to the gate where you saved Ostrava to continue in the level, make your way through the barricades, you will face in sequence two soldiers with spears, two with sword and shield and three soldiers, two with crossbow and one with sword and shield. Approach the staircase leading to the entrance of the building, look at the cutscene, and then run back with your legs up, be followed by the red-eyed knights with spears until they are not interested in you (here you need the thief's ring) then run to one of them and hit him in the back, repeat this operation until you have eliminated all three knights.
Climb the stairs to the mist portal that separates you from the boss.
Boss Trapper
Surprise of surprises Biorr will be with you inside the boss room, and the latter seems much more interested in him than in you, start hitting the Penetrator and avoid his hits as soon as he turns his attention to you, wait for him to come back to attack Biorr and keep hitting it.
Just be careful not to hit Biorr by mistake, or you risk him starting to attack you too.
If you are a character who uses magic you could keep your distance from combat, and cast damage spells.
Touch the archstone to receive the soul of the silver demon.
Nexus
Now in the Nexus in front of Freke's disciple you will find Yuria the witch, now you can spend some of the souls received by defeating the bosses to learn powerful spells such as the explosion of fire. Spend your soul points, repair your weapons, and touch the Little King's rockstone again.
Boletaria Palace - Level 4
I can't deny it, but this level is very difficult, the final boss is very difficult, I highly recommend summoning one or better two players to help you, the blue stone signals should be very numerous at the beginning of the level. Go through the door paying attention to the soldiers with crossbow, two are on the dragon's corpse, one is behind the left column, run towards the latter and kill him, being careful not to get hit, turn around the dragon's corpse, and go up to the side of the queue to eliminate the other two soldiers.
At the bottom of the square there will be three really strong black ghosts, attract the first one and take it to the dead dragon, take it out calmly, do the same thing with the second ghost, the one in heavy armor, then dedicate yourself to the third ghost the one with the bow, once killed go to the end of the square and turn left to find a stone with ephemeral eyes.
Continue down the alley in front of you, slowly enter the door and lure the red-eyed knight outside, eliminate him and enter, go up the stairs and just before the wooden balcony a murderer will come down from above, eliminate him before he manages to turn around and then dedicate yourself to the two soldiers with a crossbow. Keep climbing the stairs and towards the end you will meet a red-eyed knight without a shield, do not even give him time to deliver a blow.
Go through the exit and enjoy the spectacular blue dragon cut-scene. Attract the fat first officer (if you have the thief's ring take it off) and advance slowly, the dragon will start to blow fire and eliminate the officer for you, at this point take the timing well, as soon as the dragon flame is halfway road run running, avoid the second fat officer and throw yourself headlong towards the end of the walls, go up the stairs and approach the dragon that will take off and land on the wall of the castle above the main door.
Go up the stairs and stop just before the breath of the dragon can hit you, the dragon will blow twice before taking a short break, take your time and when the second breath is halfway up the stairs head first and reach the flight. 'entrance. At this point you can also eliminate the blue dragon, get exactly under the entrance arch of the castle, look up and target the dragon's head, at this point you can use arrows or soul rays depending on your skills.
On the stairs you will find Ostrava, talk to him and he will kill himself by leaving you the key to the mausoleum, go up the stairs and immediately turn left to find a stone with ephemeral eyes. Continue along the narrow bridge, the black ghost of Ostrava will appear, lure him to the entrance and kill him, you will receive the runesword and runeshield.
Cross the bridge and enter the elevator, activate the lever to go up. At the end of the long climb, you will find yourself in front of the mist portal for the most difficult boss of the whole game.
Boss Falso Re
Check out the impressive cut-scene and squeeze the pad tightly. It is essential for this boss that the weight of the active objects is not more than half of the total, you must be as agile as possible.
The False King has 6 main attacks:
• Triple hit, it is three consecutive sword slashes, as long as you manage to dodge the first one and distance yourself.
• Slash plus ranged attack, it is a splinter that releases a kind of energy wave capable of inflicting damage even at a distance, dodge the wave to avoid damage.
• Leap with slash, the False King will leap towards you hitting the ground and releasing a wave that can hit you from a distance, discard the blow as soon as the boss makes the leap.
• Magical explosion, it is a magical explosion with a very large area of effect that if it hits it jumps to the ground, to avoid it or hit the boss as soon as he raises the sword to charge the energy, or if you don't make it in time get away as much as possible, turn to him and get into parrying position with the shield.
• Charge, this is an almost inevitable shot, if you are at a good distance from the box he will make a charge with a final shot, the best way to avoid the shot is to discard at the last minute, or to hide under the stairs at the beginning of the room.
• It sucks soul, this is the most lethal and terrifying blow of the entire game, if you are hit by this attack you will not only lose most of your life, but you will also lose a soul level, considering that the False King makes this attack very often, you could find yourself at the end of the fight even with 10 levels less, to avoid this attack you must always retreat every 3 or 4 hits inflicted, and as soon as the boss raises his hand and a white light appears from it, discard back as quickly as possible.
There is no exact strategy to beat this boss, of course spells such as fire burst can do a lot of damage, and using the soul beam at a distance can be a safer method, the important thing however is that you avoid his attacks, and take advantage of the moment when it is charging the magical explosion to get away and heal you.
As I said at the beginning it would be good to have two other players summoned as blue ghosts with you to help you out.
Once this boss is beaten, touch the rockstone and you will receive the False King's soul.
Nexus
Spend your soul points, repair your equipment, and check out what Patches the Hyena has to sell.
Fourth episode
Welcome back to the appointment with the kingdom of Boletaria, today we will analyze the last 3 game worlds, happy reading.
Latria Tower
To access the Latria tower, touch the Queen's Archstone in the Nexus. The mind flayers, the enemies of this level, are very powerful, if you have the anti-magic field you shouldn't have any problems, otherwise avoid their electric attack, roll behind them and hit them non-stop until they are dead.
Events with a pure white trend:
You can retrieve the key to free Rydell in 3-2, above the first tower where you have to kill the prisoners who block the chain. The west wing of the second floor will be accessible, in this wing you will find the key to the east wing of the second floor.
Events with pure black trend:
Rydell's black spectrum will appear just outside his cell in level 3-1.
Three black mind flayer ghosts will appear for level 3-1.
3 black spectra of man centipede will appear for level 3-2.
The primal demon will appear in 3-2.
Latria Tower - Level 1
Exit the cell and turn left, walk the walkway to the end, kill the mind flayers, collect the keys in the wall in front of you, from the keys turn right and continue on the walkway to the passage on the left. Exit the passage slowly, you will be attacked by a mind flayer, once killed go to the end, killing the other enemy as well and collect the keys on the opposite wall. Go back to the beginning of the level, and go straight past the cell where the archstone is located, open the gate, go through the mist portal, go up the stairs to the second ramp and take the right exit.
Enter the first cell on the left, open the sarcophagus and collect a stone with ephemeral eyes from the corpse. Walk the walkway to the end and walk the opposite walkway to one of the last cells, you will notice it as it is the only cell that does not have a door, enter and exit the passage on the opposite side of the room. Exit slowly, you will be attacked by a mind flayer, turn right and collect the keys at the bottom. Go back inside the passage in the cell, exit and turn right, continue to the end and open the gate, you will access a balcony with a mind flayer, kill it and open the gate on the other side, here too you will be attacked by yet another mind flayer , kill him and enter the first cell on the right to meet the merchant of world 3, great for the price of spices. Go to the opposite walkway and walk it to the end and open the gate, go down the two flights of stairs, as soon as you pass under the arch, immediately turn left to discover another passage, go down the stairs and open the gate, collect the keys that they stand on the right wall. Open the gate on the opposite side of the corridor, go down the stairs and through the mist portal.
Immediately turn right to discover another passage, go down the two flights of stairs, open the gate and turn right, continue up to the arcades under which there is legion, a really tough monster to defeat with ranged attacks, continue straight to access to an external balcony. Look at the cut scene, reach the bridge and stop just in front of it, collect the keys, take the right time and go to the opposite side to yours (don't dream of crossing the bridge while the arrows are fired) look below, get down on the platform and collect the stone with ephemeral eyes, turn left and pass the ledge, continue to the balcony turn left to reach a hole in the railing. Go back to where you met legion, go straight up to the passage you came from, go up the stairs to the corridor where you found the keys and open the first gate on the left. Go down the corridor to the end, kill the mind flayer, open the gate and kill the second enemy as well.
Open the big gate, go down the stairs, enter the tower do not go up the stairs but exit the fog portal, immediately turn right and turn off the machine that shoots the arrows, collect the objects on the bridge. Go back behind the machinery, you will see a large staircase, enter the door on the right at the base of the stairs, go up to the top, walk the walkway to the end, open the door and kill the prisoner who is at the end of the corridor, collect the keys , with these keys you can free the wise Freke who is in a cell of this level, to free him take the left door at the base of the staircase behind the machine, exit the tower, and go up the stairs to return to the big gate, enter and open the gate on the left, walk down the corridor to the end and open the other gate, turn left up the first flight of stairs and turn left again.
Enter the passage and in the third cell on the right you will find the wise Freke, open the cell door and talk to him. Go back from the machine from which the arrows were fired, and go up the staircase behind it, halfway you will meet a black ghost that will shoot arrows at you, approach with the shield in parade position, and engage him in close combat, just be careful never turn your back on him, his attack will be devastating. Continue up the staircase to reach the portal of a church, enter the portal of fog to face the boss.
False Idol Boss
Kill all the prisoners inside the church, being careful to avoid the boss's spells, when you have made a clean sweep run to the boss and attack him. The false idol will disappear, and reappear together with several clones, who will attack you with magic rays, every now and then the boss will perform a spell that will make glyphs appear for a few moments on the floor in the middle of the benches, avoid these areas.
To understand which is the real boss, just target the various clones, the one who will not have the energy bar on his head is the False Idol, find him and hit him. The boss will continue to disappear and reappear with more and more clones, repeat the procedure until this boss, too, will not be history.
Go behind the altar and go as far as possible to find the Nail of the Infant, approach the altar and watch the cut scene. Go up the stairs and tap the archstone to complete the level.
Nexus
Now inside the Nexus you will also have the sage Freke, from which you can learn other interesting magic using the souls of the bosses.
Repair equipment and spend your soul points however you like. Touch the Queen's Archstone again.
Latria Tower - Level 2
Go down the stairs, reach the brazier and go down the stairs on the right, continue up to the tower, kill the Gargoyle that will fall in front of you, go through the archway and turn left, go up the stairs and continue up the ramp to the bridge on the left. After the first steps another gargoyle will fall in front of you, kill it and do the same with the gargoyle armed with a crossbow, continue to the next tower, you will be attacked by another gargoyle, enter the fog portal and turn right. Go up the stairs and as soon as you reach the ramp continue slowly so as not to fall into the hole, wait for the elevator and go up.
Keep going up the stairs, kill yet another gargoyle, at the end of the stairs also kill the prisoners who are praying to break the first chain. Go down the stairs on the left, as soon as you reach the brazier turn right and look at the light signals, look down to fall on the bridge below, continue and open the cage of Yurth the silent leader, wait for him to come out and enter the cage itself to go down to the swamp. As soon as you come out of the cage, turn left to find the ladder to climb the fences, kill the centipede man and make your way up to the rock face, go up the path and turn left to climb the next fence.
Follow the fence to the end and turn left, reach the staircase on the left and go up. You'll find yourself on a cliff full of monsters, kill them and turn left again to reach the mist portal. Pass the portal, and continue to reach the base of a staircase, climb slowly, on this staircase there is a black ghost of mind flayers, even more terrifying than normal mind flayers, maybe try to get behind him. At the end of the staircase turn right and pass under the two tentacles, kill the enemies and turn right to access another bridge. You'll be attacked first by a crossbow gargoyle on your right, and then a sword gargoyle coming down the column. Continue up to the tower, turn right and move slowly to avoid falling into the hole.
Wait for the elevator, go up and continue up the stairs, being careful of the attack of the gargoyles. Kill the praying prisoners here too and break the second chain, enjoy the cut scene. Continue on the bridge on the left, when you reach the end, throw yourself down on the platform below, continue and you will find yourself at the first brazier of the level.
Go down the ladder again, now you will also find some centipede man waiting for you, cross the arched passage, turn left up the stairs, but this time instead of turning on the bridge to the left, go straight. Go up the stairs slowly, being careful of the mind flayer's black ghost. Reached the end of the ladder continue to the portal of fog on the left, enter to face one of the most difficult bosses of the entire game, even here it would be advisable to help some other player.
Boss Mangiauomini
Past the fog portal you will find yourself on another bridge, the first man eater will meet you, attack him always being careful not to have your back towards the abyss, many of this boss's attacks will throw you back. As soon as the man eater takes off, take the opportunity to heal yourself, at this point the boss could stay in the air using magic attacks, avoid them, especially the energy boost, when he returns to the ground attack him. Every now and then the boss will emit yellow flames from his mouth and kneel on the ground, this is a good time to unleash your attacks.
When the first man eater is at 20% energy, a second man eater will also appear, try to eliminate the first as soon as possible, and only dedicate yourself to the second afterwards. If you are a character who uses magic, the best technique is to wait for the boss to emit the yellow flames and kneel on the ground, at which point you launch burst of fire and you should kill him with one shot. Killed the two man eaters go to the end of the bridge to find the archstone.
Nexus
Climb the stairs behind the archstones of the worlds, to find yourself in a large room, you will have already noticed some suspicious corpse, turn right all the way, and in a corner you will find Yurth the silent leader, kill him immediately, as the real task of Yurth is to kill all the important characters within the Nexus, including Boldwin and company. You can now spend your soul points.
Touch the Queen's Archstone again.
Latria Tower - Level 3
Pass the arched door on the left, go up the stairs and eliminate the first centipede man, continue to face the first black ghost of mind flayer, this time the room for maneuver will be really limited, I suggest you attract the attention of the enemy, to make yourself follow until he no longer sees you, and then hit him from behind.
Keep going up the stairs, at this point a cut scene could start, showing you the yellow monk who possess the soul of a player. Go ahead and also face the last black ghost of mind flayer, go through the portal of fog behind him to face the boss.
Boss Monaco Yellow
The boss of this level is not a real boss in the strict sense of the word, at 99% another player will be summoned who will act as the boss himself, this could be positive in the case of a poor player, but it could prove to be decidedly difficult in the case that a player specializing in PvP is summoned. If you want to try your luck, stay connected online (in case you could even pray via message to the player who invaded you to let you win), otherwise unplug the network cable and instead of the player you will find a sort of puppet character, really easy to beat. In any case, be careful of the luminous spheres that will appear on the enemy's head, in fact these will be thrown at you as soon as you are close enough, they are easy to avoid, but if you are hit you will receive high damage.
The nice thing about the Yellow Monk is that you can become the boss yourself, in fact you just have to place any summoning stone inside the world, and you could be summoned as the final boss, if you manage to kill the player on duty you will receive the turban of the Yellow Monk, a very powerful headgear for characters who use magic, this special helmet will increase your magic attack by 30% but decrease your magic defense by 40%. What is certain is that once worn you could turn up your nose in front of its bizarre and bulky skin, moreover any player who sees you will know for sure that you are characters who make extensive use of magic, you decide if the game is worth the candle.
Nexus
Spend your soul points, repair your equipment, and touch the Shadow Men archstone.
Crypt of the storm
Enemies at this level take a lot of impact damage.
Events with a pure white trend:
At the beginning of level 1, Satsuki will appear and ask you about the Makoto Magic Sword.
In level 2, in the room where you will be pushed by Patches the Hyena, you will find a corpse wearing the magic sword Makoto, bring it to Satsuki, any decision you make Satsuki will attack you, kill him to keep the sword.
Events with pure black trend:
At the start of level 1, Satsuki's black ghost will appear. Different black ghosts of different types of skeletons will appear for the level.
The primal demon will appear in level 2, near the first reaper.
Two black specters of gold skeletons will appear, and a black specter of skeleton with double katanas within level 2.

Storm Crypt - Level 1
Go up to the wall with the arched passage in the middle, kill the skeleton, pass the arch up the stairs, wait for the first skeleton to come towards you to kill him, also kill the skeleton archer, immediately turn back to face two more skeletons, finish climbing the stairs and look for the corpse in the right corner attached to the wall to find the talisman of the god. Go through the portal of fog to find yourself in a square with a Vanguard, at this point you can decide to also face this mini boss, which will leave a soul of the gray demon, but this boss is totally optional, you decide if you feel able to face the battle. As soon as you pass the fog portal, immediately turn left, walk through the passage with the shield in parade position, to protect yourself from the darts that will be fired as soon as you pass on the trap plate, exiting the passage go up the stairs to the left, you will find yourself above the walls, kill the skeleton with sword and the two archers, continue on the walls and go down the stairs, pay attention to the trap plate, collect the keys. Go back to the walls and reach the opposite side, turn right and go down the dirt passage, enter the tower and turn left, kill the skeleton that will charge you in the corridor, as soon as you exit, immediately turn left to face another enemy. Go up the stairs to the right, kill the enemy at the end, and exit the passage, follow the path up to a tree, here the crow of world 4 awaits you, with which you can exchange some items for interesting rewards. To get the reward, leave an object in front of the tree and listen to how the crow responds, then reload the game and to the right of the tree you will find your reward, each of these exchanges can be made only once per game, below trade list:
• Remains of soul = 10 white arrows
• Augite guide = 10 white arrows
• Shard of Mercury stone = 10 full herbs
• Gr. Splinter of pietramercury = 10 new herbs
• Pure Pietramercurio = 10 black herbs
• Splinter of Moonstone = 20 white arrows
• Gr. Sliver of moonstone = 40 white arrows
• Pure Moonstone = White Arch
• Shard of Sacredstone = 5 Shards of Archstone
• Gr. Sliver of sacred stone = 10 whitish matter
• Pure Sacred Stone = 3 stones with ephemeral eyes
• Jade Hair Ornament = Ring of Regeneration
• Brass telescope = Fragrant ring
• Broad sword of the moon = Devout prayer ring
• Phosphorescent rod = Ring of easy magic
• Silver diadem = Soul of the ancient hero
• Silver bracelet = Soul of the ancient hero
• Talisman of the god = Soul of the colorless demon
• Golden Mask = Soul of the colorless demon
After your exchanges, go back, go down the stairs, as soon as you reach the first floor of the tower go down the small staircase on the left and give a sword blow to the wall under the arch of stones, you will access a corridor, continue and turn to right, at the end of the corridor you will be attacked from both sides by skeletons, it would therefore be advisable to approach them with caution in order to attract them into the open (perhaps use the remains of souls), in front of the corridor on the right open the cell to find the merchant of the world 4. Go back and take the other corridor in front of you, hit the wall again to exit a hole in a garden just behind the Vanguard.
From now on you will have to watch out for the quills that will be shot at you by the flying mantas, the arrival of one or more of these quills will be foretold by a sound. Enter the portal of fog, go up the stairs to your left, face the skeleton with sword and then the one with crossbow, enter the ruin on the left, face the black skeleton with double katana, the best strategy is to approach slowly and wait for it to start with the double blow, dodge him and deal a blow to his back, behind him you will find the referee's shield. Turn behind the ruin, advance slowly, as soon as you hear the sound of the trap turn with the shield in parry position to parry the darts.
Continue and go down the path that runs along the abyss, advance always paying attention to the spikes, now you will face the first golden skeleton, dodge its slow attacks and always keep a certain distance before striking. Advance and face two more golden skeletons, at the end of the narrow passage you will find a portal of fog pass through it and turn left, advance to the end and take the passage to the right, as soon as you enter you will activate a trap, raise the shield in parade position. Go down the slope to your right, and face another black skeleton with a double katana. Enter the fog portal to face the boss.
Boss Referee
Go downstairs being careful not to be hit by the Referee's tongue. The boss will have a blade stuck in his stomach, that is his only weak point, hit him right on the wound until the Referee makes a screeching sound, immediately run behind him to avoid the blow, return to hit the wound up to that the boss will not fall, at this point hit the bird on his head (I know this boss is really bizarre), repeat the procedure until the Referee is also history.
If you use spells, you can stay on the stairs on the upper floors, and hit the bird directly with ranged damage spells. Touch the archstone to finish the level.
Nexus
Spend your soul points however you like, repair your equipment, and touch the Shadow Men Archstone.
Shrine of the Storm - Level 2
Go down the stairs and enter the tunnel, buy what you need from the merchant, go ahead and press the pedestal before the door. Look at the cut scene, advance on one of the two walkways and at the end throw yourself trying to center the reaper, kill him and all the monsters in the room will die together with him. Go down the stairs and turn left behind you, enter the room, approach the hole and you will be pushed down by Patches the hyena. Just below, talk to Saint Urbain, kill the black ghost, open the door and go back to talk to Saint Urbain to free him. Go up the stairs, talk to Patches the hyena, go back to the reaper room and press the pedestal behind the altar.
Exit the portal just opened, here too you will have to be careful of the spines of the flying mantas, attract the first of the two skeletons and kill it, do the same with the second and the skeleton with a bow. Go ahead and face the two golden skeletons together, go ahead and enter the mist portal to your right. Cross the stone bridge, and go down the stairs to your left with the shield in parade position, take the beam and kill the ghost, turn left go down the other stairs, always keep the shield in parade position and kill this ghost too . Go ahead and turn immediately behind the column on your right to kill the reaper.
Go ahead and go down the stairs on the right, turn right again and run to the portal of fog, forget the treasures that you will find nearby, they are a trap. Exit outside, continue the narrow path until you reach a rock portal, enter and continue along the tunnel, you will arrive in a huge room with white spheres that float that if touched will explode, try to pass on the narrow stone bridges without fall, until you get to the opposite side of the cave, go up the stairs and you will find yourself in front of the mist portal for the next boss.
Boss Hero Ancient
This boss does not see us, and the use of the thief's ring is highly recommended. Just approach and hit him until your stamina is exhausted, at this point move away to heal any injuries. The more you hurt the Ancient Hero, the better he will be able to see you.
If you are a character who uses magic, you can stay comfortably away from the boss to use ranged damage spells.
Killed this boss too, touch the rockstone.
Nexus
At this point you will also have unlocked Saint Urbain, from which you can learn the best miracles of the game thanks to the use of the souls of the bosses. Spend your Soul Points again, and touch the Shadow Men Archstone for the last time.
Shrine of the Storm - Level 3
Go through the mist portal ahead of you to face the last boss of this world.
Boss Lord of storms
The boss area will be full of flying mantas, so correct down the slope, as soon as you are in the area with the ruins of rock turn left, go to the end and extract the sword Queen of storms, equip it, with this sword you will make an attack on distance only in this level, thanks to this attack you can kill the flying mantas, make a massacre of enemies, and after a while the storm lord will appear. Seek refuge from his shots under the rock ruins (the one with the two crossed columns is perfect) and as soon as the boss's attack is over, start hitting him with the special attack, repeat this procedure until the boss is defeated.
Touch the archstone and the fourth world will also be archived.
Nexus
Spend the soul points, and repair the equipment.
Now you just have to touch the archstone of the Cape to enter the fifth and final world.
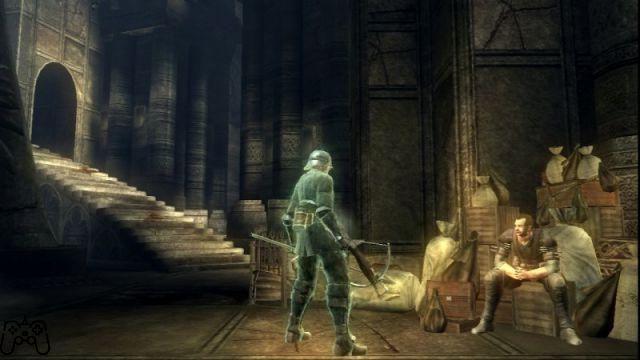
Valley of Corruption
Enemies in this world take Fire damage. In this world, good resistance to poison is advisable, and a good supply of widow's lotuses and noble lotuses.
Events with a pure white trend:
In level 1, between the rats and the first corrupted giant there will be a ladder that will lead you to find the Istraelle spear. In level 2, Selen Vinland will appear on an island in the swamp immediately after the first portal of fog. After defeating Astrea in the same area, the black ghost of Garl Vinland will appear.
Events with pure black trend:
In level 1, some black ghosts of corrupt men will appear. In level 2, the black specter of Selen Vinland will appear, along with some black specters of corrupted giants for the level, and the primal demon will appear after the second fog portal.
Valley of Corruption - Level 1
Go up the walkways and take out the first corrupt man, destroy the fence to your left, and continue along the walkway, beware of the enemy who will fall from above. Get to the end of the walkway and go down the ladder. Confront two other corrupt men, go all the way, and take down the dock, go to the other side and kill the corrupt man with firearm, throw yourself under and eliminate the other enemies.
Keep going down, cross the suspension bridge killing the enemy with the firearm, turn left and throw yourself into the hole, kill the enemies and enter the fog portal. Go downstairs, watch out for the enemies that will come out of the piles of straw, cross the suspension bridge, and turn right, hit the cocoons and take the drop in front of you. Go down and meet the merchant of world 5, buy some black turpentine, they are very useful in this level.
Keep going down, but stop above the walkway, try to eliminate the rats with ranged attacks (a couple of fire bombs would be perfect), cross the umpteenth walkway being careful of the boulder that will fall on you, face the corrupt giant holding always back against the wall, enter the next room eliminate the enemies and go up. Hit the cocoons, climb the suspension bridge, draw the two corrupt men towards you with the firearm and face the giant. Go down the last walkway to get to the mist portal for the boss.
Boss Leech
Use the catwalks to go down, being careful not to be hit by the boss's ranged attacks, as soon as you get off use a turpentine, start beating the Leech as hard as you can, it's not a very difficult enemy you will see.
If you're a magic-wielding character, a nice burst of fire under the boxwood could do the dirty work in one hit. Touch the archstone to finish the level.
Nexus
Spend your souls, repair your equipment, and touch the chief's rockstone again.
Valley of Corruption - Level 2
Enter the narrow alley between the two rock walls, as soon as you come out take the walkway on the right, face the corrupt man and continue, at the end of the walkway throw yourself under, the water of this swamp is poisonous and you will often be affected by the poison status , for this you need numerous noble lotuses. Kill the two corrupt men and go up to the islet, go straight between the fences, kill the poisonous jellyfish quickly before they can attack you, continue until you reach a larger islet with a corrupt giant and other enemies on it, and it is important to face the fight on the dry land, as you cannot dodge in the swamp.
Pass the walkway in front of you and enter the mist portal. Continue for a couple of meters on the walkway, until you see that you have passed the long fence in the swamp on your right, then jump into the swamp, go straight on staying parallel to the fence, pass some islets and continue straight on to the mainland, pass the area with snails. Go through another walkway until you see two more corrupt giants in the distance, lure one at a time, then watch out for the corrupt shaman who will throw a poisonous cloud.
Continue straight into the swamp until you reach a pile of stilts, enter the portal of fog, you will meet the merchant of world 5 again. kill him and take the first walkway on the right, continue straight, up to the mist portal for the boss.
Boss Colossus Putrid
As soon as you pass the portal, use a turpentine, approach the colossus and try to turn behind him, hit him repeatedly, heal yourself when you need it, and keep hitting the boss. Not even this clash here will prove too difficult. If you are a magic-wielding character, a magical explosion could kill the boss with one hit.
Touch the archstone to clear this level as well.
Nexus
Spend your soul points, and repair the equipment. Now touch the Chief's Archstone for the last time.
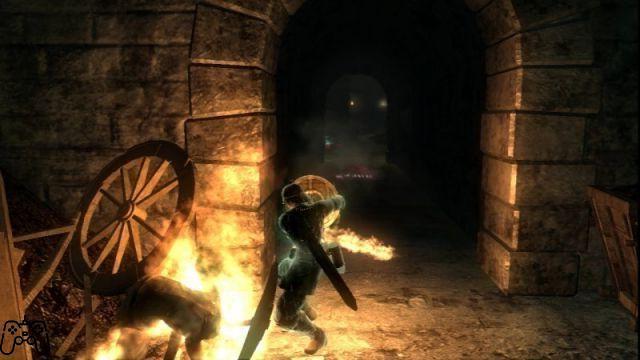
Valley of Corruption - Level 3
Go straight after the archstone, go down the stairs and continue to the portal of fog.
Boss Astrea
As soon as you enter the boss area, turn left and follow the path that runs along the swamp, Garl Vinland will be waiting for you, face him exactly in the place where he is right now, hit him using the "hit and run" strategy before one of his mighty shots can hit, leave immediately and repeat the strategy until good Garl Vinland is also dead, collect his armor and the very useful Dark Silver shield. Advance to Astrea, don't hit her but talk to her, she will kill herself. If you are a character who uses magic, you can keep the distance between you and Garl Vinland and use spells from a distance.
Touch the archstone.
Nexus
Watch the cut-scene and talk to the girl in black who will lead you in the presence of the ancient himself.
The Ancient
Watch the spectacular video.
Advance towards the ancient and enter its mouth, make your way through the branches until you reach the portal of fog.
Boss Re Going
This boss is pure formality, just hit him repeatedly, he will try to respond with some awkward attack, it won't take you more than a minute to take him out.
Once killed, pick up the SoulBrandt, and approach the light at the end of the tunnel.
Watch the cut scene, and now you can decide how to finish Demon's Souls.
Good ending
Leave the girl in black and go to the exit from the ancient behind you.
If you choose this ending, you will receive the Soul of the Maiden in Black which will allow you to learn Soul Suck magic.
Bad ending
Hit the girl in black from behind.
If you choose this ending you will receive the red-eyed stone, and the soul of the demon beast that will yield you a good 200.000 soul points.
I personally recommend this ending if it's your first time beating the game.
Fifth episode
Welcome back to our Demon's Souls Exclusive Guide; in this last installment I will teach you how to become a real master in this game, also I will add my little personal guide that will make the game less difficult than it seems.
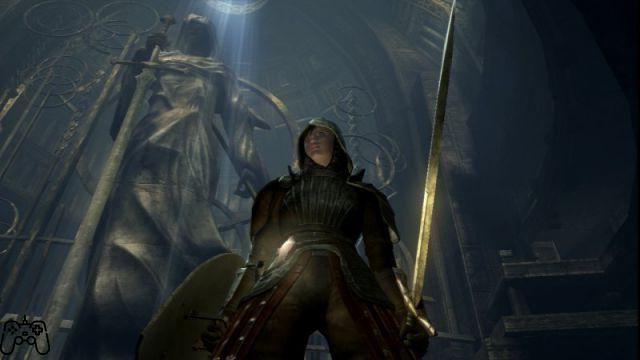
Play online
The online mode of this game is the element that makes Demon's Souls a real masterpiece, not only will we be able to tackle many of the levels together with other players (more or less good), but we can also engage in real duels to the death, we are talking about the classic PvP (player vs player) that is so loved by the communities of numerous online games, including this one.
The ways to do PvP are numerous and now we will analyze them one by one.
Premise
It is essential when deciding to PvP that the active weight of your equipment does not exceed 50% of the total, so look for a good compromise between protection, weight and aesthetics.
To invade
To invade we must be in ghost form, as soon as we enter a level we can use the black-eyed stone, at this point the server will look for a game (or world) created by a player with a similar level to ours.
If the invasion is successful, we will immediately enter the same level, but of another player in the form of black ghosts, we will be surrounded by a red light.
At this point we just have to look for the host (ie the player to whom the game belongs) and kill him.
But beware, the host will be in body shape and therefore will have much more HP than us, moreover he is often accompanied by some other player in the form of a blue spectrum (therefore with reduced HP); this makes the challenge very attractive, but at the same time very difficult ... believe me, coming out of a challenge like this is definitely satisfying.
If you do not have a particular strategy in mind, you can take advantage of the fact that the various enemies of the level will not attack you, if you see it bad you can throw yourself into the arms of some nice enemy, perhaps by being chased by the host, your new companions will be happy to give you a hand. But let's say that this practice is not exactly the best of fair play, so if you are a spotless player, avoid this strategy.
An excellent method to emerge victorious from the invasion, is to take advantage of the Hyper Mode (strategy that I will explain later), it will be more risky but you can also kill two enemies with a single blow. Obviously killing the host and his companions will shift your character's tendency towards black.
Use the red-eyed stone
Using the red-eyed stone, you will leave a red signal, with this signal other players will be able to summon you in the form of black ghosts.
It is usually used to quickly search for a challenge, and 99% of the time the summoner is looking for a clean challenge.
The only dilemma is that whoever summons you will be in body form, so you will start with a considerable disadvantage, also whoever is defeated will lose a soul level, while the winner will receive the exact amount of soul points to reach the next level.
As I said above, those who summon are people who love duels, so be prepared to face someone very prepared, it is important that before launching challenges with the red-eyed stone you are trained enough.
The duel generally begins when both of you have launched their respective buffs, have their MPs recharged, at this point perform a bow and wait for your opponent to perform one as well. Starting early, or by surprise, is considered very unfair, and using too many healing herbs is also not considered very clean and people may get annoyed in the long run, so try to limit the use of healing items just when absolutely necessary.
Being invaded
There are two levels in this game that the community considers as real arenas, these levels are 1-4 and 4-1.
It is very easy to be invaded in this level, you will have noticed it when trying to complete these levels.
However, if you like to be challenged (and maybe even have the advantage of being in body form) just leave these two levels incomplete (so that people can invade you), enter the level and wait for someone to invade you, sometime ( especially in 4-1) you will also find red signals from other players.
If you are about to be invaded in 1-4, the fog will appear on the entrance portal, however if you are about to be invaded in 4-1, touching the rockstone at the beginning will tell you that you cannot leave the level.
However, wait for your opponent right in front of the entrance to the level, as soon as you are invaded you will immediately notice if the player you are in front of is someone who wants to PvP, or is one who just wants to invade.
If your opponent doesn't charge you right away, bow down and wait for him to do the same to you. As a rule, the same fair play rules as described above apply.
Hyper Fashion
If you decide that PvP is for you, it is vital that you learn what Hyper Mode is.
With Hyper Mode you can kill an enemy with a single blow, but it's not as simple as it seems, you will need to get to 30% of your HP.
However, you have to get the Smart Rat Ring and the Stupid Rat Ring, both of which activate when your HP is at 30% of the total, the former will increase 50% of your damage and I mean any damage that is of a spell or a sword or arrow strike, the latter will increase your defenses (all of them) significantly.
You will also have to wear the Morion Sword as a secondary weapon, a sword useless as a weapon in itself, but very useful for its effect, in fact it works exactly like the ring of the intelligent rat, so at 30% of your HP you will have an additional 50% damage. .
With these 3 things, at 30% of your HP, you will activate the dreaded Hyper Mode, the figure of a rat will appear under the energy bar and you will emanate an aura of light (so be careful who gives off the same aura).
With a single slash in this mode, you will eliminate any opponent (two slashes in case our opponent used the second chance miracle).
It's really funny to see players gassed that they're about to kill you, die from a single slash or spell of yours (or "oneshottati" to use an online gaming term). So whatever your character type, Hyper Mode is key.
Builds for the characters
The maximum level of this game is 712, at this level your character will be everything, warrior and wizard, you can use every single weapon and armor.
It is common use of the most fierce online community, to stop between level 120 and level 130, it is in these levels that we will have a greater difference in characters, here we will have the pure wizard, or the heavy warrior, or perhaps the warrior a little bit finer.
Let's say that we can almost talk about real classes (not to be confused with the initial classes) each of these with its strengths and weaknesses, these sorts of classes are called Build by the players.
Below I will analyze with you the most used builds.
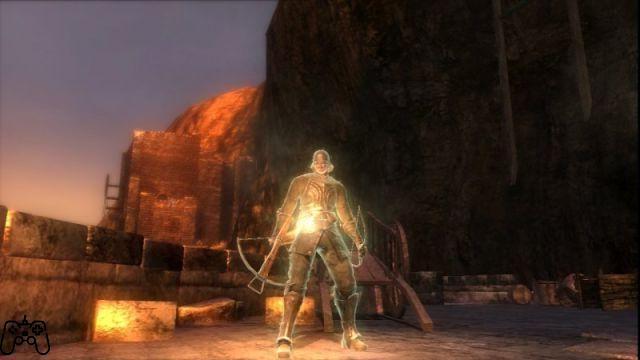
Vitality + Insigne of the North
This is currently my build, it allows you to save a lot of points in characteristics, thanks to the fact that the Insigne Del Nord takes the tendency of your character as a bonus for damage, allowing you as soon as you have met the requirements for this weapon, to spend yours on the Vitality feature.
The only flaw is that you will have to keep your trend always either pure white or pure black, at these levels however you will have the highest damage, no other weapon will reach as high as the Insigne Del Nord (1292 in Hyper Mode) without the 'aid of charms, you will also definitely have a lot of PF.
If you decide to use this build, it is advisable to bring along a splinter of archstone in the fight with the final boss (King Allant); just killed, pick up the Soulbrandt, use the Archstone Splinter and go to the ED blacksmith in world 2 with the Demonbrandt, the Soulbrandt and the soul of the false king.
Return to the Nexus and tap the rockstone in front of the chasm to return to the final area to end the game.
In this way, starting with the new game already with the Insigne Del Nord, remember also to have the tendency of the pure white or pure black character.
Starting class: Rider
Level: 130
Vitality: 85
Intelligence: 15
Resistance: 41
Strength: 20
Dexterity: 14
Magic: 12
Faith: 16
Fortuna: 7
Basic equipment:
• Insigne Del Nord
• Spada Morion
• Smart Rat Ring
• Stupid Rat Ring
Fundamental Spells and Miracles:
• Guard
• Second chance
pure magician
This character is perfect for those who love the use of spells and miracles, it allows you to use both to their maximum potential both in normal play and in PvP.
The only flaw is that in close combat you will not do a lot of damage and you will have to learn how to best use the various damage spells. Also, you won't be able to wear very heavy armor.
Starting class: Noble
Level: 125
Vitality: 40
Intelligence: 40
Resistance: 9
Strength: 9
Dexterity: 12
Magic: 44
Faith: 44
Fortuna: 7
Basic equipment:
• Kris +5
• Spada Morion
• Talisman of the beast
• Yellow monk's turban
• Armor set of the venerable sage (excluding the helmet of course)
• Easy Magic Ring
• Stupid Rat Ring
Fundamental Spells and Miracles:
• Since it is desirable that you have mastered every single spell and miracle of the game, you decide which ones best suit your style of play.
Blue Blood Swordsman
This is another great hitter.
He uses the Blue Blood Sword as his main weapon along with the magic weapon of light (or a thurpentine or whitish matter).
Not to mention the high luck feature that will allow you to find better items from killed enemies.
The only flaw is that you will not be able to use the guard spell together with a weapon of light, so you will have to be very careful about the hits of the opponents, also you will have to worry about enchanting your weapon every time the effect of the enchantment ends.
Starting class: Traveler
Level: 130
Vitality: 50
Intelligence: 15
Resistance: 40
Strength: 18
Dexterity: 18
Magic: 30
Faith: 18
Fortuna: 21
Basic equipment:
• Blue-blooded sword
• Talisman of the beast
• Spada Morion
• Smart Rat Ring
• Ring of the Eternal Warrior
• Catalyst of madness (with which you will have to throw a weapon of light)
Fundamental Spells and Miracles:
• Second chance
• Weapon of light
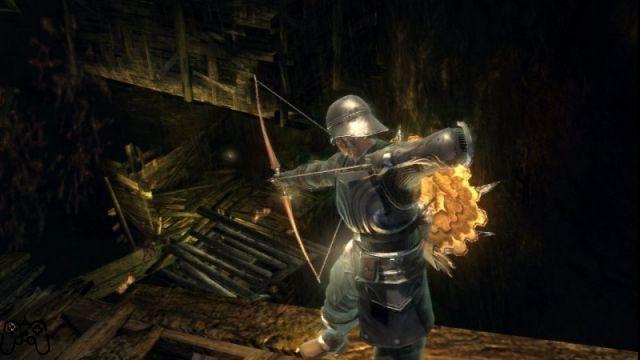
Heavy Warrior
This is the pure warrior, capable of using the mightiest weapons in the game and doing the highest damage thanks to cursed weapon magic.
The only flaw is that you will always have to remember to throw cursed weapon once the effect is over.
In addition, you will have to learn perfectly how the shots of each weapon are delivered, in order to be sure to hit your opponent.
Starting class: Rider
Level: 130
Vitality: 59
Intelligence: 18
Resistance: 40
Strength: 50
Dexterity: 10
Magic: 10
Faith: 16
Fortuna: 7
Basic equipment:
• Talisman of the beast
• Spada Morion
• Smart Rat Ring
• Stupid Rat Ring
• Dark silver shield
For weapons, on the other hand, we have to make a different speech, in fact there is no precise weapon for this build, but you will be able to choose which weapon best suits your style of play, always remember to learn well how the shots of the weapon of choice, you will mostly use very slow weapons and it is important to know when and how to hit the opponent; the most devastating blow for these weapons is the blow delivered after a sprint or the blow delivered after a roll.
Be that as it may, the most used weapons for this build are:
• Great Ax
• Dragon bone breaker
• Butcher's blade
Fundamental Spells and Miracles:
• Cursed weapon
• Protection
• Poisonous cloud
Mini guide to make the game easier
If you want to tackle the game in an easier way to be able to dedicate yourself without too much frustration to the growth of your character, here are some steps to take at the beginning of the game; you will suffer a little the first few hours, but then it will be a walk.
In level 1-1, kill Ostrava as soon as you meet him, the best strategy is to slash him behind, make him fall among the enemies, wait for him to kill them all and then finish him with your hands, at this point collect the key of the mausoleum and clear the level.
Go through level 2-2 and kill the Tower Knight boss and keep the iron demon's soul. Go to level 3-1, free the wise Freke, avoid the clash with the black ghost on the staircase leading to the boss and eliminate the False Idol.
Go back to the Nexus, go to the sage Freke and learn the Magic Guard (it is essential to have increased the intelligence characteristic to have two magic slots).
Now using protection magic, enemies will do you much less harm.
Go to level 5-1 and kill the Leech boss and keep the restless demon's soul.
Go back to the Nexus and go to the sage Freke to learn Poison Cloud and equip it (forget protection now).
Go back to level 1-1 and reach the mausoleum (the tower that is before the red-eyed knight), throw poisonous cloud and lure the red-eyed knight into it, keep running away until the knight is not interested in you and he will come back, wait for him to die and open the door of the mausoleum.
Enter, talk to King Doran, throw poisonous cloud at him, he will attack you, run away until he doesn't care about you, go back and keep your distance so that the old king doesn't attack you. As soon as the cloud effect ends, throw it back at him, run away and repeat this procedure until old King Doran is also dead.
Pick up the Demonbrandt behind him, pick up his armor and ring, equip everything.
Bring your features to the bare minimum to be able to use the Demonbrandt. Now try to bring your character's tendency to pure white, to get the maximum bonus from the damage of the Demonbrandt.
Return to the Nexus and memorize the Guard spell again.
Now the game will be much easier, you will do an absurd damage in the melee and thanks to the magic guard you will be practically indestructible.
Now enjoy Demon's Souls without too much frustration and think about how to best grow your character.
Conclusions
This ends our Demon's Souls exclusive guide, now you should know everything you need to be exceptional players and fearsome opponents.
I hope I have made your journey through the kingdom of Boletaria more relaxing and enjoyable. Now I greet you and make an appointment online.
Pietro "Emmett" Zambelli