


THE STAR
Stars are the people you have hired as actors or directors, regardless of their preferred occupation. Once you have created a star, you will not be able to change its destination by moving it to other rooms. They can also be used as "extras"; simply click on one of the star cards and take it to the "Extras" room in the casting office. The same procedure can be applied to directors and normal actors.
The Stars of The Movies they are not exactly analogous in behavior and importance to the "Sims" of The Sims, by the same author. They are autonomous and have their own needs and desires, but they don't need to go to the bathroom or eat. They will continue to work non-stop on the film until they become too stressed, so they don't need a lot of rest. Your overall goal is to find a balance between the work level and the rest level so as not to over-stress the stars. When you assign a star to a particular movie, they will do what is required of them. If a scene does not contain the star, they will stand still. Regardless of what's happening to it, you can grab a star by clicking on its card. You can force them to do some other activity, although obviously this will decrease their performance. As for stress, it is mainly caused by excessive time spent working. In fact, the number of films you conduct does not matter much, but the intensity of the time spent by the star working. If this intensity is combined with an excessive duration of the work itself, the star will suffer excessive stress. Exactly opposite of stress is boredom. Stars don't want to sit still all the time, even if that could mean some money being earned by doing nothing. To do this, you can also assign various stars to practice on a particular genre by simply clicking and dragging as usual. You will see a bar appear that marks the progress of the star's experience in that particular type of movie.
Obviously, you will have to try to curate the image of your stars. In the game, the image factor is a function of three variables. Each variable is represented by a bar. The average of the three bars makes up the total bar of the image. Now, the division is carried out as follows:
- Facial beauty. The beauty of the face, in particular, is the factor that most influences this variable. The aging of the star will have a particularly heavy impact. There is nothing you can do, of course, to slow down the natural aging process, but you could still use the cosmetic surgery building to slightly improve it. In fact, the apparent age of the star will be 2/3 of the real age.
- Fitness. Basically, it's about the star's fat and muscle distribution. These are mutually exclusive factors, in The Movies. The bar usually starts at low levels, but can be raised to higher levels quite easily. Usually, the best way is to use weights. Obviously, in the event that a star starts to overeat, the bar will plummet in a worrying way. In this case, you can use the liposuction room, or the plastic implant room.
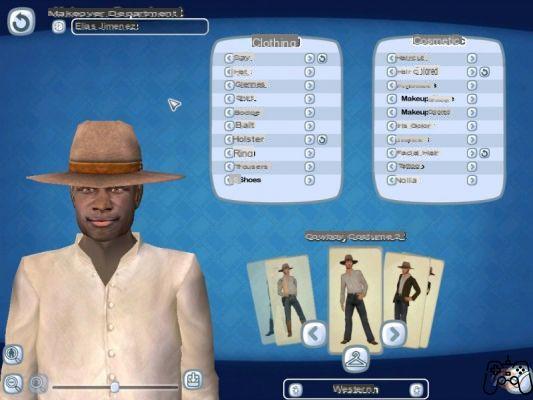
- Fashion. To increase this factor, you will necessarily have to ask for help from the Makeup department. Grab a star, and drop it in the aforementioned department, to see the level of this bar prodigiously increase. You can dress the stars to your liking, and of course this will affect, but slightly, the look bar.
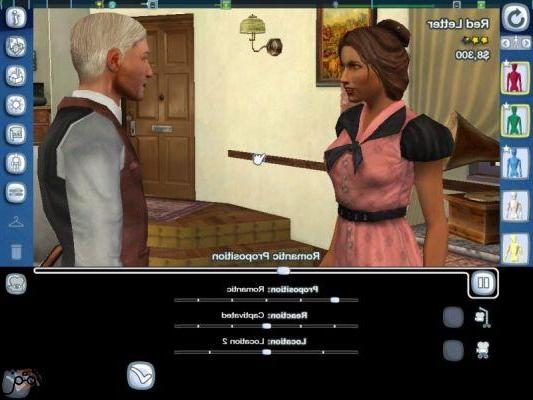
Stars develop love relationships in their interactions; however, they are not a necessity. Generally speaking, a star needs one and only one relationship to be able to work at her best, and maximize her rating. The stars will talk to each other, but without your intervention they will never be able to maximize their rating. When the stars shake hands, meet each other, you take them again and force them to meet again, so as to develop relationships. They will later say they are ready to develop their relationship. To do this, place one of your stars in the Bar, then place the other one next to her. The final two parts of the relationship between stars are formed in the dining room of the restaurant and in the VIP room.
In case a star remains in a bad mood for too long, they will tell you that they are about to leave. She gives you a warning a few months earlier, but this abandonment is not binding, you can always try to improve her mood, and make her stay. Occasionally, stars from rival companies will join you. They will have a blue aura around them. They are similar to Wannabes, but usually more experienced.
OTHER STAFF COMPONENTS
Stars are a necessary but not sufficient condition to compose a study. They are your most important employees, but there are also other types of jobs. Although your stars age and retire, the characters that will be mentioned in this section do not present similar issues.
Wannabe It is the name that is given to practically all the dudes that roam your rooms. They do nothing, but they are potential workers. You can place them in the various rooms and create the various actors, etc. Usually, it's best to assign Wannabes to buildings they are close to. If you intend to use a Wannabe as a star's personal assistant, place him in any other building and then assign him to the star of your choice.
Keepers This is the lowest position on the company ladder. The caretakers' only use is to clean the studio. Your other employees will do some dirt around, and the keepers will clean up. If they are not sufficient to clean everything, a pop-up will warn you of the excessive amount of dirt present, and to remedy it you will have to hire other caretakers.
Builders
Builders take care of the maintenance and construction of your buildings. They are very important, as repairs are the order of the day, and the security level of the set affects the rating of your stars. If you don't assign anyone to repair damaged buildings, be careful, as they may fall apart. You should have 2 builders for each keeper.
Screenwriters
The name already makes the function explicit. By placing them in the different rooms of the scriptwriting office, you will assign them different genres. However, you will never be able to get them to write a completely perfect script, unless you write it yourself. In theory, you could write everything yourself, as you do not need the writers so much, but this is not a very realistic scenario.
Researchers
Researchers give you the ability to build new types of sets, and do it faster, with new technologies. You can assign researchers to specific rooms in the lab to tell them what to work on. Once they're done in that room, they'll leave the lab entirely, although there may be another room that needs them. If that happens, you can pick them up and throw them in the vacant room. Once past the year 2000, all technologies will be unlocked. Then fire them all.
sidekick
The extras are actors who play very minor roles throughout the film. Usually the quality of the film depends on the number of extras present, but not on their experience. Extras also age and retire, but that's the only analogy they have with stars. They have no bars whatsoever, no needs whatsoever. Now, if you make an extra become a star, that changes, of course
Photography
They are not technically your employees, and you have no control over them. They remain at the doors of your office waiting for your attention. You should take one and place it next to a star who is doing something interesting so that she can photograph her. Stars will get more press attention if they are photographed performing some particularly embarrassing act, such as flirting with other stars.
OUR OFFICE
Your studio is made up of a complicated series of buildings and pathways, with people swarming everywhere.
Just like stars and movies, studios also have a rating of 1 to 5 based on several factors:
- Capital. The amount of money that is now in the bank. 5 million are the limit for obtaining the maximum rating.
- Movie. It is the most difficult factor to raise, as it depends on both the quantity and the quality of the films themselves. To maximize it, you will have to do several blockbusters.
- Star. The more stars you have, the more these stars will be of excellent quality, and the better this rating will be. Here too, he is influenced by both the quality and quantity of the stars.
- Prestige of the land. The condition of your land and the buildings on it, as well as the grass that surrounds them, have a decisive influence on this factor.
- Awards. The more awards you receive, and the more awards the people in your studio receive, the more this factor will improve.
Study facilities
In order to run your studio you will have to build many buildings, to house scriptwriters, stars and so on. This section will list all the different types of buildings you encounter in the game, their role in the game and their cost.
Cash
- Cost: $ 8,000
- Objective: Place your stars here during your free time to rest and develop their friendships.
. Casting Office
- Cost: $ 5,000
- Objective: By placing a complete script here, you can assign the stars, extras and cast to the film.
Aesthetic Surgery Clinic
- Cost: $ 60,000
- Objective: This building improves the look and physique of your stars. Physicists are mainly developed from weight lifting, but to improve the face plastic is the best method.
Custom script office
- Cost: $ 11,111
- Objective: This is the most powerful building in the game, giving you the ability to create scripts, and compose scenes to shoot them again. If you place a completed movie in here, each scene will have a small green dot.
Laboratory
- Cost: $ 24,000
- Objective: Allows you to hire researchers who will study the technologies. Even without a laboratory, you will have better technologies available, but more slowly.
Makeup department
- Cost: $ 7,000
- Objective: Allows you to change your star's wardrobe. This, of course, serves to improve the fashion level of the star herself.
Post production
- Cost: $ 39,000
- Objective: The second most powerful building in the game. It provides you with the ability to assign music and subtitles to your movies. You can also shoot complete scenes.
Production office
- Cost: $ 6,000
- Objective: In this office the completed films are published. If you also have an advertising office, you can organize a precise marketing budget.
Advertising office
- Cost: $ 44,444
- Objective: Having one in your studio gives you the opportunity to increase the attention received by your stars. It also increases audience awareness of your films.
rehabilitation
- Cost: $ 22,000
- Objective: A place where your stars can go in case they have developed a heavy addiction to food or alcohol.
Restaurant
- Cost: $ 30,000
- Objective: Just like in the case of the bar, this building gives you the possibility to give your stars a place to rest to decrease your stress levels.
Rest room (Large)
- Cost: $ 12,000
Rest room (Small)
- Cost: $ 3,000
Rest room (VIP)
- Cost: $ 20,000
- Goal: Another place to decrease your stress levels. Obviously, the more expensive the room, the faster the level drops.
Screenwriting Office (Base)
- Cost: $ 6,000
- Goal: All script offices have screenwriters who write, er, scripts for your films.
Screenwriting Office (First Class)
- Cost: $ 66,666
- Objective: A first-class script office allows you to write four-star screenplays. The computer will often fail to do four-star scripts, so you'll probably have to write it yourself.
Screenwriting Office (Intermediate)
- Cost: $ 29,000
- Objective: Allows you to script up to 2 stars.
Screenwriting Office (Good)
- Cost: $ 33,333
- Objective: Allows you to script up to 3 stars.
Snack trailer
- Cost: $ 3,000
- Goal: Give your stars the opportunity to eat and thus reduce stress.
School
- Cost: $ 5,000
- Objective: This building allows you to hire stars and assign them as acting directors or extras.
Star and screenplay sales building
- Cost: $ 3,000
- Objective: By placing a screenplay or a star in this building you will eliminate it completely, and as a reward you will be given some money.
Trailer (Inexpensive)
- Cost: $ 24,000
Trailer (Medium)
- Cost: $ 45,000
Trailer (Great)
- Cost: $ 77,777
Trailer (Good)
- Cost: $ 75,000
Trailer (Minimum)
- Cost: $ 7,000
- Objective: Every star wants to have a little trailer. However, there is a hierarchy based on the importance of the stars themselves. Stars can be jealous of other stars' trailers if the hierarchy isn't respected.
Efficiency of the study
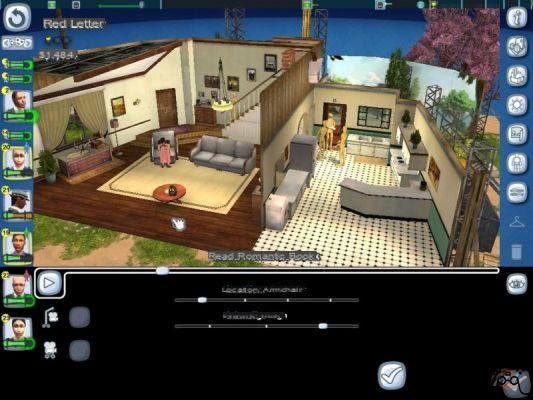
As stated earlier, there should be a 2: 1 ratio between your builders and caretakers. If you move or destroy a building, ignore the warning message. Group your administration buildings all together, based on their function, and also group the sets all together on the other side. Your stars will be busy shooting movies most of the time, so you should keep all the sets together. This minimizes the time it will take for stars to move from place to place. Another good externality of this approach: the Wannabe can be used with extreme ease and efficiency. By grouping sets by similar themes to make similar films all together, thus saving a lot of time. So, also group all the buildings that deal with the film all together, that is, the script, the advertising office, and so on.
Prestige of the lot
In general, it will seem odd, but weed is your best friend in this case. Grass increases the beauty of your soil, plus your workers will move faster through the grass, and it requires no special maintenance work whatsoever. It just gets dirty in case there are people walking on it. If you place the grass all over your lot, you will only see small dirt paths where people walk more usually. You can use the information provided by these trails to increase your efficiency. When you see these paths starting to form, place pieces of pavement on the path. This way, you can make sure that you don't have to clean studio pieces that get dirty more easily. If you have the availability, you can completely ignore the aforementioned strategy and use one that keeps your lot always at very high levels. If you press L you will see dots all over the place. The green dots indicate the spots in your study indicate the beautiful areas, the green ones indicate the not too beautiful areas. The decorations and trees enhance the beauty of the areas. The best decorations are undoubtedly the cars. They do not need maintenance and nothing.
SHOOT A FILM
There is no precise way to describe a procedure on how to make a perfect movie in this game. The following section will give general guidelines on how to shoot films, and generally accepted techniques, as well as general strategies.
The game has a rather arbitrary method of determining what are the parameters that make up a really good movie. To start, let's talk about the script. It doesn't matter if you write it or not, the script in The Movies always has a certain maximum achievable potential, based on the level of your script office. Your script will do the bare minimum to reach potential. From the moment you start the game, you can create your own scripts as long as you like. Too many scenes, however, turn out to be a waste of time, both in the creation and in the employment of your employees. In advanced mode, you can write your own script. There is a very important option, the structure option. You can choose different types of structures. When you have to write a screenplay to have it evaluated by the computer, it is always better to use a very simple structure. At the bottom of the scene is a storyboard of the scenes you have implemented so far. If you choose a simple or Hollywood structure, you will see a list of sections, which allow the computer to propose a scene to you, based on the section you are in at the moment and the genre of the film. Usually, the proposal always turns out to be good. If you use the free mode, the computer will not know what you are doing, so it cannot suggest anything to you. This also removes the bonus you will normally receive for shooting particularly appropriate scenes.
There are other essential factors as well. Among them, we can find:
- The experience of the stars in the given genre. All things being equal, an actor good at a particular genre will do better in that genre than another - quite intuitive and blatant as a conclusion, but so be it.
- Second parameter, the morale of the star. Good morale means good performance, bad morale means bad performance.
- Third factor, the actor's attitude to the given genre. This parameter is much less important than the others, but each genre still has its own favorite demands when it comes to actors.
- Fourth factor, the integrity level of the sets. Falling sets aren't exactly ideal for making a good movie. If it turns out to be a problem that persists over time, it is necessary to provide for it by hiring new builders.
- Another factor, the relationships between the stars. The more the stars are friends with each other, the more efficient and effective their collaboration on set will be.
- Staff experience also has a big influence on the performance of the film itself. There is no way to increase this value other than over time.
Other factors may be considered, but they are, shall we say, intangible:
- The power of the star. Even if a star turns out to be very experienced and good at a given genre, all other things being equal, a slightly less famous star will turn out to be a slightly less good movie.
- The interest from the world in the genre of the film. This depends on the current trend, and the trend will have a powerful impact on the popularity of your film by the masses. So pay attention to the movements of the public in terms of genre of interest.
- The novelty factor. The novelty factor refers not so much to the novelty of the script, but to the good condition of the sets. If you use them too often, the public will not like it.
- The technology of the film. If you have done a good research, this factor could have a very high value. Commonly, you will not be penalized if you have standard or medium level technology.
- Marketing and relations with the public. This factor will not matter at all until you build the advertising office. Once you build it, you can improve this factor. As soon as you are ready to release the film, five small boxes will appear in the publishing room of the production office. Placing the film in one of these boxes will select how much you will want to spend on advertising the film. Theoretically, you will have to spend on marketing to create an amount equal to that of the advertising department. However, you will not be penalized if you spend too much. Post-production might add something to the rating.
In general, as a theoretical and ideal approach it would be better to make quality prevail over quantity. But in the early stages of the game, you will necessarily have to use the opposite strategy. If you want to quickly build your reputation and get to the top of the leaderboards, there is a pretty easy way to go. It's simple: you have to produce as many films from one scene as you can, with the same star in each film. This is because before 1985 the game does not expect you to have the ability to make high quality films. To keep the shack going well, you'll need to follow the strategy outlined here: divide your cast into two groups. Group A will feature the best members of your cast. For this group follow the method described above, making as many films as possible. Group B, on the other hand, will contain the essentially waste elements. Try to get this second group to do something to increase their experience. Write scripts for a scene and shoot them, repeating this process ad libitum. The stats of all the stars and the studio will go up very quickly. You will also make a lot of money. After 1985, however, this trick will unfortunately no longer work.
WRITE A FILM TO RELEASE IT
This subsection is specifically about writing a movie and then putting it online, or just for your own satisfaction. As mentioned in the introduction to this section, no indication will be given regarding the creative parts.
First Step: Prepare the script in mind. Planning can help you a lot. You don't need to be playing and writing "On the fly". Try to think about it first. Many times the final product will be slightly diffident and more evolved than what you had previously planned. This is normal and extremely common. However, an initial plan will help you avoid big mistakes.
Second Step: Prepare your stars. If you have any preferences regarding stars, now is the time to open the Star Maker and make your stars the way you like. The stars don't need to get a good computer grade here, so you don't have to think about how to make ends meet in the previous sections.
Third step: Starting a new game. Tell the game to give you the maximum amount of money, in the last year available, with buildings that build instantly and never decay, and with stars that always do what they are told without disobeying. Then immediately save the file with a name of your choice.
Fourth step: Activate the Advanced Movie-Maker, using a "Simple" type structure. If you have creative trends in your hobbies, such as writing, you may not find structure necessary, as you probably already have training in structuring your thoughts. The Advanced Movie-Maker is described in a separate section.
Fifth step: Preview your film in post-production. Even if you have all the dialogues planned to be subtitled, wait until you do so. First, watch the movie in its entirety, and ignore the music. You have to pay attention to specific problems that could arise and that need to be resolved immediately. If you notice any problems, read the next step. If you don't notice any, go straight to the seventh step.
Sixth step: Re-shoot all problem scenes. If you notice any errors or problems in one of the scenes, you can turn them over. Get out of post-production, then take the movie icon back to the Advanced Movie-Maker, specifically the Custom Script Office. The storyboard below will show the little green symbols above the scenes that have already been shot. If you alter the scene in any way, its symbol will disappear, and the scene will be turned around completely. This function is very important in case your movie is longer than 12 scenes, as this way you can easily change the mistakes made without having to do it all over again.
Seventh Step: Add subtitles and music background. Post-production presents its appropriate section, to describe the various possibilities, but we will also summarize them here. When doing subtitles, it will take some time to get the timing right. I recommend that you use a stopwatch to succeed in the undertaking without particular difficulties and / or frustrations. You can add subtitles as you please, but try to make them stay on stage for at least one second for every four words, as the vast majority of people will have difficulty reading at higher speeds. Slower, however, will annoy and bore most people. As far as music is concerned, you will also have to pay some attention to timing, as the game has problems figuring out where to shoot the scene in the middle of the same piece of music. You will have to run the entire movie two seconds before the music background to get exact timing. For this reason, it is recommended to leave out the musical aspect as the last.
Eighth step: Add the dissolves as desired. Dissolves are a purely aesthetic component, but they can also serve various functional aspects, such as trying to make a small time pause, or a quick transition to another scene. Alternatively, you can choose to completely avoid fades. This option also works well, in case you want to quickly switch to another set, especially if you want to show two events at the same time. The type and number of fades are generally dependent on the type of film you are making. Fast moving movies, such as action movies and some types of comedy, should have few fades. Conversely, the slower a movie is, the more fades it should have, to try to keep the pace up to critical scenes. Step XNUMX: Completely re-watch the film. Even after you have all the subtitles and all the music in place, it would be better if you go through the whole movie completely, from start to finish, to see if everything is perfectly in sync. So you can also see if the fades turn out to be appropriate for the film. It's the last step, so try to perfect your film as much as possible before doing it.
Step XNUMX: Export the movie. The file will be exported as WMV, and placed in the directory
../Papers/The Movies/Movies
from here you can copy or move it wherever you want.
ADVANCED MOVIE MAKER
It is one of the most advanced tools in the whole game. It is contained in the office for the custom script. Behind the room you will always see a blank script. By clicking and dragging in the room you can start the process of writing your own script. Even if you don't post them online, you can have fun creating the movies. You can also click and bring completed scripts into this room for later editing, or follow the same procedure with a film that has already been completed, or is right in the preparation process. During all the steps of the advanced video maker you will see a button at the top right with a small "i". By clicking on it you can access several tutorials regarding advanced movie-maker notes, with videos and help to explain things.
First Screen: The splash screen isn't exactly the funniest part of the whole, but it does contain options worth considering. First, at the top you will find a place to give your movie a name. The button to the right of the header allows you to assign names at random, and the name will depend on the selected gender. You can select the gender of the protagonists either here or in the structure screen. If you are making a movie for your own pleasure and not to complete the game you can ignore the issues related to the genre. Regarding the structure, there will be no differences regarding the final product. The type of structure is in fact only a tool at your disposal to better organize your thoughts. When you use free-form structures, the computer cannot give you any hints about them. The three boxes at the bottom are the boxes for your stars. These boxes will show you who will be the main star of the film and who will be the two supporting actors. You can cancel the placements by clicking on the small symbol at the top left of the selected actor. You can, theoretically, undo all three positions, but it doesn't make much sense. To assign an actor to a particular role, click and drag the actor card to the left of the given position. You can also assign mannequins, but more on that later. Below, you can change the name of the characters. Probably, if you are making a movie for online publication, you will want to change them. The names will appear in the credits of the film. Lastly, from this screen you can change the wardrobe of the actors. Assign them one of the three positions we talked about earlier. Then click and drag the star card to the right side of the screen, where you can see the clothes. This will take you to the makeup department, where you can assign a costume and modify everything however you like. If you find a costume you like, even if it's not the main one, you can save it from this screen. This way you can quickly assign the same costume to as many people as you like, of the same gender, without having to go through the whole editing process again. In the upper left corner of the screen there is a small box where you can enter a text with the name of the actor. If you change it, the actor's name will be permanently altered, unless you pass him through the Makeup Department again. The only way to change the name of the characters is from the main screen.
The clothing decision made on this screen will apply to the entire film; however, you will be able to change the clothing in every single scene, should you deem it necessary. Costume change details for specific scenes will be listed below.
There is also the possibility of using mannequins during the scenes. In each scene, you can have people positioned in several different places. The usefulness of the mannequins is to show you the whole animation without confusing the scene with too many colors. Basically, mannequins are substitutes for your actors. You can assign the mannequins to the three main actors you selected earlier. It is preferable to know in advance who will be assigned to these positions, but sometimes it is not possible.
The mannequins are available in three different colors. The red mannequin is your main actor. Remember that just because he's your main actor doesn't mean he has to be the hero, or that he has to survive. If you're making a movie for the game, the only really important difference is that your lead actor's performance has a bigger impact on the overall rating of your movie.
Returning to the discourse concerning the mannequins, the two mannequins respectively green and blue refer to your two support actors. Also, the gray mannequins represent the extras. Typically extras will only appear in one scene.
No costume of any kind can be assigned to the various mannequins. This means that shooting mannequin scenes will give you less choice. So you should try to use your actors before exiting the Advanced Movie Maker, by clicking and dragging them on specific scenes.
If you need to use dummies to plan your script, you still have the option of organizing your work by following these guidelines:
- Create the movie in the Advanced Movie Maker with the colorful mannequins used as actors
- Click and drag the complete script into the casting office - Cast the movie
- Click and drag the movie icon to the movie room
- Then immediately return the icon to the Advanced Movie Maker - The actors you have selected will have replaced the mannequins, and now you can dress them up to your liking.

CREATE A SCENE
This subsection will provide you with the basic knowledge on how to create a scene and place actors.
At the bottom of the screen is the storyboard. If you are using a specific structure, you will see each section, always at the bottom, of a specific color. There will be a pair of white boxes in each section.
The storyboard is further divided into two lines. The upper row shows you the set that you have selected, and the lower row shows you the scenes that have been selected. If they are open, you have not selected any scenes. Just click one to start shooting the film.
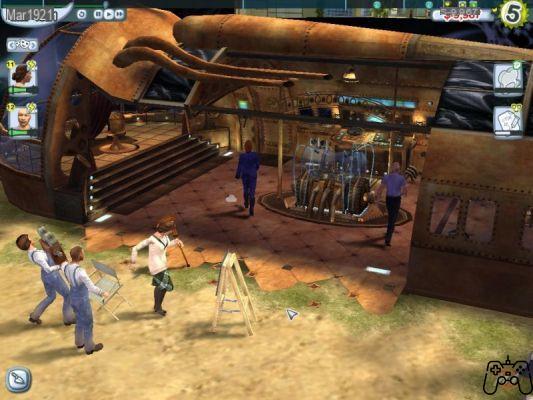
To illustrate, let's consider the possibility of being working on the creation of an action film; moreover, this type of set is available from the beginning, so an example of the genre appears to be valid for the entire duration of the game. Click on both white boxes of the storyboard, and you will be presented with a list of available sets. If a set is dimly lit, it means you have it available in your lot. If it is slightly dimmed, you will be shown the cost of the set itself. You can still write a movie using the set not yet yours, but you will have to buy it before you can shoot the scene.
Click on the actual scene, and the game will provide you with a list of all available scenes. Some scenes are blocked from the start, and need to be searched for. The availability of some other scenes is dependent on the choice of set. All the buttons at the bottom are filters. If they are colored white, this means that the filter is off. All filters are turned off as soon as you get to this screen, with the exception of the hint filter. However, this is also disabled if you have selected the free structure. Practice with the filters.
For example, let's look for the "Show a Card" scene. Turn on the Introduction, Accidental and Amorous filters by clicking on them, and the list will decrease in volume. Choose the scene we have indicated to you. The game will load for a moment, and initially it will seem like nothing has changed; this is due to the fact that the camera is located 30 meters above the stage where the scene is to be shot. Press and hold the right mouse button, and drag the mouse to rotate and zoom with the camera. You will see the scene being played by the mannequins or the actors. Each actor or mannequin you see represents a position that the actor can occupy in the given scene. If you notice, the person in the center is doing most of the acting. The person on the left is basically reacting to the behavior of the one in the center, while the one on the right is not doing anything.
This situation illustrates the importance of mannequins. Suppose you don't want the third person for this scene. Look at the star cards on the left of the screen, and you will see two arrows. Click on them to find the mannequins. Now, click and drag the brown mannequin down, and place it on the person of your choice. Some sort of border should appear on your selection. Release the mouse button, and the mannequin will take the place of the given person.
Now, having positioned the mannequin in the actor's place, and the mannequin not being part of the scene that will be shot, in the final scene we will only see the two actors who are left, that is the one in the center and the one on the left.
Moving actors who are already in the scene is equally easy. Place the mouse over a star until a white box is visible, then click and drag the star onto the scene as you wish. Normally, when you move an actor from one position to another, it will be replaced by an extra by default. You must put a brown mannequin or other actor in its place in the old position, unless it is your goal to use an extra.
If you need to edit a scene, double-click the bottom row of the storyboard. You can double-click on the top row as well if you want, but that would force you to choose a new set as well.
Edit the details of a scene
There is also the possibility to modify a scene in a totally personalized way. You can do this using the buttons on the right side of the screen. We will now deal with describing them.
Starting from the top, and working downwards.
- The first button leads to the tutorial. It is a good way to start.
- The second button takes you to a screen that allows you to add embellishments to the set. Be careful not to overdo it with additions of this type, as the only thing you will get is the confusion of the viewers. These additions can, in general, change the theme of the set, giving it a different, so to speak, "mood".
- The third button allows you to change the objects you have placed with the second button. You can thus swap the positions of the objects that are used in the given scene. For example, if an actor has a gun in his hand, you can use this button to change the type of gun. You can also remove the object from the scene entirely, but the animation will remain; useful for making the actors mimic the movements.
In general, if the object is placed in the hand of a mannequin that does not appear in the film, the object will be seen, not even in the scene. There is an exception; it is the horse - even if it is ridden by a mannequin, it will remain part of the scene. You have to disable the horse via the appropriate button if you want to make it disappear.
- The fourth key concerns the weather. You have options for flashes to appear right from the start of the game, but you will need to research a few things to be able to change the weather. You can also have the lightning simulate a time of day, such as morning, evening or afternoon. The various types of weather available are clear, rainy or foggy.
- The fifth key concerns the background. The vast majority of scenes use the background for specific effects. Changing the background from a rather scary black typically cemetery to a warm, sunny desert road can dramatically change the mood of the whole scene. Normally, it would be best if your background matches the lightning and weather you have selected. In fact, if they are conflicting, they could confuse the audience, and will generally give a rather tacky appearance to the whole scene.
- The sixth fret takes care of changing the brown dummies. By default, the brown mannequins are "on", they are visible. Obviously, this is necessary to visualize all the possible positions in which you can put your actors, and it gives you the possibility to move the actors to the positions previously left empty. In any case, you may want to remove the mannequins as soon as you finish a scene to see more clearly where you have positioned the actors.
- The seventh key is the Direction key. This key is the one that has the biggest impact on the scene. It allows you to change various things depending on the scene. This could include the level of violence in a fight scene, the actors 'mood during the conversation, the actors' reaction when something happens in the scene, and so on. If your choices turn out to be inconsistent, the entire intelligibility of the film itself will suffer greatly.
- The eighth button allows you to access the makeup department. If you are watching a specific scene, you can bring an actor here to change his outfit for that scene, only for that one. Given the precise mode of operation of the department, you can use a single appearance, making it up differently, for different scenes in the film. Or, you can change the clothes of one of your main actors for some scenes, for a specific reason, for example: after a fight, you make up the actor so that he looks injured.
- The ninth key is used to delete the scene. Click and drag from the storyboard to this button to proceed.
Completion of the scene
Once the movie is complete, click the symbol at the bottom right of the main screen. This will take you out of the Advanced Movie Maker, and the completed script will be next to the custom script office. You can now click and drag to bring the scene to the casting office so you can start shooting it. Remember that if you run into any problems, you can grab and drag any script or movie back into the advanced movie maker to switch scenes and re-roll them. Until you have fully released the film, you can still go back. In the completed film, there will be the opening credits and the closing credits. The actors and characters that appear in this list will only be the main actor along with his character. If you want the names of all three of your main stars to appear, you will need to shoot a scene with all three stars, and leave it as the last one to view before exiting the advanced movie maker.
In case you have already upgraded the game to version 1.1, this problem will not occur, and in the initial titles all the names of the main players will automatically appear.
Post production
In the real world, post-production work usually consists of inserting typically computer-generated graphics that alter the various objects in the film. In the game we're talking about now, it's not as complicated as it is in reality. In post production you will put the finishing touches on your film, cut out the scenes you don't particularly like, and try to solve the problems that arose at the last moment.
You can access the post production via the Movie Player option from the main menu. You can re-roll the scenes if you notice any issues whatsoever, adding subtitles, changing the music, exporting, and so on.
Let's now list the keys present in the post-production screen:
- The button on the top right is the tutorial. Again, this is a good start in case you are not particularly familiar with post production.
- The button just below gives you audio options. You can disable some sound effects, such as background noise, which can be annoying.
- The next two keys are the keys that refer to the fade. Click on a storyboard scene, then click on one of the buttons to choose whether to fade in or fade out. This will add a half second to the previously entered fade, which can help you switch between scenes.
- The next key allows you to divide the scenes in two. It works a little weird. Above the storyboard is a bar, which is, let's say, a "bug". The bug, and the vertical bar, move along the storyboard as the film is shown. If you pause, the bug and the vertical bar will stop. Then, if you click the scene separation button, the current scene will be divided at the point you selected. The goal is mainly to create a separation and then erase the second piece of the scene.
- You will need the next button in case you upload your movie online. In fact, when you upload to the official Lionhead site, you will be asked to also upload a small photograph for the film itself. By clicking on this button, the game will take a small screenshot of your scene. The site will automatically recognize the photo if you upload it.
- The last button in the group, on the right, is the trash can. Click and drag to remove the music and subtitles. To delete a scene, first select it, so the storyboard background will change briefly to green. Then click on the trash can, and say yes to the confirmation request.
- The set of buttons at the bottom right is used respectively to: save, load and export your movie. Details about exporting your movie will come at the end of this section. When saving and loading, you are saving and loading using the game format, so it won't take long.
- The set of keys in the middle are the playback keys. Anyone who is at least a little familiar with an mp3 player, recorder, or walkman of any sort will be able to use this group of keys with ease. And the others, well, they will learn.
- The key to the left of the rewind key is the key to see the technology. In the internal player, you will see the available effects in the date era. For example, if you shoot a movie in the 1930s it will always be in black and white and with poor quality audio. Even with all the technology available, there will always be these problems relating to different eras. When you have to export a movie, all these effects go away. You can use these buttons to turn the above effects on or off.
- The zoom key does not zoom on the whole screen, but on the storyboard. This allows you to make small corrections to the subtitles and the length of the music. Each click zooms in a little more. After reaching the maximum level available, you will return to the beginning, that is, the minimum zoom level.
- The button at the bottom left opens the advanced options, which we will talk about later.
- Finally, the top left button exits post-production. If you are in the game, click here to exit the game. If you are watching the movie player, you will be returned to the main menu.
Advanced options
The most substantial part of the post production will be visible to you only after clicking on this button, which is located at the bottom left of the screen. You will see the film move towards the top of the screen. The lower part, on the other hand, will be filled with various keys to completely refine your film. Here is the list:
- The first line allows you to put subtitles. Double-click anywhere on the bar, and a text box will open in the center of the screen. Here you can write whatever you want to appear as a subtitle in the scene. You can change the type of character in the bottom, to differentiate the various voices. Click on the small V when you are satisfied with the result. Now, you will see a part of your subtitle in the bar itself, at the point where you previously clicked. Here the subtitle in the movie will appear. Click and drag the small arrow on the right side of the subtitle to enlarge or shrink it, so that the subtitle appears for longer or shorter periods of time. Remember that the general line would be better to respect a timing that goes from 2 seconds to 4 seconds every four words. To edit a subtitle, double-click on it. To delete a subtitle, try to modify either all the text, or delete it completely by dragging it to the trash and then rewriting it.
- The second line of available options refers to the soundtrack. There is a default song depending on your era and the chosen genre. Generally, it is not of good quality. Then delete it by bringing it to the trash. Now that you are working without interference of any kind, double click on the area you defined, and you will see a list of default songs in the game. There is no way to be able to see a preview. Double-click on one that inspires you to insert it into the movie. You can click and drag the music as you did for your subtitles. The bar there will show you the title of the music you have chosen, as well as its length. You have no control over the length, but you can manually trim the music before it ends. You can play as many songs as you like. Generally it would be better to have the music play early in the scenes, but the choice is yours, as is the case with everything else. If you want to put your favorite music in the game, you will need a decent audio editing program. Then save the music as an OGG file in the Documents directoryThe MoviesMovie Music. To the right of the music area you can see a bar that controls the volume. By default it is 0.5.
- Next, you can see the area to check the sound effects. Similarly to what we saw for the music area, but only useful for very short sound effects. In the game itself there are a few. Most scenes already have them predefined, so you won't have to work much with this button. Here, too, you can use some sound effects you have created by placing them in the Documents directoryThe MoviesMovie Sounds. You can also preview the sound effects by double clicking on them in the selection box. You can also right-click on a sound effect that has already been entered to change the volume. You can alter the volume both on a global scale and on an individual scale.
- In the lower advanced options area there is an area where you can record your personal dialogues. If you have a microphone, you can record your voice from within the game and use it as a sound effect. Also, once you record a dialogue section, you can double click on its bar and link it directly to one of your actors. In this way the game will try to synchronize the character's lip to the dialogue you entered. It works very well. The game will automatically turn off background noise, of course.
Video - Movie created by a player


