


Please note:
The solution is based on the US version for Xbox 360 of the game, so there may be differences in the Spanish version and / or for other versions.
Section 1
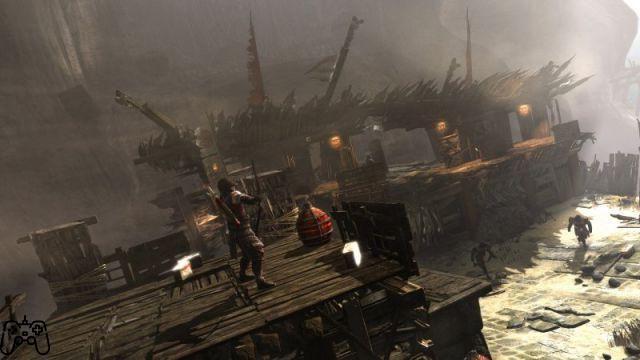
Move Lara left and right so that the bag on the right catches fire. Then move it towards the burning pipes, making it fall to the ground. Remove the sting, then go through the sacrificial chamber, burning the debris. Proceed beyond the crack, turning the flashlight back on. Jump to the platform on the left, setting the pipes on fire. Move along the tunnel, passing the sequence in quick time. Move the analog stick left and right, continuing forward. Light the torch, burn the flag, climb the catwalk, jump onto the cage and set the debris on fire. Move them to the opposite side, thus going down the tunnel.
Jump across the next platforms, jump over the ravine after the tunnel, then alternate trigger presses to proceed. Move the analog stick to the left, re-squeezing the triggers, and moving forward again.
Straight up to the tree, following it to get to a plane. Climb along the plane using the platforms, holding on. Move up by pressing the left analog stick, jumping with A. Walk the wing, then the nearby wall, picking up the radio. Glide to the next area.
Section 2
Continue straight to base camp. Upgrade your skills, then watch the cutscene and continue forward. You will now have to take care of hunting a deer - there are plenty of them within the forest. We recommend always aiming for their head, holding down the right trigger for a few seconds, so as to accumulate more tension and be able to kill them with certainty. So go back to the camp to make the "level up" that you are entitled to following the killing of the deer.
After the cutscene, proceed to the bunker and enter. Approach the ladder, go down, go through the tunnel. Examine the table, recovering the relic. Burn the wooden debris on the left, proceeding beyond that side of the room. Continue along the tunnel, climb the ladder, watch the cutscene. You will therefore find yourself inside the "Forest Ruins".
Section 3
Proceed straight to reach the bridge in the center of the play area, pushing back the wolves in the area. Walk along the next game points, avoiding the areas densely populated by wolves. You will gain several life points after you meet Whitman. Unfortunately, the nearby wheel will not move in any way, and will not have a handle - we therefore recommend that you follow the instructions that will appear at the top of the screen, to complete a short event. You will then have to go back to Whitman, and proceed to the next section.
Section 4
Hide behind the wall, taking the next path. Hide again waiting for the guard to pass, then run up again. Enter the nearby building, go up the stairs after the guard passes. At the top, wait for the guards to turn their backs towards you, entering the building on the right. After the cutscene, you'll get the gun. Move to the walkway to the east, climbing the stairs at the top. Get rid of the two nearby guards by retrieving the pistol ammo. Examine the bodies of the guards, then enter the next building.
Re-exit the opposite side, follow the walkway. Hide behind the nearby cart, shooting at the guard above, using an arrow. Climb the wall, grab the ammo, jump along the pipes and climb up. So hide behind the nearby crates, waiting for the two nearby guards to finish their conversation. One of the two will therefore approach, turning around. Kill her with a headshot, repeating the operation on the next. Continue forward, shooting the third guard on the way. Grab the arrows, then examine the life-point box on the corner, climbing the nearby rope. You will reach the mountain temple village.
Move to the bridge, go up the stairs, hide behind the nearby low wall, listening to the conversation with the two guards. Hit the left guard with an arrow to the head, quickly killing the next one. Then move to the area of the building in the upper left. Keep climbing the wall, thus retrieving the objects from inside the building. Go back to where you killed the two guards, waiting before going up the stairs. Instead, examine the adjacent grassy area. Go up the wall, get the chest under the roof. Move beyond it, retrieving a GPS from the platform next to the chest.
Go up the stairs, enter the building. Silently take out the next two guards, then hide behind the crate. Then hit the lantern placed next to the piece of leather. Go along the wall to the left, shooting at the guard positioned on the walkway. As soon as it comes back, get rid of it again quickly, with a blow to the head. Jump over the ravine, locate the lantern and hit it. Then go up the stairs, arriving at the mountain village.
Section 5
Proceed straight into the wolf lair, retrieving the package at its end. Then go back, finding yourself in front of a quicktime event: move the analog stick to the left-right, press Y, X, Y, Y. Retrieve the "contents" of the corpse, then return to the camp. After the cutscenes, grab the ax and use it to climb the nearby mountain (we highly recommend using the wall next to the lower waterfall as a foothold). Then go up to the top, arriving at the Tomb.
Tomb of the Unworthy
Pass the camp near the cave, then the waterfall. Run to the cage, climb it, jump to the opposite side, lighting the torch. Climb onto the cage, burning the three bags. Press down on the nearby cage, then go up the next flyover to reach a scalable wall, arriving at the next treasure. Take it, then continue to the next tombs. Climb the wall of rocks, then jumping to the next one, located between the two falls. Climb to the top, awaiting the end of the conversation between the guards. Hide behind the speakers, waiting for the end of subsequent conversations. Hit the guard in the head, move to the side to finish the next one as well, recovering the arrows behind the crate.
Move to the next building, retrieve the GPS, then climb yet another wall of rocks. Proceed to the second floor, then head to the document near the building beside the river. Examine the "Cache" for the GPS visible on the roof. Go back to the first building, climb up to the roof again, move to the platform in the center of the falls, then jump to the platform on the right and retrieve the lantern.
Climb along the wall of rocks to the bridge. Throw your ax at the rock wall, jumping in its direction. Slide to the rope, starting the fight. Dodge the Molotov cocktails, waiting for the third subject to arrive, to finish it quickly. Finally, get rid of the third, then recover the nearby arrows and the bag, thus moving towards the next area.
Section 6
Collect the relic next to the only visible tree near the camp, as well as the GPS next to the trunk. Continue along the corridor, you will then hear some guards. We recommend using a "stealth" approach, killing the first guard as you approach from behind, throttling him. So hide behind the sandbags, then examine the movement of the nearby light. As soon as you are illuminated, move to the left and throttle the guard in the area. So hide behind the bags in the area, then kill the guard on the right by hitting him in the head.
Go forward, kill the salad bowl, then shoot at the "responsible" guard of the lamp while you are still in the corridor. Go around the corner, locating a next guard and finishing it too. Once this is done, you can easily proceed towards the inside of the base.
Section 7
Move along the stream, then take the confessions from the table. Having heard the two guards, turn the corner and turn the nearby valve to stop the gas. Proceed beyond the crack, look around the corner to locate the two guards moving the explosive barrel. Fire as soon as they are next to it, causing it to explode. Then turn on the torch near the barrel, continuing towards the room to the left of the stairs. Get the arrows from inside, then go up the stairs and fend off the guard who will attack. Move the nearby debris, climbing along the wall to get to the generator room. Throw a lantern at it to destroy it.
Go through the hole above the glass, turn the valve, go back along the hole, grab a lantern and throw it into the hole. Approach the guard and grab his rifle as well as the flag on the corner. As you enter forward, you will be ambushed. Get rid of one of the enemies on the slow motion path. Hide behind one of the blue barrels, grab the ammo. Destroy the lights and get rid of the nearest enemies, then jump to the opposite side as the grenades are thrown at you.
Examine the adjacent room for more ammo. To reach the camp, use the semi-destroyed door so you can make your way to the walkway. Then take the nearby arrows. Go down the next corridor, get rid of the guard, enter the control center and observe the cutscene. Examine the area for ammo by picking it up from the table. Move inside the hole to the north.
Video - Launch Trailer
Section 8
Cross the bridge, thus completing the next quick time event. Hide behind the nearby wall, letting the enemies pass. As you progress forward, more opponents will descend from the building to the right. Go back and kill the ones with axes and swords, then still visible on this building. Turn the corner, aim for the explosive barrels inside the next building, causing them to explode. Continue forward, causing the next wave of enemies to appear. Throw yourself to the side, killing them one by one.
So move along the wall to the west. Get rid of other opponents, especially those who will throw Molotov cocktails. Drop down, meeting the guard with the shield. You can easily defeat it by dodging often and willingly; when he tries to hit you with the machete, press B and quickly move to the right to dodge the same blow. Then aim at the guardhouse to finish it off. Then examine the area to retrieve the items.
Enter the building, climbing the stairs to get to the "base" camp of the radio tower. Examine the carpet, taking the document. Glide along the rope to the previously inaccessible platform. Get the shotgun and the treasure map. Climb the rope to the west to get to the radio tower. Climb it, thereby "activating" an intermission scene. Move the analog stick to the fourth zone, clockwise, then listen to the message.
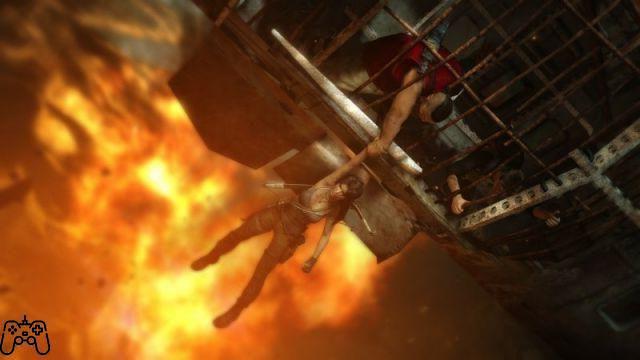
Glide along the rope, approaching the gas cans. Turn the valve, taking out the ammo. Set the nearby canisters on fire, observing the next scene. You will therefore have to get Lara down, but making sure that she does not hit the "stinging" obstacles. So jump to the catwalk on the right.
Section 9
Use the various "flying" trapezes to reach the end of the game area, overcoming the various ravines. Once near the last house, start inflicting damage on the enemy with a shield, using the same tactics as the previous boss (repeatedly dodge to the right and left). Move along the next tunnel, go up the stairs. Eliminate the three enemies, recovering the rope. It allows you to "pull" objects in the area. First pull the pillar visible under the cabin, thus "starting" the fight. We recommend that you first take care of the subject with Molotov cock inside the building. Then locate the arrows on the ground, take them and make your own also the crate on the platform immediately beyond the river. Proceed upwards, following the walkway. Carefully examine the play area, then take the nearby arrows and destroy the next door, making your way to the end of the tunnel, where you will find yourself with Roth.
Section 10
Create a rope bridge and slide down, hiding behind the fence. Wait for the third guard to leave, thus getting rid of the other two. Exit, go up the stairs, take the statue. Glide along the rope, scanning the area under the hut for the GPS. Enter the hut, jump along the platforms to the north, recovering the statue. So create a new bridge that leads to the trunk, so that you can eventually go back with greater ease.
Climb up to the roof of the hut, lighting the torch and moving it from the bag, so that it catches fire. So create a rope bridge that runs north-east from the tent itself. Wait before climbing the last part of the rock wall, until the two guards finish their conversation, proceeding into the tunnel on the left, where you will find an illuminating statue. Get rid of the two nearby guards, then create another bridge to get to the entrance to the tomb.
Hall of Ascension
Move forward along the cave, recovering some fragments of the shotgun. Keep moving along the tomb, thus creating a curved arch. Proceed along the bridge, arriving at the puzzle. You will now have to carry out the following maneuvers: close the locks, move towards the valve in the center, wait for the first lock to open, then immediately turn the valve again. Then climb onto the platform, projecting yourself towards the platform attached to the ceiling. Wait for it to proceed forward, then jump to reach it. So use the tube to reach the previously inaccessible platform. Collect the items, then return to the village to proceed.
Then create a rope bridge to the platform on the far left, recovering the nearby statue. Drop into the adjacent platform, then retrieve the relic from the bridge. Create a rope bridge to reach the central platform, retrieving the GPS. Return to the statue to the north, creating a subsequent bridge to the platform to the east, retrieving a document from the table.
Keep building bridges, arriving at the western platform closest to you. Climb the wall, taking another document, thus recovering the egg next to the rope itself. Create a bridge to the platform to the west by moving towards it. Now, from the southwest platform, create a next bridge to get to the smoke signal.
Section 12
Glide down the path, proceeding along the pass, retrieving the plant before reaching the cave. After the cutscene, move the analog stick in both directions, allowing the keys indicated on the screen to reach the hole.
Collect the Shotgun ammo next to the corpse, then continue to the end of the walkway, destroying the wooden barriers. Jump over the ravine, enter the hole at its end, arriving at a circular tomb. Equip your shotgun by shooting the three enemies in the area. So shift your weight to free the portal. Move along the tunnel, arriving at the alcove. Grab the ammo, break the barrier, approach the walkway, entering the next building.
Quickly get rid of the enemies, then grab the shotgun ammo from the left corner. Go up the stairs, killing the savage. So open the barriers on the side, pulling the weight with a rope, so that it hits the pillars on the side. Close the barriers, opening those on the opposite side, then pulling the weight again. This time, it's going to hit a pillar. Take out the shotgun and take out the enemies. Open both barriers, pull the weight one last time to bring the bell down.
Run down the corridor, jumping towards the rope. Shoot through the two barriers using the shotgun, observing the next cutscene.
Section 13
Go out and sit down. Follow the river for a few seconds, retrieving the items. So, to burn the second bag, light the first torch and jump over the bridge. Pull the extinguished torch, then go under the bag and pull it in the same direction. Also take the GPS nearby. Go back to where you came from, creating a rope bridge along the left side of the wooden bridge, reaching the previously inaccessible path. Jump to the top of the arch to get the items on the nearby platform.
Recover what you can from the three enemies, creating a rope that leads to the first house. Take the GPS to the right, then break through the nearby barrier and proceed inward, triggering a cutscene. Climb upstairs, moving towards the bell and jumping along the pipes. Destroy the barrier on the ground, recovering the ammunition. Then go back to the camp on the lower level, creating a bridge to return to the building to the east, across the river. Jump across the ravine to the east, sliding along the rope.
Mountain Descent
Wait for the guard to take a good look at the area and leave, then hiding behind the fence. Shoot at the lantern before the guards finish their conversation. Swerve to the right, moving along the arch to get the ammo. Jump to the platform on the right, killing the last two subjects. You can then go back to delete the others as well - if you want. Then cross the river, starting the descent.
Position yourself in the center of the river, avoiding the quills on the sides. During the next fall, press X or square, then B or circle, so always try to stay well away from the trees.
Section 14
Proceed forward, then letting yourself slide down. Examine the area to the left, recovering the fragments of the shotgun. You can also pick up some arrows in the area. Proceed beyond the hole on the right, making your way straight to the end of the path. Once outside, hide behind the crate, killing the subject at the top of the building, preferably with a headshot. Beware of the red explosive barrel located near the stairs: shoot in its direction as soon as the enemies approach, so as to make it explode. So examine the play area to get some arrows along the walkway, then go up the stairs and retrieve the other objects. Straight ahead, grabbing some more shotgun ammo. So move along the pipe, crossing the ravine and killing the two nearby enemies. Turn the corner, pushing back a third. Once you get to the helicopter, hook onto its back by throwing the rope, so you can then enter. After the cutscene, you can retrieve the fire arrows.
You can use them almost immediately, killing the enemies below. Wait for some of them to start hiding in the building on the right, then hit the explosive barrel next to the fence, eliminating some of them. You can therefore explore some areas of the city, recovering various objects and ammunition.
Near the initial area, you can therefore locate the base camp "Helicopter Hill", corresponding to the north-west corner.
Section 15
Destroy the planks in the room now, dropping down to retrieve the GPS. Go through the cave, then - before going down the ladder - look straight ahead to see a bag, which you can hit with an arrow. You can find a second one hanging from the ceiling on the right. Then go down along the wall of rocks, pass the crack in front of you, entering the tomb. To solve the following "puzzle" you have to do the following: throw the three jerrycans on the platform, remove a container from it, exit the platform and then climb up, and climb up again to get to the nearby pipe.
Exit the cave. Proceed south. Push back the enemy neighbors, but try to always stay behind the crates. Examine the play area, recovering some ammo. Spin the wheel to proceed.
Section 16
Slide down to the square, recovering the effigy on the right. Go up the stairs to the left, walk to the walkway, destroy the nearby barrier to get the shotgun fragments. Walk forward through the mud, grabbing the arrows. Move towards the bridge, proceeding from crate to crate to avoid the hits of the enemies. You can then explore the game area to get various items to collect.
Having made them yours, move northeast from the walkway. Once near the windmill, push back the enemies and proceed to the next area.
Section 17
From the "Windmill" base camp, proceed to the east entrance. Examine the left area of the first circular chamber, retrieving the GPS from the grass. Keep going, sliding down the next slope. Move along the pipes until you reach the fork. Proceed along the path to the right to enter the cave. You will now have to tackle a short puzzle. First jump off the ramp on the left, thus "breaking" the platform. Place the Jerrycans towards the end of the ramp on the right, then run forward and throw the ax to the next wall, reaching the chest on the left. Climb the pipes to reach it.
Collected the objects, you can exit the cave without problems. Move to the top of one of the crates, being carried to the opposite side. So equip the rifle and start eliminating the subjects that come down from the platform. Then move on to those placed in the tower above. Move from cover to cover, always trying to avoid the enemies. We therefore recommend shooting repeatedly at the visible subjects inside the next tower.
So use the rope to reach the tower, climb to the top and continue towards the wall of rocks to the southeast. Then continue to the "Vista Tower" camp, crossing the large bridge, entering the nearby house and reaching the bridge. Jump ahead, then follow Roth's instructions to get to the opposite side. Climb up the wall of rocks, recovering the nearby additional life points. Move along the tunnel, then along the following cave continuing completely straight.
Section 18
Move to the left, then go up the stairs. Move through the blood, climbing the path until you reach the arrows. Use a "burning" arrow to zero the gas at the top. Move beyond the hole, arriving at a camp. Proceed to the next corridor, approaching the checkpoint. After the cutscene, go down the walkway. Observe the nearby stalactites. Shoot them with a "burning" arrow, causing them to melt.
Drop down and hide behind the debris until the cannibals disappear. Proceed beyond the portal to the east. As you walk up the stairs, swerve to the right, hiding behind the stalactite pillar as the two Solarii guards approach. Then examine the right wall, continuing forward and hiding behind the wooden fence. Then go up the stone stairs that lead back to the south. Turn the valve before reaching the top, thus shooting an arrow at the gas, to proceed.
Climb on the crate, then continue towards the walkway. After the conversation, go up the nearby walkway on the left, arriving at the platform with the wall of rocks, go up. Move to the end of the walkway, getting rid of the Solarii guard. Continue to the right, get rid of the following guard using a flashing light. Also examine the "hidden" area to the left of the altar. Climb the stairs again, locating the valve to create a subsequent gas leak. Open it, then use a rope to pull it towards you. Shoot an arrow at the gas, run down the walkway, then slide down and keep running forward until you can climb to the next area. Wait for the guards to complete the conversation, then pick up the arrows. Turn the nearby valve, then shoot towards the gas and retrieve the next arrows again. After the explosion, you can proceed forward and jump to the cage.
Then shoot the "gaseous" area to the left of the cage, then project yourself to the right, climbing to the top of the cage. Jump to the nearby platform, destroy the two valves, then shoot at the enemies using burning arrows. Jump to the yellow cages, go up the stairs and open the double doors using the ax, reaching the Solarii palace.
Section 19
Walk down the hall, bowing under the burning boards. Then continue to the next corridor, where there will be some enemies. Project yourself to the roof, climb along the wall, jumping from pipe to pipe. After encountering the enemy, continue along the walkway, viewing an intermission scene. Go up the roof again, sliding along the rope. Jump behind cover to quickly take out the two nearby enemies.
So jump to the opposite side of the play area, trying to use the right "timing". Climb along the wall, arriving at the ceremonial hall. Pick up your weapons, using the assault rifle to take out the nearby enemies. When the Solarii come from the side, we recommend jumping to the nearest cover so you can take them out quickly. Proceed down the corridor at the top left. You will find yourself in front of other groups of Solarii, get rid of them by taking all the necessary ammunition. Other enemies will arrive on the scene, locate one with a shield, dodge his sword and hit him with the Shotgun aiming at his body. Exit, observe the cutscene.
Continue to the right, jumping behind the nearby walls. From the far right side, you can proceed up to the left and climb the wall. So jump to the rope, climbing it. After the cutscene, fire using the grenade launcher. Collect the nearby ammunition, then break the double doors. Drop down again to gain access to the Solarii fortress. Here it will be possible to upgrade the Shotgun. Then continue up the wall, taking the ammo from the walkway. Continue to the final area, retrieving the grenades from the metal barrier. Break as much as you can by moving forward, thus sliding along the rope. Go down the stairs, fending off yet another wave of enemies. Collect the ammo behind the shrine, then turn the corner and push the gunslinger back behind the turret. Move from barrel to barrel until you reach the building on the left. Climb up, hiding behind the crates, killing the enemies on the other side of the road.
Go through the building, recovering the grenades inside. Therefore, destroy the turret using always a grenade, preferably aiming towards the outside of the window. Slide along the rope to reach Sam. Collect the shotgun ammo next to the doors. Climb along the structure to the right, grabbing the next grenades at the top. Slide down again, climb the next wall to enter the building. Make your way to Lara's play area, avoiding the fire. Jump along the pipes, reaching the wall on the right, which - climbed - allows you to exit the building. Move Lara along the bridge, then begin to walk the nearby wooden planks. Jump over the ravine, using the pole to proceed forward. At the top of the wall, jump onto the wooden railing and climb it. Walk forward, jump to the chest, grab and jump to the last pipe of the building, thus managing to reach the outside. Climb the next wall, going up the pipe to the right, and climb the next one again to reach the helicopter.
Section 20
Pick up the document near the edge of the ravine. Pick up the silencer from nearby, then start proceeding in a "Stealth" manner. Wait for the opponents in front to complete their conversation, then flash a flashlight at one of the two guards while she is looking to the opposite side. Then take the arrows from the rock on the right. So continue straight ahead, remembering the possibility of "zooming" by pressing the right analog stick. Then move to the left-north, eliminating the guard located near the bridge.
So instead of crossing the bridge, go south, staying adjacent to the wall. Headshot the neighboring guard. Keep following the west wall, up to the stone platform, behind which you will have to hide. Get rid of the nearby guard by hitting him with the arrow. So move east, hiding behind one of the trees in the southeast corner. Wait for the nearby guard to move in the same direction, then take it out.
So hide behind the plates, looking east to locate another Solarii guard. He quickly hit her in the head. Then move towards your companion, passing the camp, to locate the last one I looked at and eliminate this too at speed.
Three more guards will appear near the checkpoint to the east. To eliminate them, we advise you to move towards the hut on the left, shoot an arrow at their back, then kill the next two close to each other. Then continue towards the Stromguard.
Section 21
Collect the arrows next to the camp. Shoot some arrows at the torches that "hang" from the wall, thus hitting the area full of barriers visible above. So go up, then turn left and go up the upper walkway, locating other arrows. Look at the area on the opposite side, locating a climbing wall on the right. Before climbing, we recommend that you shoot the debris at the top, using a "burning" arrow. So jump ahead, proceeding to the top to retrieve the treasure chest.
Video - Survival Guide
Section 22
Proceed to the checkpoint to the east. Cross the bridge, destroy the door by hitting it with a rope-arrow, then proceed along the cave until you reach an area containing several caged wolves. Climb the ladder, shoot another arrow to make the deer crash towards the pole, then jump on the pole itself and use it to climb along the wall. Continue forward, sliding Lara down. Continue further along the linear path, passing the bats on the right. Slide down the rope again, you will then be contacted by Alex. Slide along the next two ropes, recover the Shotgun fragments, jump on one of the two cages.
After the Gondola stops, shoot an arrow at the rope visible on the nearby platform. Climb the yellow ladder on the corner, slide along the following rope. So start fighting. After the cutscene, proceed upwards, therefore sideways, until the next one appears. Jump across the ravine, then slide along the ropes. Grab the next one, then shoot at the barriers near the river, using the shotgun. Then enter the crack at the end of the path.
Section 23
Proceed first to the camp, then continue to the checkpoint to meet your companions. Talk to all of them, then proceed to the next section.
Section 24
Proceed west of the beach, climbing onto the scaffolding. At the tower, move south, looking at the sea area to the west. So get on the crane and retrieve the rope. Drop down, then examine the sea on the left, and project yourself towards the rock wall. Proceed to the ship, using the platform on the right. Enter the ship, hide in the center to hear the conversation between the Solarii guards.
When they're done, finish off the nearest guard, using a headshot. Then take the contents of his bag, then jump to the next area of the ship. Get rid of the next guard, visible on the elevated bridge. Go up the stairs.
Proceed to the front of the ship, moving sideways. Once in the front area, quickly hit the big acora, and take everything you can and then move towards the mainmast. You will therefore find two enemies above; after their conversation, return to the mast. Hit the remaining opponents from afar, staying on the right side of the bridge. Also don't forget to grab the relic from the area on the left, then jump to the next area. Get rid of the fanatical neighbors, then go down the ropes and return to the camp. Having taken the arch from Jonah, talk to everyone present and proceed towards the south-east area of the beach, thus walking to the end of the port. In front of you you will find some rocks; we recommend that you shoot your rope towards the others on the left, thus reaching the platform to the north, which contains a memory for GPS. Climb the ship's mast, reaching the top. Go down one level, examining the room to the east to get the relic. Drop to the lower level, then - to get back up - jump from the end of the rusty pipe to the upper level.
Now, to continue, you can slide towards the rocks to get to the walkway to the south. Then approach the next building to locate the two Solarii. After the conversation, kill them from a distance. To proceed with the story, you will have to jump on the concrete pillar visible below, near the burning barrel. Continue from here towards the walkway. At the top of the tower, drop onto the balcony on the right, then destroy the barrier and return to the top of the tower to go down the rope, arriving at the next platform. Listen to the conversation between the two Solarii, then kill the guard on the left, then quickly kill the next one as well. This way you can easily reach the flooded area. Go up the stairs, grab some Shotgun ammo, and press the buttons that will appear on the screen. Go down the stairs, open the doors. Locate the raft on the left - approach the rope that holds it "tied", and burn it. Then move to the generator room, on the opposite side. Collect the shotgun ammo along the way.
Destroy the barrier, thus pulling the raft towards you. Jump on it to reach the opposite side of the wall. So place yourself on the steps, looking upwards. Shoot a string arrow at the iron weight, so that the electric wire "comes out" of the water. So jump to the opposite side, walking on the next catwalk. Then pull the raft in your direction, bringing it closer to the electric object visible in the water. Pull the iron weight down so that the electric object hits the raft. When the path is clear, move forward in the water to reach the stairs on the corner, then reach the treasure. Then go down towards the field, reaching the rope.
Keep going along the wooden walkway to the east, then jump to the pole, moving towards its end. Shoot a rope at the rocks, reaching the next platform. Proceed to the nearby semi-destroyed building, then grab the scroll in the area. Then locate the metal barrier on the right, going through the next tunnel to reach the next play area.
Section 25
Pick up the GPS on the left, then stand near the nearby pole and shoot an arrow at the wall of rocks in front of you. Climb the pipes on the right, entering the bunker. You can then locate a star inside, along with a flag. Burn it to retrieve the first inhabitant, then retrieve the savage near the hole in the wall, and proceed forward.
Eliminate the guard at the end of the tunnel, then hide nearby and hear the conversation between the various Solarii. Collect the nearby arrows, then get rid of the welders left and right. Approach the next guards, one of them will begin patrolling the area - kill her immediately, followed by her two companions. Then move to the right, arriving at one of the two welders. Take it out, then take out one of your guns and detonate the explosive barrel in the center. Kill the eight enemies nearby, then start recovering everything you can in the area. Go through the door on the left, approaching the stairs. Get rid of the Solarii guards, then retrieve the ammo from the nearby areas. Go up the stairs, around the corner, push back the enemies near the main corridor. Jump across the ravine, examine the door on the left. Proceed to the third floor, using your "pole". Turn the corner, hiding near the concrete pillar. Kill the enemies above, climb to the nearby chest, examining the southwest wall.
Take the previous "inhabitants". Proceed to the roof, examining its north side. Drop down, grab the ID next to the field, then continue to the end of the building. Then shoot an arrow towards the lower part of the platform to the east. Glide down, examine the rocks to the left, getting the last GPS in the area. Then slide along the rope, recovering the Endurance.
Section 26
Drop to the wooden crate, then hit the Solarii guard who is conversing, preferably with an arrow to the head. Eliminate the next two as well, using Shotgun shots. After the fight, you will get an item that allows you to "climb" with the ropes, which you will need to destroy the larger barriers.
Use it to get to the objects on the left. So drop into the nearby hole, moving along the corridor to Sam's cabin. Take the document inside, then wait for the Solarii guard to finish his conversation. Move forward along the walkway, hitting the guard in the head, and repeating the procedure for the next guard below. You will then reach the "flooded" area of the ship.
Finding Alex, pull the object that was visible on the roof towards the door. He proceeds upward, beginning to clear the way. Move to the left, holding on to the ladder to move the vehicle. Then move him away from the door, using an arrow. Climb its right side, to get to the opening in the ceiling. Move inside, throwing the tube down. Pull the car so that it moves away from the door, then climb the broken ladder to place it in the proper position. Pull again, so that the hook hits the electric wires blocking the door. The path for Alex will therefore be completely free. After the cutscene, run down the hall, jump on the rope and press X to go up. Climb the crates, then use the rope again to go back. Make your way to the lower area, then retrieve the document. Open the door on the right, jump to the nearby chest, then pick up the relic.
Go back the way you came, destroy the barrier, then grab the treasure map next to the sandbags near the door. Back at the destroyed ship, pulverize the barrier on the left as well, then recover the nearby crate. Push back the Solarii guards, then get rid of the next two using the arrows. Go down to the nearby platform, thus taking the GPS. Retrace the ropes, observing an intermission scene, and proceeding towards the camp to quickly pick up the eighth document.
Section 27
Proceed to the southeast area of the large play area, south of the rock hill. Use the rope to destroy the nearby barrier. Go inside and get the Shotgun Shards. Proceed into the next crevice, then use the rope to cross the river.
When you reach the camp, move to the left to retrieve some arrows. You will then have to turn the wheel using your ax, visible at the beginning of the play area. In this way the animals will move in a circle around the central area, causing the pole to move to the left, so that Lara can reach the previously inaccessible platform. From here, Lara can then shoot a rope at the object below, and continue towards the climbing wall.
Section 28
Proceed northwest, opening the door with the ascension rope. Pull the nearby lever, causing the platform to descend. You will then be able to climb along the rock wall. Move to the right, dropping onto the nearby walkway and then grab the bag. Climb the rock wall to its highest part.
So make your way up to the elevator; Pick up the chest next to the ruins, then shoot an arrow at the tower above, climbing again. Then climb the wall, then curving near the water tank, and climbing the ladder to its top. Pull one of the crates, making them move close to you. Jump on it, then move the second one towards you, and jump forward. Then use the tower to proceed to the platform on the opposite side, recovering the shots for the Shotgun.
So go up along the pipes, moving around the building. Go up the stairs again, wait for the two Solarii guards to finish their conversation, then kill them with headshots. Collect the shotgun ammo, climb the wall next to the gate, move along the pipes and climb the nearby platform as well. Shoot an arrow at the rock wall near the bunker, then proceed to its top. Jump up the ladder to reach the barrier, then continue to the end of the walkway.
Section 29
After falling down, locate the metal barrier, to be destroyed with a grenade. Pulverize the second one as well, then climb the next wall and move along the "blocks". Locate the area beyond the globe of light by taking the first totem of the sun. Jump to the catwalk below. Get the Shotgun ammo from the next room. Locate the research lab, then move around the corner and kill the two Solarii guards.
Open the next door, looking through the window to locate two enemies. Place yourself near the door, then take them out quickly. Jump forward, entering the next opening. Collect the health points, then enter the next opening, returning to the corridor. Move to the opposite side, pressing the switch to call the elevator. Unfortunately, it will not work and you will have to climb on the nearby crates, destroying the rocket with the ax. Then go up the stairs, take the document from the barrels.
Go up to the fourth floor, calling the elevator. Go back to the third, climbing the ladder. Start the second wheel, then call the elevator near the third floor, stand behind it and jump to the walkway. Then turn the third wheel. Only one will remain, unfortunately more complex to withdraw. Call the elevator once you are on the third floor, proceed to the fourth, thus observing the area immediately below the shaft. You will locate a barrier on the right; shoot in his direction using the shotgun. A scalable wall will then be "opened", which moves by curving along the elevator. Call the elevator, jumping on it just before it goes through the opening. So jump ahead, climbing the wall to reach an area previously inaccessible. You can then activate the last wheel.
Now go down, locating the totem to the right of the elevator. Proceed towards the inside of the hole, taking the lock on the left. Kill the guard above, waiting for a second one to come to the area to examine his body; kill her too. Take the ammo for the shotgun, then climb the crates on the opposite side to get a treasure map. Go through the bunker, arriving at the corridor. Retrieve the Shotgun near the blue barrels, then approach the corpse at the top of the stairs, observing an intermission scene.
Two waves of enemies will therefore arrive in the area. Reject the first, therefore - while waiting for the second - we recommend that you project yourself towards the watercourse, immediately behind the stairs. Use the "triple" shot of your pistol to take out the enemies. Having killed them all, move outwards, reaching the catwalk. At its end, you can slide to the right, reaching a wall that you can climb, which will lead back to the ship. Use the rope to move forward, push back the two nearby Solarii guards, then slide forward using the two ropes. Observe the cutscene, then enter the nearby boat to proceed to the next area.
Section 30
Create a rope bridge, thus following the linear path in front of you and observing the resulting cutscene. Shoot an arrow at the wall on the right, entering the castle. Turn the corner, picking up the ammo. Go along the corridor, locating the Stormguards - then shoot the wood in the center, so as to eliminate them in its entirety.
Go through the tunnel, go up the stairs, take the chest on the right. Move along the pipe, then climb forward and pass the Stormguard, killing it after you pass it. Go up the walkway on the left, then slide along the next area, full of corpses. Grab the ammo from the ground, then head across the bridge. Retrieve the explosives from the ground, and eliminate the Stormguards by hitting them preferably in the head.
Turn the corner, dodging the explosives thrown by the nearby guard. Then shoot at the next explosives placed in the center of the tower, freeing yourself of the enemies in their surroundings. Destroy the next barrier by hitting it with the arrow, approaching the gate to view an intermission scene.
Section 31
Pick up the document, open the next doors, then retrieve the next document on the left. Proceed to the second floor walkway, recovering the crate and completing the map. Pick up the relic from the corner. Turn the wheel to the right, then the wheel to the left, lifting the cage. Pull the cage back using a rope, breaking it on the wall above the portal. Turn the lever to the right, dropping the crate back to the ground, turning the wheel again. Go up to the second floor, pulling the cage towards you. Jump on it, then throw yourself towards the fracture in the wall to get to the next corridor.
Walk through it, opening the double doors at its end. Move to the bridge, triggering a cutscene. Collect experience points from the chest on the left. Shoot a rope at the wall, making it to the catwalk above. Climb along the ice wall, placing yourself on its left side and pulling the object towards you. Moving thanks to the wind, it will break the nearby door, freeing you the way. Proceed to the left, climbing onto the platform. Create a string bridge towards its top. Begin to ascend, naturally falling towards a pipe - walk along it, then jump to the walkway in the distance. Approach the wall of ice, throwing your ax at it as Lara comes down. Double jump to the windows, enter. Shoot an arrow-rope at the ice wall in the distance.
Move to the left, jumping to the ice wall on the left. Then let yourself fall down, always throwing the ax towards the wall below you. Move along the right side along the mountain, arriving at a footbridge.
Section 32
Climb the tower, fending off the Solarii guards. After a short cutscene, you will find yourself facing the final boss. During the first phase, you will fight him in a one-on-one, Lara against the Stormguard Oni. The opponent will throw his club at you; you will therefore have to dodge by projecting to the right or left. When he stops, due to fatigue, you can throw yourself towards him and hit him easily.
You will therefore pass to the second phase; two Stormguard-type archers will join the group. These are quite damaging subjects - we recommend recovering the Shotgun and trying to take them out very quickly. The same strategy will have to be used towards the neighbor Oni. In case you have additional grenades available, we recommend using them right now.
The third phase will therefore arrive, similar to the second, but in this case you can further damage the Oni by hitting its face. Unfortunately, he will tend to cover her almost immediately using his arm - we therefore recommend that you always stay on the move, using the Shotgun to eliminate the archers and grenades to hit the Oni. After a short cutscene, all that remains is to complete a quick time event to achieve victory!


