


Please note:
The solution is based on the US version of the game. There may be divergences from the Spanish version.
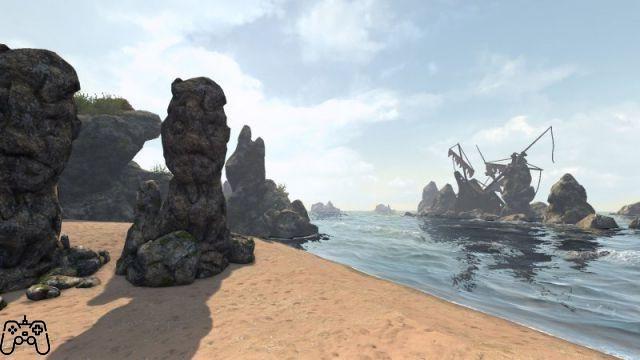
Welcome to Nex
Retrieve the visible root outside by giving it to one of your characters. Then strike the door to cause it to open. Move to the alcove, retrieving the rock from the floor.
Left, give the items to your characters. Turn around and go down towards the stream, so beyond the rocks on the right. Retrieve the club from the floor. Hit the roots on the left, then continue forward, picking up the Aether from the floor. Get rid of the turtle on the right. Move towards the portal, pressing the button next to it to cause it to open. Collect the darts next to the nest. Continue to the light, retrieving the key from the floor on the right. West, towards the sea. Collect the turtle egg on the floor. Proceed north along the beach, picking up the next egg and rock on the left. Open the portal, recover the shirt. Close the nearby door, then read the letter near the pedestal.
Head south, locating the crystal. Examine the tree next to the ship, picking up the knives. Turn around and look at the fruit on the floor. Pick up the parchment near the pedestal. Examine the writing next to the crystal to learn how to use it. Save your game, continue east to start the next puzzle. Place the various objects on the various scales, then place yourself in the center to open the portal. Continue to the opposite side, clearing the Zarchton. Examine the writing next to the flashlight. Head north, destroy the nearby trees to locate the farmer's hat. Right, then west towards the portal. Hit the switch nearby and enter the teleporter.
Quickly kill the turtle nearby. South, locate the sack containing the rocks. Move to the portal, then retrieve the healing potion and the knife near the key.
Go back through the portal, destroy the gate and locate the Zarchton. Take the wooden and salmon chest inside, as well as the parchment and sword. Insert the sword into the statues, causing the nearby door to open which will allow you to go down to the basement.
Dead Sailor Cave
Right, remove the nearby torches. Continue to the end of the path, open the door and retrieve the potion from inside the next room. Go back and go up the stairs, opening the door that leads to the "corridor of the dead". Retrieve the contents of the crates. Place an object on the scale to the west. Collect the key on the opposite side of the room. Interact with the two mummies behind the door, killing them quickly. Go up the stairs.
Shipwreck Beach
Press the switch to open the hidden door. Then north, locating the stone circle. Right, locate the locked door and use the golden key to open it. Stand in the center of the stone circle and summon the boss.
Boss: Viper Root
To fight the boss you will always have to keep moving. Remember that the boss is able to use a distant attack called Poison Bolt which can cause you serious damage, so avoid positioning yourself too far from him.
Retrieve the gem on the ground, then locate the portal that opens to the north. Proceed beyond it.
Video - Legend of Grimrock
Playing with Fire
Locate the nearby sack containing the mortar, giving it to anyone who has the ability to use alchemy. Also recover the Alchemy Scroll. Examine the letter, then locate the sign on the left, reading it in detail. Continue to the right, around the corner, then proceed east. Try to lure the enemy out of the roots, then hitting him off guard. Once this is done, go back to the west, then to the north, freeing yourself of the two Twigroots. Examine the sack to the east for the Poison Scroll. Head back west, then continue north, spotting the Wad on the floor. Pick it up, then turn south and go down the stairs. Project yourself forward, continuing beyond the roots. Go back north, joining the path that goes west. Turn the corner, then examine the next hidden Twigroot. Break the roots, follow the path along the stairs.
Twigroot Tunnels
Proceed along the only path available, to the portal. So follow the only available path to its end, reaching the skeletons. Move to the next small room, getting rid of the enemy. After its elimination, retrieve the key from the floor. Return to the portal, activating it. Retrieve the chest in front of you, then go back the way you came and go up the stairs.
Follow the path north, east, then north. Unlock the gate using the key. Turn the corner, locating the structure in front of you, which is the elemental shrine. Press the crystal near the door, causing it to open. Look inwards. Locate the table, noting the heads nearby. Examine what the various heads are saying.
Head east, locating the portal and the ivy. Destroy the ivy, then proceed along the roots and retrieve the pellets. Turn right, then north along the path. Follow the path up to Borra, then up to Twigroot near the cash desk. Go back to the area where you found the pellets, continuing east, locating the tree with the two torches.
Starting from the tree, head south and proceed along the U-shaped path, hitting the bolt near the alcove. Pull the lever to access the next gem. Go back, interacting with the Twigroots. Get rid of it and retrieve the Power Gem. Return to the shrine, placing the gem in its correspondence. Destroy the ivy, then move forward to the next area. Head left, reading the sign. Move north, reading the sign here too. East, south, then north towards the torch. Locate the hidden Twigroot by destroying more ivies. Move forward again, continue north to locate the flight of stairs.
Always ahead, continuing to the next door, retrieving the bread on the floor. Open the door, still ahead, turn the corner. The opponent visible in the area will immediately teleport away. Forward, left, right, freeing yourself from the knights who will throw knives at you. Retrieve the shield scroll, destroying the barrels as well, gaining access to the sausage and leather hat.
Go back to the door you passed earlier by reading the sign next to it. Open the portal, walk forward. Step onto the scale, causing the nearby hole to open. Go down the next holes, then along the hole and locate the potion. Continue to the portal, then press the secret key to reactivate the portal and return to the previous room.
Interact with the button next to the torch, then continue forward, turn left, following the path to the next door. Open it, then recover the pellets in the area. Go back where you came from, proceeding along the alternate path, arriving at the crystal of life. Continue along the path, then proceed to the nearby gate. Follow the only path available, coming to a door with a single door to the north. Get rid of the Ratling to the south as well. Follow the path. South, up to the door marked "Philosopher of stone". Open it, then right, retrieving the hat. West, towards the cells, recovering the bread and the machete. Here you can actively move the large stone. First move it east, then south, then west to the orange brick, opening the nearby portal.
Go through yet another portal. Retrieve the key. Get rid of the skeletons. Activate the lever next to the flap to open the portal. At the area with the door marked "The Nest", pull the lever to reach some Ratlings. Right, interact with the Cudgel. Continue forward, interacting with the energy potion. Continuing towards the head, you will have to solve a quick puzzle.
Hit the switch on the wall, then move to either side to avoid the hit. Once this is done, continue forward to the next room before the portal closes. The first time you hit the switch, you'll have to face a group of enemies. Then return to the portal that was previously closed by the "low" enemy, dropping near the crystal of life. Use the iron key to open the portal. Follow the path, then locate the lever on either side, as well as a hole in the floor. Try to examine it to get some useful items.
With that done, go back through the portal and flip the lever to close the hole in the floor. Hit the levers on the walls to open the entrances, freeing yourself from the turtles that will appear in the area. So keep moving, avoiding the holes in the area. Retrieve the key and the warning, then quickly get rid of the various turtles by recovering the pellets and the bracket.
Now take the nearby gem, move east and smash the barrels, gaining access to the nearby door. Move forward, passing the portal. Once in the area with the debris, move north, arriving at the portal and recovering the crystal of life. South, retrieve the bread, then go back to the portal and take the two scrolls nearby, which will allow you to create a potion for the shield. Go up the nearby flight of stairs.
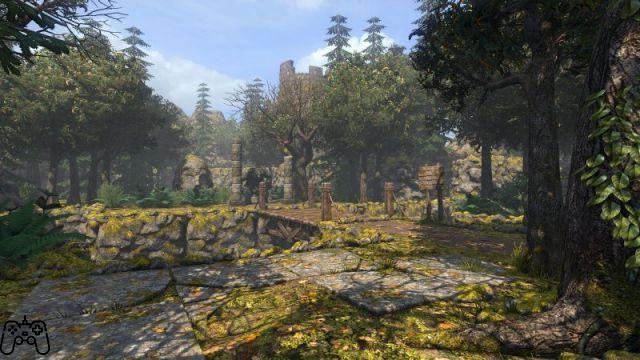
Twigroot Forest
Go ahead, left, get rid of the two enemies and retrieve the crate. Take the pellets inside, then go back and interact with the lever to open the nearby portal, returning to the main game area. Right, arriving at the sanctuary. Proceed inside, placing the two gems on the table. The gems will fly to the sky, and you can get the essence of fire. Retrieve it and put it in reserve. Move east to reach the next play area.
Getting your Feet Wet
Follow the path forward. Turn left, locating the ivy in the distance. Hit her, then examine the chest nearby. Collect the torch and the nearby tribal. Go back, then head left moving along a zigzag path. Once on the plain, retrieve the fruit in the lower part of the tree. Look at the nearby sign. Examine the nearby wooden chest for the golden key and torch.
Head south from the sign, stopping before reaching the bridge. Swerve to the right. Turn west, hit the platform, throw a rock to open the portal in front of you. You will now have to solve a short puzzle. You will notice four scales in front of you, which allow you to raise and lower the portals. First place yourself on the button on the right. Then on the one on the left. Then move to the "ugly" face near the wall. Then to the plate on the back. Therefore, only a small part of the quills will remain "activated". Proceed along the only path available.
Summon Stones
This opponent will not take severe damage from physical attacks. You will therefore have to try to prefer magical attacks. The opponents will be able to attack you from the sides, so when you decide to make an attack, we recommend doing it at maximum speed and proceed to "retract" immediately afterwards. Try to always keep yourself at the maximum of care, always continuing to move. After a short time, you will be able to triumph.
Get rid of the Wargs here. Move east, past the stone arch. Turn left, locating the bushes. Proceed in the direction, hit the bushes until you locate the healing potion. Collect them, then go back east, crossing the bridge.
On the opposite side of the bridge, retrieve the objects in the area, then move south to the pedestal and interact with the nearby short arch. Proceed eastward, reaching the crystal of life. Go past the fountain, jumping on the plate to open the portal. Continue forward to the next area, turning around and pulling the lever to open the portal.
Move north, beyond the portal, past the Wargs. Move to the left, continuing along the rock and examining the area immediately beyond it. So go up the stairs.
Forgotten River
Continuing towards the courtyard, you will locate the four statues, each with a small pedestal associated with a symbol. Each symbol will be associated with a given element - fire, earth, air, water. You will need to associate each of them with the "appropriate" statue.
Now move north. Here you will find Viper Root. After eliminating it, you can return to the area in front of the castle. You can then explore the area to the north. We recommend proceeding along the path to the right, going through the playing area in an anticlockwise direction, using the latch. Always forward, up to the shield. Then go down to the area below.
Open the door on the left, locating the four signs. Move forward to the next sign, reaching the back of the play area. Activate the subsequent portals, using them as shortcuts to get to all the game areas of the island. Proceed south, then west, then cross the bridge and retrieve the Warhammer and pellets. Also locate the nearby lever and pull it down to open the portal to the south, arriving at the opposite side of the river.
Dive into the river. Stand on the bridge, locating the ladder in front. Drop down, then walk forward and climb the next ladder. Collect nearby items, including the gem. Get back in the water, climbing the ladder to the southwest. Back across the bridge, continue south, returning to the giant door you opened earlier. So go ahead.
Down and Dirty
Right, forward, to the dead end with the flashlight and the rocks on the floor. Examine the next letter. Go back, proceeding along the path that continues south. Go through the portal, then retrieve the hat beyond the portal. Place yourself next to the wind portals. Here you will have to try to have the right timing in throwing the rocks, so that it proceeds beyond all the portals.
Once this is done, proceed along the portal and follow the path, keeping to the left. Once this is done, continue south, reaching the lower area of the floor on the right. Drop down, then retrieve both the Wad and the Venom Edge. Climb the ladder to the south, then right to the portal. Press the switch to open the portal and proceed forward.
Once in the area, continue north to the enemy. Swim forward to the ladder visible in the nearby body of water. Retrieve the Etherweed to the south, then continue to the ladder to the northwest. Jump underwater, then follow the narrow path until you reach the ladder on the opposite side of the river. So quickly kill the Swamp Toad. Collect the nearby items, then the boots to the south, then the pellets to the south again.
You will now have to complete another puzzle. You will notice twelve levers in the area next to the gem, beyond the portal. You will need to make sure that all levers are pointing down. Some levers will also affect the surrounding levers, but this will only happen on the fourth lever starting on either side. You will therefore have to make sure that the levers along the north-south "faces" correspond to those of the east-west "faces". The exact procedure to follow will be as follows: the two north levers must not be touched. Of the four in the center, hit only the two on the east side. Of the two to the south, turn only the one to the far west. Once this is done, you can also turn the levers facing east and / or west, so that they are all pointing downwards. The portal will then open and you can retrieve the gem. Grab the gem, go back along the bridge and climb the ladder in the area. North, then look at the Falconskyre on the left. Then go down the ladder that goes down.
Go down the two ladders, then north. Follow the edge of the water, locating the two rocks on the floor. Here it will be possible for you to try to go down towards the watercourse, recovering the objects in the vicinity and examining the latch next to it. Then go down to the underwater area, recovering the shoes from the wooden box. So go back to the mainland.
Move along the portal to the north, then retrieve the pellets nearby. When you locate Gem on the opposite side, watch out for the Zarchtons who will jump out of the stream, freeing you at maximum speed. Having eliminated them, you can quickly recover the gem. Go back through the portal. South, right, along the bridge. Right, retrieving the object from the floor. Break the nearby ivy, following the path opposite. Locate the alcove on the left, retrieving the object inside. Then continue further south along the associated path.
Go past the bushes, then go back a few steps to locate the downhill ladder. Drop down, retrieving nearby items. Go up the next ladder, then go down the stairs.
Hardener It
Head forward, passing the first door, which is blocked for now. Open it, then continue to the next area. Retrieve the ax and the Falconskyre. Retrieve the key from the nearby chest as well as the map. Locate the treasure nearby.
Head back, then south to the crystal of life. To get past the next area, you'll have to try to create an "L" shape along the top area of the runes. Suppose we create a "grid" of plates, where the top plates will be 1, 2, 3 from left to right, then 4, 5, 6 in the middle and 7, 8, 9 at the bottom. Place an object to associate with the fireball on 1, 2, 3, 6. Place an object relating to the spikes of ice on 7, 8, 9. Then place an object relating to the lightning bolt on 2, 3, 4, 5.
The portal will then open. Collect everything you can, so you'll have to deal with a boss.
Boss: Spore Mushroom
The best method to eliminate this boss is to move slowly towards the Spore Mushroom and kill them one by one: every time you approach one of them, focus your energy on killing it immediately, avoiding the "multiple" encounter with Spores. Mushroom.
After you have recovered the items nearby, also read the sign and go back to the flight of stairs you came down from.
Keelbreach Bog
Head to the elemental shrine to retrieve a new essence. Go down the ladder, then proceed to the opposite side. Left, then right to approach the door. Open it quickly, then talk to the faces nearby. Also collect the pellets hidden in the sanctuary. Place the four gems on the table. So go back to the forgotten river.
Forgotten River
Head south, placing the essence of the earth in the area due. When you get to the castle, place the essence in the area opposite to that of the fire essence. So begin to proceed towards the interior of the island.
Video - Pre-Order Opening Trailer
Further Up Further In
Forgotten River
Proceed north, examining the lizard. You will therefore have to overcome a kind of "sea of quills". First place yourself on the right side, waiting for the quills to move along the two squares in front of you. Come on, left. When the quills have reached the area with the "lever", jump on it and flip the lever. Examine the letter visible on the pedestal. Follow the path, getting rid of the Viper Root.
Sleet Island
Examine the map of the island on the left, as well as the letter directly in front of you. Proceed east, hitting the lever near the "Mind and Matter" sign. So retrieve the hat near the grove. Turn the lever next to the hat, then start moving the big black rocks. Right, cross the switch, continuing along the path.
Left, flip the switch on the wall. Left, push both rocks in the area forward. Press yet another switch, then interact with the latch on the floor, as well as the wooden crate containing various kinds of power. You can now complete the puzzle: press the first stone to the east, then continue south, beyond the portal, then north to the orange square. Moving on to the second part, press the stone east past the bars, then press it south, then three times east. Then press it north, then east, causing the portal to open.
Next to the water you will notice a ladder, examine it. From the top of the ladder, move north, west, south, examine the nearby alcove, then retrieve the recipe. Continue west, locating the entrance to the pyramid. To open the door you will have to use the snake bracket found earlier. Move up the ladder. Then continue southwest to the next island. Retrieve the tribal shield and note nearby. Look south, locating the ladder. Project yourself towards it, avoiding the enemies. Throw the rock towards the nearby bridge.
Move through the nearby passage to reach the next play area.
Break on Through
Left, towards the portal, open it. Right, examine the Ice Guardian. Go down to the area below, collecting the pellets. Open the nearby door, following the path. Retrieve the bomb. Ignore the nearby door, then continue along the passage to the north. Kill the mummies. Retrieve the dagger. East, go up the ladder. Recover the sausage with the salt. Use the nearby lever to open the portal. Drop down, left, hit the ice guardian and also retrieve the fireball parchment, also taking the key.
Go back to the west, then go through the portal to the south and go up the ladder. Drop the rocks to activate the magic bridge. Move fast forward, continuing to the opposite side of the room, to the lock on the wall. Use the key to open the portal, moving forward. Right, interact with the door to open the lever. After the door closes, return to the previous door, recovering the crystal of life and the scroll of light.
Retrieve the Falconskyre, interact with the switch in the center. Position yourself on the nearby scale, bringing you back to the previous area. Examine the area to the west by pressing the switch on the wall, then also retrieve the scroll that says "follow the light". You will now have to go back to the top. Move up, continuing to the central room. Try to use the trap door, then go down the stairs to examine the surroundings. The hatch will have activated a light, which will allow you to understand which rocks need a "support": this is the number 1, 2, 4. Go up the stairs, then continue towards the grates on the opposite side of the room. Drop the rocks into the holes. Wait 5 seconds for the door to open.
Go down to the right, open the door. Collect the fire bombs and bread. South, left, get the shield. Turn around, back, then to the left again. Pull the lever to open the portal.
East, towards the Shrakk Torr. Kill him and recover the possible from the surroundings. You will then find yourself on the opposite side of the crystal of life. Then turn the nearby lever to proceed. Now head north, open the door and hit the switch next to the Falconskyre. The wall on the left will open, go past it and go up the stairs. Go down the stairs in front of you, continuing forward. Right, get the bread and bombs. Activate the portal that appears behind you to retrieve the bloody hat. Also take the iron key from the surroundings. With the key taken, you will have to turn the lever again to deactivate the wind portals. Then go back to the central room, open the door to the north and retrieve the knives, also turning the lever.
Move south, then proceed forward and follow the corridor. Go ahead, left, open the door in the area. Collect the potion and the pendant. Go back and follow the path to reach the ladder. Left, hit the switch on the wall, causing green mud to release. Collect the pellets, then follow the path near the Ice Guardian. When you get to the closed door, go through it and pay attention to the ice guardian who will attack you from behind.
Turn the lever in the area to open the portal below. Go down towards the end of the play area. Collect the cheese, then hit the switch near the portal. Move forward and throw a rock towards the scale. Get rid of the slimes. Proceed forward to the now accessible area. Collect all the items, then proceed beyond the new portal and go down the stairs. Proceed to the north portal. Turn the lever in front of you, then go back through the portal. Go straight, then go right as soon as possible. To solve the "puzzle" of the archives you will have to go to the area where the scale is not present, then move forward twice, once to the left, twice to the right, once backwards and twice to the left.
Then continue towards the area to which you will have been given access. Go back to the portal, go up the stairs and continue towards the end of the corridor. Locate the trap door and the energy tome. You will have to try to retrieve the next book. You will now have to try to explore the area immediately below. Going further down, remember to take the items from the crates. Interact with the nearby lever to open the portal that will allow you to access the previous portal. Go down the stairs.
Left, pick up the items. So go back and activate the lever to open the door. Continue to the room, clearing the ice guardians to the right. Continue to the area where they were hiding, recovering the rock. So move south, opening the corresponding door and continuing beyond it. At the next small room, move left, then north, following the path. Right, continuing along the path. Place a rock on the scale, then go back and continue along the other path. Place yet another rock in the area, activating the light on the opposite side of the room.
Then throw the rock again towards the platform. Drop down and examine the black rocks. Press both of them to the south, so that you can stand on them and throw a rock on the nearby platform. This will activate the last black stone, being able to move them all to create a single bridge to cross the ravine. So, near the scales in the far east, you can retrieve the ax and the nearby rocks. Also take the skeleton figurine, releasing the object. Return to the previous area by opening the door. Go down the ladder, proceed along the path. Get rid of the Green Slimes, then continue towards the portal. Climb the two ladders on the side. At the top, drop down from the area on the left. From the nearby elevated area, look down causing a magical bridge to appear.
Proceed to the opposite side, recovering the snail figurine. Then drop to the platform below, then move forward twice, once to the left, forward twice, twice to the right, backwards once, twice to the right, forward once, left once, forward twice. Back on the ground, drop off the bridge, thus exiting the play area.
Go back, go up the stairs, move beyond the door. Left, interact with the Ice Guardians. Then continue west, interacting with the hat. Turn the nearby lever, opening the door and interact with the fireball. Move forward to the room. Get rid of the crab. Turn the lever, activating the portal. Continuing to the north room, interact with the crab. After you kill him, he will release a round key and you have to complete a puzzle. Press the switch on the wall, then place a rock on the portal to reach the scales in the center. Throw a rock towards the south portal, press the switch on the wall again, throwing yet another rock towards the north portal to reach the third switch. Retrieve the figurine in the center. In the area you will also find a switch on the wall. Proceed north, then right, taking the rock from the floor. Continue north, recovering the crystal of life. Collect the pellets and the sword.
Go back up, then continue forward to go and use the crystal of life. Turn left, locating an area with three shelves - each corresponding to a "symbol" of the rock, paper, scissor game. Now place a rock on the sword shelf, a scroll on the rock shelf, causing the door to open. Retrieve the Ogre figurine. When the path turns east, you will see two doors. Use the round key to unlock them, getting rid of the Shrakk Torrs. Also recover the latch just below the door, in the room on the left.
Go through the two doors to the east and collect the potions. Move south, open the doors to find yourself where you started. Head to the room "The Lexiconary" and place the stickers in the following way "I'm Alve" -> Corvo; "I'm the strongest" -> Ogre; "I can't fly" -> Snail; "I can walk" -> Skeleton. The door will open and you will have access to various objects. Also recover the gem. Go back up the stairs. Left, returning to the small room nearby. Still ahead, go through the door and go down the stairs.
A Breath of Fresh Air
Climb the ladder and retrieve the crystal of life. Continue along the nearby ladder, reaching the sign indicating the exit from the sewers. Continue west, interacting with the lever. After you pull it, the two nearby portals will open. So go back to where you came from, close to the crystal. Climb the ladder, exiting to the outside.
Hamlet of Stormbreach
Collect nearby food, as well as nearby turtle eggs, healing potion in the alcove and pellets in the area with the locked gate. Continue west through the arch, locating the various Etherweeds. Starting from the beach area, there will be two ways to proceed south. We recommend proceeding west. Read the sign, then continue south again. Beware of the forest Ogre visible in the area.
Staying along the east side of the play area, continue to the dead end and interact with the hat on the opposite side of the cave. Moving south, locate the next hat. To the west, interact with the scales. West, towards the open area. Collect the key, then return to the previous large game area, locating the fountain. Just west, interact with "The Hub". You will have to proceed following these directions: turn around to turn the lever, then forward, forward, left, turn the lever, back, right, forward, left, forward, turn the lever, forward, right, retrieve the key, right, right, back , left, back, back, right, forward, right, turn the lever, back, left, forward, right, forward, turn the lever, forward, left, forward.
Take the object from the chest, then repeat the previous path backwards to return to the previous area. Continue west, then take the shortcut. South, then turn the nearby lever. North, east, use the latch. West, use the key, then retrieve the boots to the southeast. Continue northwest. Proceed north-east reaching the last lever, also destroying the nearby woods. Continue east, then retrieve the potion and the nearby pendant. Continue further east, recovering the potions. Go back between the previous two walls, then continue west to the right. Retrieve the key and the crystal of life. Continue west to reach the beach, recovering the ether from the water, as well as the sphere of vision.
North, back to the ether. East, right, then continue until the portal is activated. Continue west again, making your way up to the statue and going down the stairs in the area.


