


Please note:
The solution is based on the US PC version of the game. There may be divergences from the Spanish version and / or for other platforms.
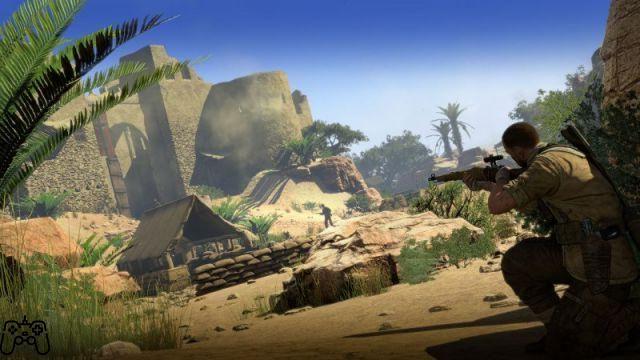
Prima Mission - Siege of Toboruk
Use the sniper rifle to get rid of the first enemies. Regaining control of the character, exit the building, approaching the sandbags. Get rid of the artillery posts further north. With the two observers killed, move northeast to locate the third one. Examine the hill visible in the distance and hit it using preferably the sniper rifle.
After the cutscene, you will be shown the arrival of the artillery. First approach the sandbags that will be indicated on the screen. Select the "binoculars" from the inventory, taking a closer look at the vehicle, locating the engine and tank. Shoot the tank immediately to cause the vehicle to explode.
Having regained control of the character, select the medical kit, then traveling east and carefully examining the game area. Get rid of the two enemies to reach the next mission area. Your objective will now be to neutralize four Nebelwerfer rocket launchers. Rather than causing them to explode, we recommend eliminating the "controllers" of the rocket launchers. Approach the first one and equip the silenced pistol to take out the two enemies controlling the first rocket launcher. Once this is done, there will still be three left. We recommend proceeding from east to west.
So wait for the single patrolling soldier, placed in the next play area, to pass beyond your position, so that you can quickly hit him from behind. March south, freeing yourself from the lone opponent in the area. Climb to the nearby observation tower. Go to its right, pressing the interact button to unlock the snipers' residence area. Exit the tower, moving north, paying attention to the lone soldier patrolling the area. Then examine the main camp, locating the tent with a single soldier inside. Get rid of it using melee moves, then retrieve the war log.
You will now have to move to the rocket launcher, located to the northwest. Only jump when the rocket launcher starts firing, so you can go down quietly. You can therefore get rid of the other subjects in the area with the necessary calm. We therefore recommend using the tunnel to the south to destroy the last of the series of rocket launchers.
So approach the solitary soldier and get rid of him silently. Then locate the nearby observatory tower, recovering the collectible card on top of it. Then move north, using the passage and jumping over the precipice, thus completing the mission.
Video - Trailer on Shiva
Second Mission - Gaberoun
From the southwest section of the map, approach the first sentry and take it out by hitting it closely. We recommend using binoculars to view the enemy more accurately.
During the later stages, you will periodically hear noisy generators. You can use the noise they cause to hit your enemies with the sniper rifle. Then proceed to the tent, hitting the lone enemy inside, to eliminate him. So examine his body to retrieve the war log.
The locations of three "new" officers will now be marked on the map. First get rid of the officer located north-east of your current position, he is inside a tent; we recommend that you first kill all the subjects scattered along the nearby play area, and then proceed to the direct elimination of the officer.
Examine the enemy's corpse to retrieve the war log. You can now move on to the next officer, he is in the small camp to the north. First examine the mountainous path just to the west, it ultimately leads to your goal. Move along this path to get to an elevated point, with a sniper inside. Get rid of it, then sabotage the following generator. Now, rather than continuing along the passage to the north, we recommend returning to the south, always trying to stay close to the watercourse. Examine the ruins in detail, killing opponents in their vicinity.
You will now find yourself in the vicinity of the encampment containing the second officer. We recommend that you approach it from the south and / or south-west side. We recommend taking out the enemy when he is at the back of the tent. After you get rid of the second mate, we recommend examining the rest of the camp to retrieve additional war logs, especially from the corpse.
The third officer will therefore be in the central area of the oasis. You will first have to proceed along the main path leading to the southeast. Pay attention to the opposing vehicle that will stop along the way, thus avoiding proceeding too fast along your march. So go immediately and hide to avoid being discovered by incoming enemy reinforcements. You can decide to hit them in the back, preferably with a silenced pistol.
So pay attention to the two machine guns that act as a block for the south-east part of the map. We recommend ignoring them during these early stages, using weed instead to avoid getting noticed. So move west, where you will find a path that will allow you to reach the officer. Before eliminating him, you will have to take out his two assistants, immediately placed around him. The simplest method sees you shooting at the nearby ammo crate, it will explode and kill at least 2 of the three subjects in the area.
You will now need to head to the ruins to the east to locate the last generator. Pay attention to the two soldiers placed as patrol, try to eliminate them silently, one by one. Once you have "secured" the play area, you can quickly sabotage the generator. So make it explode to eliminate the enemies in the surroundings. So begin to proceed towards the fourth officer. Kill him with a back shot and examine his body to retrieve the last document.
You will now have to quickly prepare the ambush for the general. The vehicle "containing" the general will immediately appear on the map, heading towards your position. You will have to avoid letting him escape, instead selecting the mines from the inventory and placing yourself in the building on the opposite side. Just before the general arrives, go back to the road and quickly place the mine.
Once this is done, you will have to go and hide in the immediate vicinity, preferably near the ruins, thus avoiding being noticed by the armored vehicle visible in the area. The transporter will crash into one of the mines, quickly pulverizing and killing the generals inside. Then head towards the station, to the west of the building that serves as the "extraction point".
Third Mission - Halfaya Pass
You will initially find yourself along the south side of the map. Proceed east, crossing the bridge, paying attention to the enemies scattered around: we recommend using the trenches to remain sufficiently isolated.
Along the way, slowly turn north, paying attention to the patrolling enemies along the main path. Between the two "potential" bridges in the area, we advise you to freely choose which one to walk, their "difficulty" is identical.
Nearby opponents will now be mainly located in the buildings to the right and left. Pay further attention to the lone guard near one of the trucks. In case you try to get rid of enemies in the area, we recommend that you take advantage of the noises in the area to shoot opponents without attracting too much attention. You will therefore have to start exploring the map again, again with due attention. Proceed inside the building to the east, recovering the war log. Also examine the small booth in the center, also containing a useful document.
Now move west to locate the next artillery station, taking advantage of the caves and corridors nearby. Once at the artillery, we recommend that you take advantage of the loud noise coming from it to your advantage: get rid of all the enemies in the vicinity, focusing especially on the soda near the roof. To destroy the nearby artillery station, we recommend using a well-placed grenade.
The two remaining stations will instead be located in other areas of the map. To reach them, you will have to walk north, however avoiding using the main road, but preferring one of the small corridors completely free from any enemy presence. To reach the next village, we recommend moving along the path to the east. Collect the war logs, until you reach a hill, where you have to start paying attention to the opponents (initially, a single enemy). After eliminating it, try to reach the roof of one of the buildings visible to the east. Here too, you can retrieve a war diary.
Once you reach the reunion between the two paths, you will have to start proceeding towards the north-east. When you reach the crossroads, turn right. Once in the new area, we recommend using binoculars to locate all enemies. We recommend starting to eliminate them right away. Then move to the top of the tower; from here, you will have to destroy all the vehicles in the parking lot (ie a truck and a tank). We recommend aiming for the valve of the petrol can, thus causing a huge explosion.
You can now begin to descend again, exploring the buildings along the east side of the play area. You will find stairs leading to a basement. It will be populated by two guards, positioned next to each other. We recommend eliminating them using a machine gun and / or a pistol with a silencer. Finally, head to the lonely building located to the west. Kill the nearby enemies before entering, then retrieve the collectible cards. Two artillery stations will now remain to be destroyed, the order you will follow will not be strictly relevant, but we recommend starting from the one to the north-west, and then killing the enemy visible nearby with a silenced pistol and continuing to proceed towards the next. area. Also in this case, the transfer will be carried out avoiding taking advantage of the main route, preferring the side passages instead.
Always move west, trying to aim for the watchtower. You will therefore find yourself near a large precipice, which separates you from the nearby artillery station. You will have to try to destroy it from afar: start by climbing one of the guard towers, then eliminate the nearby guard, and recover his Panzerschreck.
Stand face-to-face with the artillery, then use your binoculars. Locate the soldier near the station. To the right of him, you will notice General Hoesslein - we recommend killing him with the sniper rifle, and destroying the artillery later. Moving on to the destruction of the second station, you'll need to aim for the barrel inside the cave, just to the left of the artillery. By detonating it, you will also destroy the artillery itself. Now move south, stopping in the area where you killed the sniper. You will locate a generator here. Try to sabotage it, so that you can easily eliminate the opponents located immediately to the south and immediately to the north.
A last part of the artillery will remain, near the western area of the map. This too can be destroyed from a distance: we recommend taking advantage of the bunker visible to the west, reachable via one of the trails in the area. Another possibility is to use the third sniper area.
In any case, we recommend that you make the most of your rifle, especially to destroy the area around the third artillery station. You will have to aim at the red explosive barrels first, they will cause a chain reaction and you will immediately complete your objective.
Fourth Mission - Fort Refuge
You will start the mission starting from the south of the fort. First move east, approaching the first group of enemies, focusing your attention on the war log.
Examine the snipers area, then sabotage the nearby generator. Deactivate the machine gun, then throw yourself to the ground and try to hit the fort, killing the enemy with a quick shot from a distance. So keep killing the enemies nearby. Once this is done, we recommend starting the exploration of the area north of the area containing the snipers, but paying attention to the enemies near the hill.
So move west, trying to reach the gated camp. Retrieve the War Journal from the wooden portal. It will therefore be time to get closer to the fort, your main goal. You can do it in various ways, however, we recommend that you take advantage of one of the paths in the western area of the map and more precisely the path that starts from the northern area of today's camp. Then move along the side path visible along the east part of the map, paying attention to the soldier who will stop near the "examination" point.
Finally, you will have to try to explore the large area located south of the wall of the fort. In the area, you will find three enemies; using the right timing, you should be able to eliminate them one by one without excessive problems.
To enter the fort itself, you can choose one of three possible routes. The first sees you take advantage of the narrow passage to the west, near the main portal. To reach it, you will have to climb along some rocks, but luckily for you there will be no guards posted to guard the passage itself. We recommend using this variant, so as to avoid any contact with enemy soldiers.
To retrieve the cell key you will need to reach the officer located in the northwest area of the fort. He is on the second floor of the northwest tower; get rid of it and then retrieve the key from his body. The cell will always be located in the north-west area of the fort. However, we do not recommend proceeding quickly in the area, preferring instead to eliminate the lone enemy nearby and explore the tower to recover a collector card.
So avoiding the central courtyard, move towards the stairs near the tower to the north. Then move east, freeing yourself of the lone enemies visible along the way. Locate the informant's cell, visible on the upper level. Explore the area to the northeast, paying attention to the guards nearby. Strike the nearby enemy from behind, retrieving the war log. The last of the series of secrets will therefore be located on the second floor; you will have to take advantage of the nearby ladder to reach it.
So move towards the south wall, trying to be quick to avoid any interaction with the reinforcements. Examine the elevated area, locating the Panzerschrecks. So clear the area near the main entrance, causing a tank to appear near the portal. We recommend aiming one of your rockets at the nearby play area to destroy the tank. Continue to the main portal, examining its west side, gaining access to a previously blocked ladder.
Continue to the south wall, using the crates and recovering the ammo for the sniper rifle. Continue west, your goal is now to escort your informant. Try to eliminate in series the neighboring enemies, using the sniper rifle.
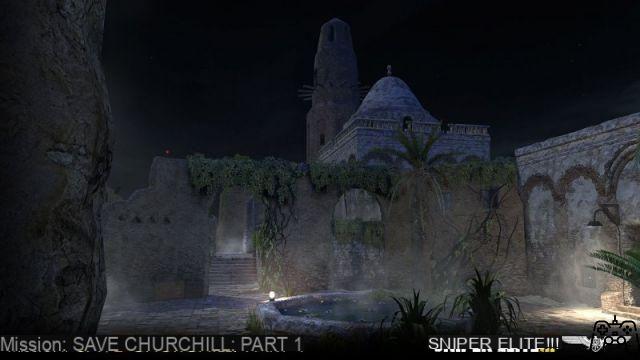
Fifth Mission - Siwa Oasis
The mission will begin near the oasis, southeast of the main city. While exploring the nearby map, we recommend crouching down repeatedly to avoid running into trouble. To reach the old city we recommend proceeding towards one of the paths that lead to the east hill. Watch out for the enemy moving up and down to avoid taking hits from him.
You can now freely choose whether to complete the exploration of the city, but your main objective must still be the office of Vahlen, located in the southwestern area of the city. We recommend that you approach it from the south. Go up the stairs, therefore, before entering the office, examine in detail the next building, on the left. Here you can locate a very useful war diary. Continue to proceed towards your destination, observing the cutscene.
The preferred observation point will be located north of the Vahlen office. To reach it you will have to start from the south and climb along the scaffolding in the area. So get ready to use binoculars. Observe the enemies visible to the southeast, starting to kill them one by one. Once this is done, quickly descend from this area, starting to follow the officer, keeping within the safe distance. He will reach a "secret" building. We advise against killing him directly, it is more convenient to cause a nearby truck to explode, making the murder look like an accident.
So keep following the officer until he reaches a truck parked in the northwest area of the city. Select one of the weapons at your disposal and shoot one of the crates in the area. The explosion will kill the officer. Jump behind the nearest cover and take out the rest of the enemies as well. A "Panzer IV" tank will arrive in the area. We recommend throwing some dynamite towards the main area, awaiting the arrival of the wagon. Then use the sniper rifle to cause the dynamite to explode.
So try to proceed towards the north exit. A short skit will tell you that in order to continue you will have to take out three snipers. Try to always stay behind the walls during your killing work, so as to avoid becoming easy targets for the opponents.
Video - Tobruk Trailer
Sixth Mission - Kasserine Pass
Starting in the northwestern area of the map, follow the linear path to proceed straight. Beware of the guard near the hill (immediately south of it), avoid interacting with it, preferring instead to proceed along the path that leads to the hill to the south. When you reach its top, examine the surroundings. Quickly get rid of the enemy sniper occupying the village tower.
Once this is done, move to the north side of the hill. Once you reach the raised area, get rid of the single obstacle visible in the area, recovering the war diary. You will therefore have to destroy the first rocket launcher as well. To do this, we recommend launching a rocket from a distance towards the first red barrel. In case you don't want to use direct weapons, it will be possible to throw an M24 grenade.
The command center you want / need to reach is located near the eastern area of the map. The easiest way to get there is to see you climb up the hill south of the command center. Start around the second destroyed rocket launcher. Move south, locating the "ascent" area. Move up the hill to the south, using the "suppressed" weapon to take out the three enemies in the area. This will give you a perfect view of the entire game area near the command center. You can now begin eliminating enemies in succession, preferably from a distance. Always try to pay attention to the two enemy soldiers who will periodically return to the command center. Having secured this area, make your way to your current objective by climbing one of the flights of stairs to enter the temple.
Once inside, first locate the two crates. Retrieve the objects inside them, then approach the table marked on the screen, where you can find a war diary. The notice associated with the combination of the lock is in the possession of an enemy officer who has been spotted near the small village nearby, along the southern area of the map. You will not have to be in a hurry in trying to reach him: he will in fact be guarded by six different soldiers, including a sniper. We recommend trying to reach the opponent starting from the south-west, killing in a "progressive" way all the subjects placed to protect him. Your target officer should be placed in the building all the way to the west. You can therefore choose whether to shoot at him, or hit him directly using the melee. After one of your attacks hits, hold down the "search" key to get the lock combination.
Head to the meeting with Brauer. Once in the area, observe the cutscene, which will confirm the death of your ally. Move to the southwest side of the map, locating the enemy tank. Quickly throw yourself behind one of the nearest buildings to avoid taking damage from incoming enemies.
Then select the dynamite from the inventory, throwing it towards one of the main streets. So position yourself on one of the surrounding rooftops, shooting at the dynamite to cause it to explode, so that the enemy truck is destroyed. Now hide towards one of the nearby buildings, waiting for one of the oncoming vehicles. We recommend using the mine in the area to destroy it quickly.
The rest of the enemies will then begin to assemble near the entrance to Vahlen's command center. Head up the hill to the south, and start hitting them with your sniper rifle. Keep attacking until you are confirmed that the area is safe. Enter the temple, then continue towards the command center. Approach the lock indicated by the game. Wait for your character to interact with it automatically. After the short cut scene, you will be informed about the arrival of some snipers.
Once out of the temple, jump behind the nearest cover to hide. Locate one of the two nearby snipers as fast as possible - it should be west of the command center. You can then go to Brauer's corpse. Beware of the second sniper in the area, located near the same tower that was previously occupied by the other sniper, even closer. We also recommend making a quick shot from a distance. Killed both snipers visible nearby, move towards the corpse to view the last cutscene.
Seventh Mission - Pont Du Fahs Airfield
You will start the mission in the southwestern area of the map. First try to get close to the first group of enemies immediately to the east. After getting rid of it, quickly go find the huge generator, which you will have to try to sabotage. After you have taken possession of the southwest section of the air zone, we recommend proceeding north, but starting from the area in the far west. Continuing further along your path, you will find yourself near two soldiers, positioned next to each other - we recommend moving around them, then hitting them from behind.
Then locate the fortifications connected to the bunkers, visible to the north-west of the map. We recommend that you eliminate all enemy vehicles in their surroundings, at the first opportunity that comes your way, so as to make it easier for you to explore the rest of the map. However, avoid using the sniper rifle and / or rocket launcher, to avoid being identified too easily: it will be better to use the mines on the ground as an indirect "support". Then move towards the northeast area of the map, locating the control tower here. Get rid of the two guards posted on patrol near the tower. Go up the stairs, get rid of the single enemy visible inside the tower. Retrieve the War Journal from his dead body.
Go down the stairs, then locate the two hangars south of the control tower, called hangars "1" and "2". They will be especially useful if / when you run out of ammo. You will therefore have to deal with the destruction of the three deposits in the area. They are located just east of the hangars, and your goal will be to destroy all three depots, shooting at the explosive barrels using preferably a firearm and / or throwing grenades. Then examine the curtains immediately to the east, recovering the collectible paper inside one of them. As you continue to explore the area east of the battlefield, you'll need to pay attention to both the armored vehicle (near the door) and the two snipers populating the play area. They will mainly be located near the hills in the southeast corner of the map. The first sniper is positioned slightly lower than the second (the latter is on an elevated platform).
So move south to reach the fortifications with several enemies guarding them. You will have to complete another secondary objective here, by entering the small bunker to the south. Here you will locate a radiotelegraph operator, which you will need to quickly eliminate. Once this is done, you can easily deal with the opponents who "observe" the air zone. We recommend throwing a grenade to eliminate them "en masse". You can then take care of the rest of the soldiers, placed on patrol along the southern section of the map. Along the area to the southeast and south of the aerial area there will be other areas that you will need to visit. First of all, it will be necessary to unlock the two "residence" areas of the snipers, one in the south tower and one in the nearby hill. A little further on you can also find a collector's card and a war diary.
The following objective will be to gain access to the bunkers. We recommend that you complete it only after you have sufficiently explored all the surrounding areas. You will therefore first have to approach the small bunker in the north-west area of the map. Having located the entrance, we recommend proceeding along one of the passages that proceed along the surface fortifications, then climbing the stairs located in each of the four hangars in the area.
So start exploring the corridors of the underground bunkers, always paying attention to the four patrolling enemies. Therefore, move towards the central part of the bunkers, trying to pay attention to the three additional guards who are in the area: we recommend waiting for their solitary arrival (it is very likely that they will arrive one by one, at regular intervals) and hit them with quick shots of a silenced weapon. Then exit the underground complex, heading towards the third sniper "location", near the area to the south-east of the map. Along the way, make sure you have recovered all the ammunition needed for the sniper rifle. Position yourself near the hill, waiting for the arrival of the vehicle containing the enemies.
Immediately begin attacking the enemies, who will appear to the left and right of the "main" air area. You will find yourself in front of some tanks: we strongly recommend using dynamite to destroy them, using the rifle for detonation. As far as the armored vehicle is concerned, an anti-personnel mine will be sufficient, which must be placed "sideways" with respect to the vehicle itself. You will therefore have to head towards the extraction point, located exactly in the center of the take-off and landing area.
Eighth Mission - Ratte Factory
The mission will take off near the northeastern area of the map. Start by following the only path that goes south. You will initially be faced with two guards. You can quickly eliminate both of them, using melee. Then slowly approach the next enemy near the ravine. Eliminate it following the same procedure, therefore again with the melee.
Continue to the table on the left, where you will find two more opponents. We advise not to attempt the approach, it is preferable to avoid them (deviating slightly from the "central" path) rather than killing them. Your target will therefore be towards the south. We recommend proceeding along the main path, using the machinery in the area. Before quickly approaching the target, we recommend eliminating the enemies placed near the two bridges nearby, so that they cannot locate you.
It will also be necessary to explore the area southwest of the transformer, using the wooden planks (by removing them). You will gain access to the second sniper "hotbed". By staying far enough away, you will need to aim for the explosive barrel to kill them all. You can then go back to the transformer and eliminate it without incurring "annoying" snipers.
The second of the transformers is located south of this area. Begin the journey by climbing one of the nearby bridges, which lead to the next part of the farm (we recommend starting from the easternmost bridge). Having reached the following play area, you can start eliminating your opponents again. So try to reach the nearby balconies, up to the southwest room, from which you can retrieve some useful schemes for an advanced weapon. So get rid of the enemies placed to patrol the nearby bridges. Avoid exploiting the explosives, preferring to hit the red explosive barrel instead, with any of the weapons at your disposal.
After you've secured the entire play area, you can move to the upstairs room in the southwest corner. Here you can get the third schematic for the "advanced" weapon. Once this is done, press the keys on the screen to place the explosive. After you destroy the ammo depot, more enemies will start arriving. We recommend eliminating opponents coming from the balconies above first, as they will have an altitude advantage over you.
Finally, head to the elevator and watch the short skit. When he's finished running, go out and hide behind one of the closest covers on the left. Get rid of the first group of enemies, then start moving forward along the corridor. Warning: the corridor is also connected to some areas that come from "above", so the enemies will be able to reach you even when / if they are in an elevated area. As before, here too you will have to try to get rid of all enemy units as quickly as possible, since from this point on, the game will no longer allow you to "dodge" your opponents. Remember to visit the area west of the corridor where you can find the fourth weapon schematic.
Your next goal will be to place some explosives along the corridor. You will have to plant four in all, and we recommend starting with this objective only after you have "secured" the rest of the play area - that is, after you have eliminated the enemies nearby. The explosives can be placed in the order you prefer, however there are some issues to consider: the charge to the north-west can be placed only after you have reached the balcony above, so you will have to eliminate any enemies in the area. The southwest charge should be located near the bottom of the corridor. To position the charge in the northeast, you will first have to reach the balcony located under the ceiling, paying attention to the guard posted on patrol - you will have to kill him before proceeding to place the charges.
After you have placed the fourth explosive, you will be able to observe a short cutscene, which will "introduce" you a new group of enemy soldiers. We recommend not attacking them immediately, rather letting them disperse during the initial stages. You can therefore try to eliminate them by using the generators, or by making them explode. Moving on to the main objective, you will have to climb to the top of the "Rattle" type tank, climbing the stairs visible near the north part of the vehicle. At the top, you can place the explosives in the area designated for it.
Then go down and move east, but avoid immediately turning towards the exit. Instead, wait for three opponents to arrive in the area, and use the noise caused by nearby objects to eliminate them quickly. So, as soon as you notice that the tanks start "shooting" towards the portal, quickly run towards it to be able to reach the exit in time.
Once out of the factory, hide behind the nearest rocks, with the aim of eliminating the other soldiers in the area. We recommend taking advantage of the nearby turret / machine gun to be able to eliminate them at maximum speed. Then continue along the path, but only after you have completely secured the playing area. You will then have to reach the last sniper "hotbed", located at the top of the hill, on the other side of the factory exit. Once in the area, crouch down and start shooting at your target. After hitting it, you can enjoy the final scene!


