


Please note:
The solution is based on the American version of the game, so it is possible to find differences in the Spanish version.
CHAPTER 1
The game starts with our heroine awakening in Dr. Blackmore's last lair. In the previous two games, Blackmore was trying to get energy from the fear of asylum patients and children, in this game he wants to take revenge on six people who hurt him in the past and our heroine and Tim are at the top of his list.
First Room
This first room serves as a tutorial. When the cursor turns into an eyeball, you can click to enlarge the area, for example click on the table on the left to enlarge ... When the cursor turns into a hand you can take something, at the table take the sugar cube, the target and scissors. Examine the plants near the table, give the lump to the lemur and you will get a case that serves as a portable laboratory, since you have no ingredients, you cannot use it at this time. In plants you can also find a lighter. Look at the wooden Indian on the right, you can get a feather and a cigar from it. Examine the pirate on the left pillar, put the cigar over his mouth, then use the scissors to cut it and light it, the eye patch will pop up and you can take the eye. There is a nail under the pirate's head, hang the target on it and the wooden Indian will throw a tomahawk at him, take it. Now examine the right pillar, Dr. Blackmore will appear on the screen to talk to you, under the monitor there is a red button under the glass, use the tomahawk to break the glass and take the button. When you are gone, one of Dr. Blackmore's tentacles will be visible, click on it to get rid of it. Now examine the door in the middle of the room, put the button you got earlier in the slot and press it, then place the pirate's eye in the circular slot at the top to start a puzzle. As you can see there are 10 tiles and 10 fingers, each tile is connected to a finger: swap the tiles so that each is connected to a finger marked with a symbol similar to his, with each exact match a finger will move. The left column from top to bottom is: silverware, heart, stars, clouds and branch; the right column from top to bottom is: fly, headphones, coins, roulette wheel and rocket. By solving the puzzle the hands will pull the lever and the door will open.
Getting to Tim
Tim is on the other side of the right door, but he's stuck. In this room all you can do is put a feather in the pheasant to get an egg, you can also put the cables of the vending machine in the tank in hopes of charging the car, but unfortunately the electric beam is too far to load the wires. Enter the door on the left, the kangaroo needs reading glasses. In the lower left corner is a table, zoom in on it, get the liquid nitrogen and read about the other four people that Dr. Blackmore has kidnapped. On the wall on the right there is a puzzle, click on it to start it: your goal is to connect all the lines, press the button at the top of the screen to go to the second pattern, then press the following six buttons to move the lines; connect them all and you will receive fertilizer and an empty bottle. Now there is a hidden object challenge, a Hunted Halls series pin, click on the wooden chest to start it, a tutorial will guide you. Start by finding the screwdriver and use it at the bottom left to get a screw. On the lid of the box there is a scissors blade, take it and use it on the other scissors blade on the bottom right, then use the screw and screwdriver on the blades to get the scissors. Use the scissors on the net to get some pesticide. The lid for the pesticide is on the right edge, above where the scissors formed. To the left of the vase with the scorpion are three bottles, zoom in on the bottle display at the top left. Place the three bottles on the right and the pesticide on the left. You have to put the bottles in the pesticide in order, which according to the note is: green, yellow, blue and red. When you are done put the pesticide lid on his jar to get some pesticide and use it on the scorpion in the jar to get some threads, then use the threads on the dough to get a code: 539. Enter the code on the chest to the right to get a currency. Before leaving this room, use the fertilizer on the plants to the left, they will grow into wheat, so click on the wheat to get the seeds. Go back to the previous screen and use the liquid nitrogen on the lock on the right door so you can reach Tim.
Blackmore's Machines
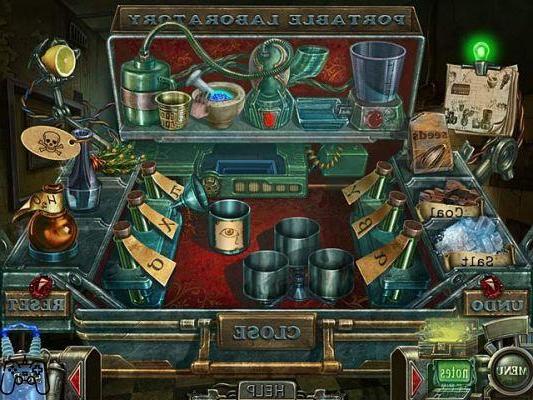
Blackmore appears and says that you can save Tim but it will be difficult, talk to Tim and he will tell you that you must first save all the other victims. Look in the ventilation system on the left, put the egg in the nest and a small ostrich will be born, give it the grain of wheat and it will grow quickly, then open the door in the next room, inside you will see that it will be blocked by a hallucination, so you can't do anything. In the room with Tim take a slice of bread, then look at the sink on the right, take the glasses and turn on the tap, machine oil will come out, use the empty bottle to collect it. Go back to the previous screen, now you can use the vending machine, just click on the cables on the ground to put them in the water tank, then use the slice of bread on the tank to get the electric beam close enough to the cables to charge them. Next to the vending machine is a puzzle, use machine oil to clean the gears, then move them to align them all. Move the green gear higher to the left and up, then the red one to the right, up and right again, then move the green gear lower left and down, then the blue one to the right, finish by moving the red gear on the left. Solving the puzzle will repair the vending machine, so use the coin to get some latex gloves. Enter the room with the kangaroo (left), give him the glasses and he will give you a container for eye drops, take it and you can finally use the portable laboratory. On the left is an instruction sheet. Put the flowers in the mortar and use the pestle to grind them, then put everything in the black machine, then in the blender and press the button, then put it in the machine at the top right and press the button, finally put it in the three containers for eye drops. If you make a mistake, the light above the instructions will flash red, you can use the undo button at the bottom left to undo the mistake, also at the bottom right is the reset button to restart the puzzle. By solving it you will get eye drops for hallucinations. You will notice that the hidden object container still glows, click on it for another challenge. Take the blunt knife (top) and use it on the stone (left of the box) to sharpen it, cut the net aside to get some cutters and look at the piece of paper to get a recipe for the acid, also here you can also find tweezers. Follow the recipe, use the sharp knife on the lemon to get a slice to use on the acid container, look at the jar with the scorpion and use the tweezers to get its poison, then use the cutters to free the tube attached to the jar and use it on the acid container. Now you can collect the acid and use it on the golden lock to find a can opener. Zoom in on the helium tank in the corner, put the latex glove on it and turn the handle to fill it with helium, then use it on the crack in the ceiling above the kangaroo, it will drop a jar on the floor, use the can opener to get a Chicago record. Go back, enter the right door to Tim's room and continue to the hallucination room, use the eye drops on it to get rid of it. In the center of the room is a computer, use the Chicago disk on it, now you can go through the portal to Chicago on the left, where one of Dr.
CHAPTER 2
Getting Inside
The victim is held hostage in the basement of the building on the left, the door is on fire, so you need to figure out how to use the water tower on the right to put it out. Pick up the shovel off the ground, there is also a newspaper about the victim if you want to read. Go ahead and use the shovel on the sand, this will allow you to put out a small fire, letting you take a poker, a stone and a metal comb. You will see it shine over the area to the right, this is another hidden object challenge. Unlike the screens in the previous chapter, all you have to do is find all the elements at the bottom of the screen based on their outlines. Hover the mouse pointer over an item at the bottom of the screen to see her name and a small image. By solving this challenge you will get dynamite. Go back to the previous screen and use the shovel on the base of the water tower to find a worm, then put dynamite in it, you need a long fuse. Look at the top of the tree and click on the saw to cut it, join the branch and the metal comb, you can get some string from the kite. Go ahead and use the string in the glue, then in the gunpowder, now it can work as a fuse, so put it on the dynamite. Use the tomahawk on the left door to enter the building.
The First Floor
Dr. Blackmore appears on the TV screen and uses his tentacles to stop you from reaching the second floor, here are two doors, the one on the right leads to the basement where the victim is, enter the one on the left to go to the kitchen. There are a lot of items to collect here, take the vinegar on the left, open the cabinet to the left of the oven to get the salts, then take the oven mitt and open the oven, use the poker on the coals to reveal a iron tooth that you can collect with the oven glove. Examine the clock above the hood for a puzzle.
When the pendulum is on the right, click several times on the right weight, until the device stops, then move the pendulum to the left and click several times on the central weight until the device stops, move the pendulum to the right again and continue the operation until the clock shows 12:00. By solving the puzzle you will get a fishing line. Open the window to see the beaver on the tree, use the tomahawk to chase the poison ivy away from the tree, the beaver will start gnawing on it but its tooth will break, so give it the metal one so it will finish gnawing on the tree, making you get a wooden ladder. There is a gas mask that you can see through the window, click on it and you can do a puzzle with the portable lab. Mix salt and charcoal, put the mixture in the machine at the top right, then blend with the seeds and put it all in a mortar, then put it in the gas mask to make it work. Leave the kitchen and examine the fish tank near the ladder, move the spear, then attach the fishing line to it, put the worm on the hook and click on the spear again to catch a fish. Go back to the kitchen and use the oven mitt to remove the tray, put the fish on it, then push the tray into the oven and you will get a nice cooked fish. Exit the building and go forward, do you see the cat? Use the cooked fish on him to be able to catch him. You can also take on another hidden object challenge here, to eventually get a belt. Go back to the house, take the umbrella from the umbrella stand and enter the door on the right, it is full of smoke, use the stone on the window to release some air, you will see a fan, put the belt on it, then put the cat on the wheel, so the fan will start clearing the room. Dr. Armstrong is unconscious, use the salts (taken in the kitchen) on him, he will wake up and give you a code. Use the umbrella on the baking soda (on the top shelf) to throw it in a bucket, then use the vinegar here to get a second code. Grab the pliers from the wall in the basement before you go.
Upstairs
Put the ladder on the landing, now you can see a big picture, zoom in on it, in particular on the stick of man, that stick is in the umbrella stand, you will have to solve a puzzle to put the stick as it is in the picture. There are four sets of arrows, when you click on one of the three sets of arrows at the bottom, it will be highlighted, this means that you can press the two arrows in this series and the two at the top, solving the puzzle you will get a sword. Go upstairs, Dr. Blackmore will appear and hallucinate you, use the gas mask to get rid of it, then use the pliers on the door to the right for a hidden object challenge. In this challenge you will have a list of items to take, find them all to get the salt. Go back into the kitchen downstairs and look at the table, put the salt down for a cooking challenge: prepare all four recipes to get a pumpkin. The fire symbol is at the bottom of the metal cooking device at the top. Go back upstairs and enter the door on the left, there are two armor that want to stop you, use the tomahawk on the right one, then use the pumpkin on the exhaust pipe of the left one, then use the sword on it. Now you can look at the cage on the back, unlock it with the two codes you got in the basement: x27z and 4zhk. Look at the elements in the cage for a puzzle: you have to stare at the red four times and the green five, then click on the red button twice and five on the green one. Dr. Armstrong is safe, enter the cellar to talk to him before he goes with the cat, he will drop part of the Chernobyl disk and a ball of energy, grab them and go back upstairs. On the right the hidden object challenge will reopen, solve it to get some glue, then go to the desk with the scientific equipment to find three pieces of the Chernobyl disk, put the one you took before and use the glue to fix it. Now you can go back to Blackmore's lair, use the Chernobyl disk on the computer on the floor to open the portal to Chernobyl.
CHAPTER 3
Getting Inside
Dr. Blackmore's tentacles block the entrance to the building, use the tomahawk on the base of the statue (right) for a puzzle: press the red button and the two arrows until all eight rays have three identical symbols, the inner rim of the wheel cannot be moved. The statue will chase away the tentacles so enter the building, look in the mirror on the left and you can get some wands from your jacket pocket. The door on the right is blocked so enter the one on the left, at the top right you will find a crowbar, use it on the lockers on the left to get some ammunition, use it on the chains of the vents (right) to get a balloon. football. Go back outside the building, there is a piece of paper on the floor that you will read on: 26847, use the crowbar three times on the phone booth then put that number on the phone, you will get a coin. Do you see the silhouette of the boy playing soccer? Use the balloon on him to unlock a hidden object screen called the fragmented hidden object screen: the four elements you are looking for have all been divided into four parts, find all four to reform the object. By solving the challenge you will get a portable lab pill. Go to the side of the building, look in the door for matches and a glass, then use the crowbar on the front of the tank to get a funnel and a drum, finally use the ammo on the gun and then on the tank to find a puzzle. Put the funnel here to start the puzzle: click on a piece to rotate it, rotate the pieces in the first two rows so that they are all connected and ignore the bottom row. By solving the puzzle you will get a trumpet. Continue to the playground where you will find an octopus mold. Go back inside the school, now that you have a coin and a glass, you can use the vending machine at the far left for sparkling water. Do you see the statues at the door on the right? Put the trumpet on the left statue, the drum on the right and the drumsticks on the last one, it will open the door and let you in.
The School
There is a hallucination, to eliminate it you have to put the pill in the portable laboratory and then use it on the hallucination. Open the window and take the bubble blower, enter the door on the left and use the sparkling water on the template to get a hairpin, then open the backpack on the desk for the gold spray, examine the calculator for a battery and open the blackboard to take the sponge under the image of the door. Leave the room, use the hairpin on the keyhole of the door on the right to enter, you will find a blackboard on the floor, take the chalk and examine the portable game on the desk, then insert the battery to make it work. In this puzzle there are four chickens, click on the one from which the egg is about to fall and repeat the operation eight times to solve the puzzle and get a basket. Leave the room and use the basket on the template to get a mushroom. Leave the school and go to the tank, use the sponge on the water hole then go to the playground, take the octopus mold if you don't already have it and give the mushroom to the mushroom, you will get a bubble. Return to the previous screen, you will find the fragmented challenge to hidden objects, face it again to get a star. Go back inside the school, in the classroom on the left and use the sponge and chalk on the blackboard to create a friendly door.
In the classroom on the right, examine the chest, click on the star to break it then put the star you found earlier in its place, then use the gold spray on it for a puzzle: click on a piece, then click on the place where you would like to move it; move all the pieces to form a totem, once solved you will get seven suckers. Leave the room, go down the stairs, the back door looks like the door on the blackboard, which means it is now open, before going through it, use the bubble container on the template to get a second bubble, then use both bubbles on the door left for a hidden object challenge. Once the challenge is solved, you will get some pliers. Now go through the door, Billy Bully is trapped behind an electric fence and cannot reach his sandwich. Examine the electric machine at the top left, in this puzzle you can move the pieces: you have to put them all in correspondence, but you will only have five moves and there are multiple solutions; with the first level move the green piece down first to the left, then up, then move the blue one down to the top; with the second level move the blue piece down and to the right, the yellow one to the left and the green one up and down; with the third level move the yellow piece all the way to the right, the blue one to the left to the right and up, then the green one down to the top and right. Solving the puzzle will turn off the electricity on the fence, so use the pliers on it to cut it, Billy Bully is still trapped by the dynamite. Leave the room and face the hidden object challenge on the left to get a candle, then go back to Billy Bully, enlarge the plate holding his sandwich and put the octopus mold in it and put the candle on the mold, then use the matches to light. the candle thus obtaining a wax octopus. The device to deactivate the bomb is at the bottom left, use the seven suckers and the wax octopus to open the gate, you must align four elements to deactivate the bomb: press the green button three times and once the other buttons, this will bring you will allow to free Billy Bully who will go away. Take the energy sphere and the screen that Billy will leave, then go up the stairs and enter the classroom on the right, zoom in on the robot and use the present screen for a puzzle: put the triangle in the upper left point, the square at the top in the center and the x at the top right; put these pieces in place separately and not at the same time. By solving the puzzle you will get a Pompeii disk. Go back to Blackmore's lair and use the Pompeii disk on the car to go to Pompeii.
CHAPTER 4
The Street
There is a bull blocking most of the screen, all you can do is enter the building on the left, examine the window for a corkscrew and a trident, then examine the door on the left for some herbs. In the corner there is a hidden object challenge, face it and you will get a duvet. Go out and give the herbs to the bull that will step aside, look at the dirt on the ground and clean it with the duvet, you will get a feather, use it on the bull to get its ring, use the ring on the ground to get some oil and a sword . Go up the stairs but there are two statues blocking you, take the shield on the right and go through the door on the right, take the helmet on top of the cross and some flints from the bed. Leave this area and go to the building on the left, go down to the basement, in the upper right corner there is a lantern, put some oil in it and use the flint to light it, now this room is well lit. Take the torch from the wall and use it on the oil lantern to light it, do you see some meat wrapped in a net? Use the tomahawk on it to get some cooking fat and a net, and pick up the bust of Caesar. Go back upstairs and face the hidden object challenge to get some bay leaves. Go down the stairs and use the leaves on the leaves thus starting a puzzle: you have to place the leaves in order to form a complete laurel wreath, start from the lower side, then move on to the upper one. Go back to the street and go through the doors on the right, you will find many puzzles to solve here. Use the tomahawk on the left rope to get a rope, then use the rope on the upper left beam, look at the bed and click on the rope to tie it to the bed, then use the Caesar's torso on the other side of the rope to get a ointment to add to the portable laboratory, follow the instructions to do so. Look at the display on the right side of the room, put on the trident, the sword and the helmet, a puzzle will start: move the elements so that the spider warrior has all the spider equipment, the lion warrior has all the equipment to lion and eagle warrior have all eagle gear. By solving this puzzle you will get a rose. Go back to the street, go into the building on the left and go downstairs. Use the corkscrew on the bottom right vase, put the rose in it and you will get a red rose. Go back to the street and examine the statues on the stairs, use the laurel wreath on Caesar and the red rose on his wife, they'll thumbs up and move.
The Temple
Caroline is being held hostage here and there is a lioness nearby. Take the bucket and use it on the coal, then go up the stairs, you will find a lion cub who cannot leave the tank because his legs are weak. Look at the tent on the left, use the tomahawk on its stand to get it. Look at the statue to find a signet ring, use it on the jewelry box on the opposite side of the room, you will get a jewel. Go out the doors, Dr. Blackmore will appear with a hallucination, use the ointment on it to get rid of it, so you can solve the hidden object challenge by getting a bellows. Use the bellows on the dirt in the corner to get a tablet, grab the soap dish from the wall, then go back. Zoom in on the bathtub and use the tablet, the dirty lion will leave the room, grab it and solve another hidden object challenge to get a hook. Leave the temple and go into the building on the left and if you haven't already, turn on the oven on the right, put the cooking fat and the soap dish in it to start a two-part puzzle.
The first part is to put all the tubes in place; in the second part there are three jars and three levers, in the one on the left there is the symbol of the bar, in the one in the center there is the symbol of the triangle and in the one on the right there is the symbol of water, mix three ingredients then pull the fire lever down, repeat five times in a row to get soap. Now you can catch the eagle above the fireplace. Go downstairs, zoom in on the pots in the lower left and use the hook to get a key. Go back down the street and go to the building on the right, pull the covers on the bed on the right to reveal a box, open the lock, put the key in it, then click on it to get a gem. Go back to the temple pool area, use the soap on the fountain, then use the lion cub to clean it. Go back to the previous screen and use the clean cub on the lioness so they both go away. Now you can see a mural on the wall, put the gems and the curtain stand in it, then pull the stand, this will bring down the bull that contains the bombs. This puzzle is very simple: click on the blue button once and twice on the red one to solve it. Caroline is safe and leaves. Use the eagle on the window above her chair, this will make the light shine in the room, look where the light lands and click on the blocks to move them, thus obtaining the Alaska disk. Collect the glowing sphere and return to Blackmore's lair to use the disc on the machine and open the portal to Alaska.
CHAPTER 5
Examine the car, under the hood you can find a screwdriver, inside the door you will find electrical tape and a knife. Go back to the hood and use the electrical tape on the wires, then enter the car and take the cigarette lighter. Leave the car and move on, talk to Jack, use the tomahawk on the lower left branches to get them, zoom in on the lawn mower to get some straw, then use the screwdriver on the fence to get a ladder and take the funnel on the head of the scarecrow. Go back, use the ladder on the lamppost to get the lamp sphere, zoom in on the metal barrel of the building and put the branches in it, then add the straw on top and use the cigarette lighter to make the snow fall from the roof, and a shovel with it. Go ahead and use the snow shovel to the right and use the knife on the pipe to get it, then use the tomahawk on the ice to get the car keys. Look at the mower, put the bulb holder ball down and remove the mower cover, put the hose in so the fuel will pass from the mower to the ball. Go back to the car and use the funnel on the engine, then use the fuel, enter the car and use the ignition key to start it, the car will come to life and destroy the side of the building, revealing a hidden object screen. Find all the items to get a chainsaw that you will use on the hedge to the left by creating a passage to a new area. In this area there is a bear attached to a pole, to the right is a shed which contains a connector and a repair kit and always to the right is a display device. Use the screwdriver on the screws to remove the plate, click on the plate to remove it, then click again to get a segment of a lens. Go to the boat, collect the bone, then go back one screen to give it to the bear and get the leash. Go back to the boat, open the first aid box to get some string, then use the connector on the door on the left to start a hidden object challenge. In this scene there is a clock hidden in the bottom left box, solve the challenge to get a lens. Look at the door on the right for a puzzle: pull the levers to move the lead piece higher up or down and press the red button to rotate the circle, you have to move all the pieces so that they are connected between two wires. Go through the door, on the table there is a broken telescope, put the segment of the lens at the bottom and then put the lens too, click on the pieces to join them and you will get a whole telescope. Leave the room and face the new hidden object challenge to get some ammo. Enter the door on the right, put the ammo on the table and use all the bullets on the device, then click a few times on the card to fold it and use the string to get an explosive package. Leave the room and go upstairs, the car on the left will unload into the room below, zoom in on it, use the belt on the device and use the repair kit on the sleeve, then walk away from the car and click on the sleeve to lower it into the room below, this will drain all the water from the chamber. Click on the crane to lower it, go downstairs and click on it to lower it again, then click on the mesh next to the cannon to hook it to the crane. Take the head of the statue and go back upstairs, click on the crane and then on the net to fix the cannon. Put the telescope on the viewing stand on the left, it looks like the cannon should fire at three and five. Zoom in on the cannon, open the final part and put the head of the statue inside, then insert the explosive package and close, set the device left to three and right to five, then shoot. Go back to the first screen, where the car was, solve the hidden object challenge for a map, then go back to the boat and go through the right door to the navigation room. Look at the screen in the middle left, put the map in it and you will get a code: 871 243, then look at the locked area (on the right, under the fish) and use the code to open it and get a syringe. With this syringe and your portable laboratory you can create an antifreeze tonic. Go to the screen where John is being held hostage, advance and Dr. Blackmore will bring up another hallucination, use the antifreeze tonic on it to get rid of it. Examine the car on the right for another bomb challenge, to solve it press the orange button five times, once the red one, once the green one and once the blue one, this will free John and give you another sphere. You should have four orbs, one for each person you have saved. Go back to Blackmore's lair, to the screen with Tim, put all four orbs in the box and you can examine the bombs to Tim's right. To solve this puzzle you must first place the yellow piece, the green one, then the blue one and finally the red one.
Solution video - Playlists
Click here to see the entire video solution of the game!
Video of the solution - First part
Video of the solution - Second part


