


Please note:
The solution is based on the US version of the game. Some passages may not correspond with the Spanish version.
Introduction
Puzzle 1:
You will have to head towards the city on the upper left.
Puzzle 2:
Look at the pentagon, and insert the gear into the first slot.
Puzzle 3:
The hat A
Chapter 1
Puzzle 4:
The house to select is the one in the middle, with a blue roof.
Puzzle 5:
34 times in one day.
Puzzle 6:
Place three weights on each side. If they are the same, take the two remaining ones, and see which is the lighter. If they are unequal, take the lighter ones, placing one on each side, removing the rest. If they are the same, the heavier one is the removed one; if they are unequal, the lighter of the two is the lighter.
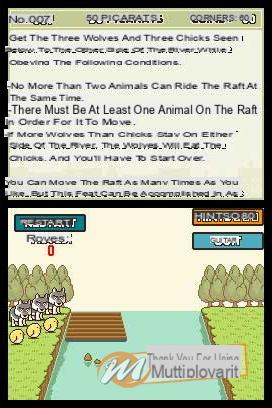
Puzzle 7:
Bring 2 wolves to the other side, take one out. Do the same thing again. So, take two girls, take them to the other side. Remove a wolf and a girl. Bring two girls to the other side, take out a wolf. Bring two wolves to the other side, take out one wolf, and finally bring the wolves back.
Puzzle 8:
The answer is $ 50.
Puzzle 9:
Take two legs, moving them towards the upper body, obtaining a kind of robot.
Puzzle 10:
The letter is T, the last of the word alphabet.
Puzzle 11:
AC must be set equal to 10.
Puzzle 12:
Turn the stick of the cube in the middle, until it is vertical, so as to form 3 cubes that touch on the sides.
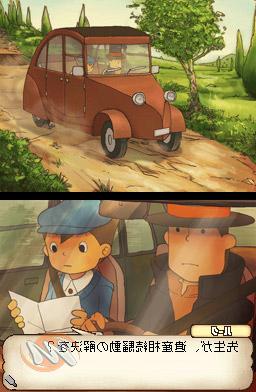
Chapter 2
Press the shoe, go back to Foyer; then go out towards Reinhold; go back to Border, and you will get the puzzle.
Puzzle 13:
12 people plus the driver, total 13.
Return to Manor Road, entering the next blue door.
Puzzle 14:
The chair to indicate is the one corresponding to the letter E. Press the burnt candle.
Puzzle 15:
Only 3 candles will remain. Exit the shop, then towards the square, on the left. Try to talk to Claudia, then Deke, and enter the blue door.
Puzzle 16:
You will need to use 7 to complete the figure. Go back to the square, towards the entrance, talk to Stachen.
Puzzle 17:
You will need to select D. Enter the blue door. Talk to Beatrice twice.
Puzzle 18:
Take the match on the right, taking it to the left of the garbage. So, take the one in the center, also moving to the left. Exit outside, towards the entrance, then off to the drawbridge.
Puzzle 19:
Let us suppose that the machines of the second row are indicated with E, those of the third row with F and A (from left to right), those of the fourth with F, D, A; those of the fifth with G, H, H, D, B; those of the sixth with G, I, I, C, C, B. Each car, of course, occupies two positions; the letters are to be understood as a placement similar to that of a naval battle. Move machine A up, as does machine B. Move C to the right, D down. The E to the right, the F to the top. The Laytonmobile to the right. The G up, the H to the left. The I also, to the left. The F down. The Laytonmobile to the left. The E to the left. The D up. The C to the left. The B down, the Laytonmobile to the right. Then go back towards the entrance, and from here turn left into Park Road.
Puzzle 20:
For a, top left: head south, then east, south again for two intersections, at the fourth turn west, continuing along the wall. For b, go straight in a vertical line. For c, you'll need to head east, then south to the dead end; at the crossroads, west, arriving near the b; then south, west, arriving at c. For the d on the left, continue west, arriving at the wall; follow it until you pass the hole, south, and east. Talk to Pauly.
Puzzle 21:
The answer is 8. Talk to Agens.
Puzzle 22:
The first rope starts from the post near the pig at the bottom, reaches the one at the top right. The second string, starts from the post to the right of the pig at the bottom, and reaches that of the one at the top left. The third starts from the lower right post with respect to the upper right pig, and continues towards the lower left post with respect to the upper left pig. Enter the blue door, driver to the restaurant. Talk to the bartender.
Puzzle 23:
You will first have to throw 5 doses from 8 to 5. So, 3 doses from 5 to 3. So, 3 doses from 3 to 8. So, 2 doses from 5 to 3. So, 5 doses from 8 to 5. So, 1 dose from 5 to 3. So, 3 doses from 3 to 8. Talk to Fickl.
Puzzle 25:
You will need to take the top vertex, and move it under the bottom row. Next, take the two lower vertices and place them on the sides of the topmost row. Exit the restaurant, continuing to the parking lot, then pressing on the bottle in the lower left corner.
Puzzle 26:
The answer is 59 minutes. Talk to Claudia. Talk to Gordon.
Puzzle 27:
Choose 1, 3, 6, 4, 2, 5. Talk to Matthew.
Puzzle 28:
The black dot should be placed in exactly the same place as the red dot. Talk to Chelmey and Matthew. Enter the room, talk to Dahlia.
Chapter 3
Take the coin and leave the room. Talk to Chelmey.
Puzzle 29:
The answer is only one person. Talk to Dahlia, then exit the room. Talk to Matthew, exit towards Reinhold Manor. Talk to Claudia, then go back to the Border. Talk to Agnes.
Puzzle 30:
The only figure that matches is the one at the bottom left. Return to Manor Road. Talk to Marco twice.
Puzzle 31:
The solution is 1 minute. Go back inside the shop, then hit the candy bowl.
Puzzle 32:
The exact percentage is 100 percent. Now press the candle.
Puzzle 33:
The answer is the match. Give the Pine Bed to Layton, exit to the Plaza, where you will talk to Percy twice.
Puzzle 34:
The solution is 5. Enter the white door. Talk to the woman, entering the next house. Exit the puzzle cottage, and return to the square. Left, inside the restaurant, talk to Crouton. It is possible to participate in an optional puzzle. Go outside, back to the square, talk to Deke.
Puzzle 35:
The solution is 3. Enter the clock tower.
Puzzle 36:
The solution is 1. Talk to Lucy.
Puzzle 37:
The solution is 6, age of both brothers. Press the hole in the left wall for the hidden puzzle. Then continue forward, up to the crossroads, where you can talk to Zappone.
Puzzle 38:
You will need to draw a bridge between the lighthouse (to the southwest), and the purple house right in the middle. So talk to Agnes.
Puzzle 39:
You will need to select the top hat. Take the path to the left, arriving at the market, where you will have to talk to Archibald.
Puzzle 40:
The answer is 44. Head right, talk to Jarvis, and go back after getting the coins. Talk to Gerard.
Puzzle 41:
The solution is 9. Talk to Gerard again.
Puzzle 42:
The solution is $ 95. Go back to the fork. Talk to Zappone, go back to the clock tower. Go back to the square, talk to Deke, then go back to the tower. Talk to Lucy.
Puzzle 43:
The Solution is zero percent. Give the Blue Bed to Luke, then head back to the square. Enter the blue door. Talk to Rodney twice.
Puzzle 44:
Place the first form in the upper left, the third form in the upper right, the fourth form in the center, the second form in the lower left, the seventh form in the lower right, the sixth form in the lower center-left, the fifth form wedged between the fourth, the seventh, and the sixth. Exit the restaurant, go back to the square, then enter the blue door, and go talk to Crouton.
Chapter 4
Talk to Andrea.
Puzzle 45:
The answer is "Compass". Right, towards the square. Talk to Gerard. Go back to the left, after having recovered all the possible objects. Talk to Deke in the park.
Puzzle 46:
Use the pine at the bottom to create a fifth point of the star. Go back to the park, then to the square. Now, towards the pension, where you can retrieve the watch; go back to the square, give the watch to Gerard.
Puzzle 47:
The answer is exit B. Give the Cream Rug to Luke. Enter the clock tower. Press the cat.
Puzzle 48:
The solution is 5 cats. Talk to Lucy.
Puzzle 49:
The solution is the letter M. Give the Bookcase to Luke. Continue to the crossroads, talk to Marco. The solution is the letter F. Give the object to Layton, then go into the cafe; talk to Crumm and Zappone.
Puzzle 51:
The answer is A. Get out, go back to the market, talk to Agnes.
Puzzle 53:
The answer is C. Talk to Joseph.
Puzzle 54:
You will need to hit the moon at the top left of the screen. Right, towards Northern Hill; talk to pauly, for an optional puzzle. Go back, enter the blue door, there is a chance to complete an optional puzzle. In case you don't want to, go outside. When daylight comes, you will automatically return to retirement. Talk to Beatrice.
Puzzle 55:
The solution is once. Go outside and talk to Stachen.
Puzzle 56:
The solution is 2. Give the Desk to Luke. Go back to the Plaza. Talk to Deke.
Puzzle 57:
The solution is D. Give the Pile of Books to Luke, then go out to the street and talk to Marco.
Puzzle 59:
You will have to perform a serpentine path. Enter the shop, take the coin, go out to the street, enter the manor. Talk to Claudia.
Puzzle 60:
The solution is sinister. Enter the following manor. Go up the stairs twice. Talk to Gordon.
Puzzle 61:
In the first row, you will need to start with the third and fifth points (starting from the left). In the second, the second, the fourth, and the sixth. In the third, the first and the last. In the fourth, the second and the penultimate. In the fifth, the first and the last. In the sixth, the second, the fourth, and the penultimate. In the seventh, the third and the fifth. Give Layton the watch. Talk to Gordon if you want an optional puzzle. So, with Chelmey.
Puzzle 62:
Turn the paper over, you will see Bill's name. Talk to Dahlia.
Puzzle 63:
The age of the father is 44, that of the mother 43. Give the painting to Layton, go back to the Foyer, up to the Border, where you will have to talk to Ramon.
Chapter 5
Towards the Reinhold Manor. So, go in, talk to Matthew, and go out, all the way to the street. Talk to Ingrid, the girl here, then go back inside the manor. Talk to Matthew. Go up the stairs, enter Dahlia's room. Go back outside after watching the cutscene. Go outside, go back to the Reinhold Manor. Talk to Ingrid here, returning to the border, then to the road, up to the square. From here, to the drawbridge, then back to the square, to enter the blue door, on the right. Talk to Rodney inside the Town Hall building.
Puzzle 64:
The solution is 1. Go back outside to the clock tower. Talk to the cat.
Puzzle 65:
The solution is 5. Talk to Lucy now.
Puzzle 66:
The solution is the second of January. Again with Lucy.
Puzzle 67:
The answer is "text me" Continue along the fork, talk to Zappone, and proceed to the right. Talk to Gerard twice.
Puzzle 68:
The solution is 12. Enter the nearby blue door. Talk to Prosciutto.
Puzzle 69:
The solution is 29. Give the World Map to Luke. Go back out, at the crossroads, take a left.
Puzzle 70:
You will recognize the solution by eye. Talk to Giuseppe.
Puzzle 71:
The solution is C. Give the Flower Vase to Layton. Talk to Archibald. At his house, you can, if you wish, solve a hidden puzzle. Collect all the items, then go out to the clock tower, then the square. Enter the pension. Talk to Beatrice, go back outside.
Chapter 6
Head to the square, talk to Percy.
Puzzle 72:
The solution is "Rest". Give the Reading Lamp to Luke, then enter the blue door. Talk to Rodney.
Puzzle 73:
The solution is 11 squares. Give the gramophone to Layton, heading towards the Clock Tower, towards the fork, and then the market, where you will speak with Agnes.
Puzzle 74:
The solution is A. Talk to Agnes again.
Puzzle 75:
The solution is 4. Go back to the beginning of the path, where you can complete an optional puzzle if you wish. So, continue towards the tower road. You can solve two optional puzzles, or, if you wish, continue straight into the tower. Get all the coins, go back to the tower, then to the path. From here, towards the market, then right, towards the nearby hill. Walk along the north path, then along the crossroads, returning to the clock tower. From here, to the square, and to the park, where you will find Pauly, who will provide you with a puzzle to solve.
Puzzle 76:
The solution is 20. Talk to Adrea.
Puzzle 77:
The solution is B. Give the Houseplant to Layton, thus entering the nearby restaurant. Talk to Crouton.
Puzzle 78:
9 from 16 to 9; therefore, 7 from that from 9 to that from 7, therefore, 7 from that from 7 to that from 16; therefore, 2 from that from 9 to that from 7; therefore, 9 from that from 16 to that from 9; 5 from 9 to 7; 7 from 7 to 16; 4 from 9 to 7; 3 from 16 to 9; 3 from 9 to 7; 7 from 7 to 16; 6 from 9 to 7; 9 from 16 to 9; 1 from 9 to 7; 7 from 7 to 16. Give the Boquet of Clubs to Layton. Talk to Crouton again.
Puzzle 79:
By dividing the map into coordinates, numbers for the rows and letters for the columns, the sequence to be followed must be the following: an orange from B2 to D1, always orange from B3 to D3, an apple from F2 to B3, an apple from F3 to B2, an apple from G3 to C2, an orange from D3 to G3, another orange from D1 to F3, an apple from C2 to F2, another apple from B2 to E2, an orange from A2 to D1 , another orange from A3 to D3; an apple from E2 to A3, an apple again from F2 to A2, another apple from G2 to B2, and always an apple from G1 to C2; orange from D3 to G1, again orange from D1 to G2, apple from C2 to F2, always apple from B2 to E2, orange from A1 to D3, orange from B1 to D1, apple from E2 to A1, apple again from F2 to B1 , and again apple from F1 to B2; therefore orange from D3 to F1, and always orange from D1 to F2. So talk to Flick.
Puzzle 80:
The first queen in the third block of the first row. The second, in the first block of the third. The third, in the last block of the fifth. The last one, in the second block. Give Layton the chair, talk to Flick again.
Puzzle 81:
Analogous to the previous one. First queen, in the third block of the first row. Second queen, in the first block of the third row. Third queen, in the fourth block of the fifth row. Fourth queen, in the second block of the seventh row. Fifth queen, in the last block of the penultimate line. Talk to Flick again.
Puzzle 82:
First queen in the first block of the first row. Second queen in the fourth block of the third row. Third queen in the third block of the seventh row. Give the Hat Rack to Layton. Talk to Flick again.
Puzzle 83:
Place a silver queen in the second block of the first row. A golden queen in the sixth of the third row. A silver queen in the first of the fifth row. A golden queen in the penultimate of the seventh line. A golden queen in the fourth of the ninth row. A silver queen in the last of the ninth row. A silver queen in the third of the eleventh row. A golden queen in the fifth of the penultimate row. Exit the restaurant, arriving at the park. Enter it, then towards the gate.
Chapter 7
Go back to the street, then to the town hall. Talk to Rodney, and go outside. Left, up to the sewers, via the park road. If you want, you can participate in an optional puzzle. Talk to Pavel, then to Stachen.
Puzzle 84:
The solution is 3. Exit outside, then press at the Laytonmobile.
Puzzle 85:
The Solution is 60. Give the fossil to Layton, then go back to the sewers. Take the path to the right, talk to Sylvain.
Puzzle 86:
The solution is 4. You will automatically return to the park. Enter, then take the items near the crossroads, then continue forward. If you want, you can find an optional puzzle inside the abandoned tent. So right, press on the wheel.
Puzzle 87:
The solution is 42. Continue to the right again. Watch the scene, grab all the items nearby, and go back to the main path. Talk to Sylvain.
Puzzle 88:
The solution is water. Give the Violin to Luke. Go back to the tent, then to the wheel. Back to the tent, drop down, and press on the plates in front of you.
Puzzle 89:
The arrow you are looking for is the one that points to the left, on the right edge of the signal. Head left, then press on the wooden door to get the puzzle.
Puzzle 90:
Take the blue block below and move it to the right by one; move the purple block down and move it one to the right, and one down. So take the bottom, right, blue block and move it two to the left. Take the purple colored block, to the right, and move it down one, and right the other. Take the green one on the right, and drop it two.
Take the top purple block and move it two to the right. Grab the blue block above and move it one left. Take the yellow block, and move it up one, and to the right of another. Take the red ball, and move it down 3 and right by one. Take the purple block on the left and move it once to the right and up two blocks. Take the green block on the left and make it go up one block. Take the blue block, and move it two to the left. Take the purple block below, and bring it up one, and to the left of another. Drop the red ball by two. Continue to the basement.
Puzzle 91:
The solution is B. Give Layton the Bone China Teacup. Now go back to the basement, heading towards the hut, then continuing to the park.
Chapter 8
Proceed to the sewers, talking to Sylvain.
Puzzle 92:
Starting from where the water comes, continue to the intersection, take a left, and go up towards the valve. Now, starting from the pipe above the sink, continue to the intersection, then to the left. Go back to the square. Go into the pension, talk to Beatrice, then go out. Head to the manor, where you can talk to Ramon.
Puzzle 93:
Move the sheep to the opposite side, take nothing away, then move the cabbage to the opposite side, bring the sheep back, move the wolf to the opposite side, bring nothing back, then move the sheep to the opposite side, return to the Manor, look at the scene, then up to the Parlor. Answer the first question, and 2 the second. Go back to the manor to talk to Dahlia. Exit, heading towards the clock tower. Here Archibald will provide you with an optional puzzle. So go back to the crossroads. Here, take the path to the right. Talk to Prosciutto, and ask for a puzzle (optional). Go back to the fork, take the road to the left, proceed along the path, talk to Martha. She will provide you with an optional puzzle. So, continue to the dead end.
Chapter 9
Enter the tower, then head to its foundations. Go out, talk to Bruno. Head to the first floor of the tower. Press the question mark near the stairs.
Puzzle 94:
There are 21 moves, so its resolution turns out to be slightly complicated. He takes the purple block, bottom left, and move it down one. Take the next one, also purple, and move it to the left by one. Take the bottom right blue one and move it one left. Take the one on the right, green, and move it down two. Take the top right one, purple, and move it down two. Always purple, next to the previous one, move it one to the right and down. Take the blue block above, and move it two to the right. Take the red ball, and move it down by one, to the right of another. Take the green block on the left, and move it up two.
Take the yellow block, and move it one to the left. Take the top purple block and move it one to the left and one to the bottom. Take the blue block above and move it one down. Take the red ball and move it two to the right, and one upward. Take the top, right, blue block and move it one block up and one block left.
Move the red ball two blocks down, and one block to the left. Move the top purple block three upwards. Move the red ball right one, and one down. Move the other purple block up one. Move the red ball left one block. Move the green block, right, up by 3. Move the red ball, right, one and two down. Go up the stairs. Press the question mark on the gate to get the next puzzle.
Puzzle 95:
Place 2,9,4 in the first row. Place 7,5,3 in the second. Place 6,1,8 in the third. Go up the stairs again. Talk to Pavel.
Puzzle 96:
The solution is 16 seconds for each floor. Go up the stairs again. Press the question mark at the gate to the puzzle.
Puzzle 97:
Again, the solution is rather complicated. On the other hand, we are approaching the end of the game, so it is also right that this is the case. Take the green block from the second row by moving it one to the right. So, take the green block from the third row, also moving to the right. Move the purple block one to the right. Move the block in the bottom green row up two. The same position, one on the left and one on the top. Same position, two on the left. Move the purple block down by one. Move the green block in the second row, one to the left.
Move the green block in the third row one up. Move the purple block one to the right. Move the green block of the second row down by two. Move the top green block down two. Move the green block up one to the right and one down. Move the top blue block two to the right. Move the red block up by one. Move the green block in the third row two to the left. Move the same two to the left. Move the green block in the second row one down. Same move, again. Move the top blue block one down. Move the top green block two to the left. Move the green block in the second row, one up and one to the left. Move the purple block up by one.
Move the green block in the third row one to the right and one down. Move the same block two to the right. Move the block in the second row one down. Move the green block in the top row one to the bottom, and one to the right. Move the red block one to the right. Move the green block, in the third row, up by two. Same block, one to the left and one to the top. Third row, blue block, two to the left. Second row, green block, one down and one to the left. Top row, green block, two down. Move the red block one to the right. Move the green block, in the second row, one to the right and one up. Move the blue block, in the third row, one up. Move the green block, in the third row, two to the left. Same move, again. Move the red block down by one. Move the green block, in the top row, two to the right.
Same move, again. Move the blue block, in the second row, one up. Move the green block, in the third row, one up. Same move. Move the blue block, in the bottom row, one up. Move the green block, in the bottom row, two to the left. Same move. Move the red block down by one. Move the green block, in the top row, one down and one to the left. Move the purple block one to the left. Move the green block, in the third row, two upwards.
Move the green block, in the bottom row, two upwards. Move the red block one to the right. Move the green block in the second row two down. Move the green block in the top row two down. Move the purple block one to the left. Move the green block, in the second row, one to the left and one up. Move the red block one up and two to the right. Go up the stairs. Talk to Martha.
Puzzle 98:
The solution is Diamond, Jokers, Hearts, Batons, Swords. Go up the stairs again. Press the question mark for the puzzle.
Puzzle 99:
The numbers to use are: in the first line, 41268, in the second, -7935. Enter the following door. Press the question mark to get to the last puzzle.
Puzzle 100:
For the first square, the line must join the first point of the first row, with the first point of the second row, with the second point of the second row, with the second point of the first row. For the second square, the line must join the third point of the first row, with the second of the third row, with the third of the third row, with the fifth of the second row.
For the third square, you will have to join the first of the third row, with the second of the last row, with the fifth of the fourth row, with the fourth of the first row. For the fourth square, you will have to join the first of the penultimate row, with the first of the last, with the third of the penultimate, with the first of the third last. For the fifth square, you will have to join the second of the fourth row, with the last of the fifth, with the fourth of the fourth, with the third of the third.
For the sixth square, you will have to join the fourth of the second, with the fourth of the third, with the last of the second, with the fifth of the first. For the seventh square, you will have to join the third of the second row, with the second of the penultimate, with the third of the last, with the last of the third. Go up the last two flights of stairs, selecting the first option, to complete the game.


