Please note:
The solution is based on the US version of the game. There may be divergences from the Spanish version and / or for other platforms.
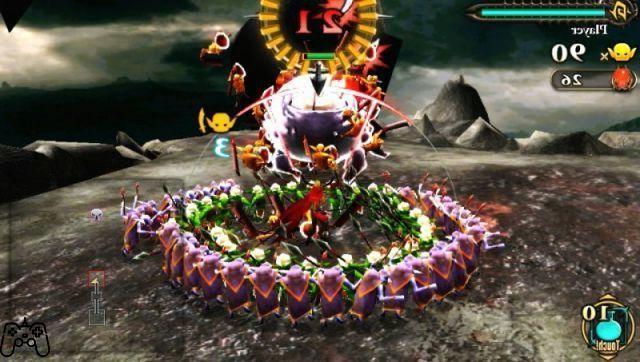
General Councils - The Combat System
Generally speaking, the system sees you commanding a group of goblins during various combat courses / scenarios. Such Goblins can be of three types: Goblin-Wizard, Goblin-Soldier or Goblin-Spearman. Each of them is characterized by some specific properties, as well as some strong and / or weak points. You will find yourself moving the various groups using the analog controller, and then giving commands using the R key.
The various types of goblins can always be "combined" - this will increase your fighting chances / abilities, but at the same time it will create some coordination problems, usually related to the different speed of movement of the different types of Goblins - the Goblin-magician they can in fact move faster than the Goblin-spearmen, while the latter are endowed with a greater capacity in the melee. In general, you should try to always turn your troops "gaze" towards the enemies, unless otherwise indicated in the mission description.
The Soldiers
This is the most common group of subjects, as well as the first that you will find yourself checking. Pressing the R button will literally "jump over" the enemy. When a good number of soldiers have managed to jump "over" the enemies, they will be able to carry out the special attack called "Save" - this attack allows you to use a critical hit on the enemy when a large amount of Goblins are on it; very effective! It is also possible to hold down the L key to create more concentrated "groups" of Goblins; in this case, it will be easier to "direct" the Pokémon, but they will also prove to be less "flexible" in their movement. Generally speaking, soldiers should be used in situations where there are not many enemies and / or where the enemies present are not particularly strong.
The magicians
This type of soldier reveals its usefulness mainly when used against insects and / or against enemies capable of inflicting elemental damage. The utility turns out to be even greater when you find yourself facing enemies connected to the electrical element: they are in fact capable of killing your entire goblin army in a single shot, a situation that you clearly want to avoid.
To "cast" the wizards it will initially be necessary to load his spells, using the R key. The more the loading time will be high, the more powerful will be the spell that you will have / can emit. It is always advisable to try to reach the area where the energy bar turns red.
Video - Launch Trailer
Lancers
It is an "all-rounder" goblin, effective in a large number of cases. They can either attack en masse or arrange themselves in peculiar formations.
Ideally, you should place at least 50 in your army - they often serve to "make up the numbers"; as well as to prevent the wizards from being attacked directly (consequently suffering very serious damage). They are particularly effective in fighting dragons.
Elemental Forms
Two elements can be associated with armor, three others can be associated with weapons. The same consideration applies to opponents - some are a fire element, while others are an electricity element. To counteract the elemental abilities of enemies, the ideal mode sees you equip armor capable of protecting you from the specific elements associated with a specific enemy (in general, fire-type armor will completely protect you from damage of that kind, while the armor of electric type will prevent you from suffering serious damage following a lightning strike). But be careful: the armor does NOT protect you from the traps scattered throughout the game scenario! Therefore, try to avoid them always and in any case, since the damage suffered as a result of contact with them cannot in any way be recovered.
The Phases of the Game
Below, some indications regarding the optimal resolution method for the various phases of the game. Since not all stages are equally difficult, we will limit ourselves to dealing with only those that really need detailed information.
Stages 2-10
Phase 2: The King of Fury
Here you will be placed almost immediately in front of a boss, or Gigadon. In general, the most effective Goblins against this type of opponent are those with a spear; We therefore recommend initially creating a formation, and then quickly sending them to the opponent to begin the fight - they will immediately attack the part of the ground immediately below the boss, causing him to lift. You can then hit him repeatedly on the head. So wait for the boss to go to charge for a second time; after having also in this case avoided his blows, repeat the previous attack, always trying to hit him in the head. By repeating this procedure for a third time, you will be sure of victory!
Phase 3: Diabolical Sight
You will be here for the first time faced with snakes. Whenever you notice a kind of "hole" in the ground, you have to pay attention to the possibility of a snake coming out of it. Ideally, you should try to move in formation with soldiers and / or wizards - wizards are especially useful, as they turn out to be very quick to attack; Furthermore, snakes are particularly weak against "sword" -based moves: as a result, soldiers will be able to inflict more damage on hit than other categories.
Phase 4: The Mountain of the Kingdom
During this phase, you will see it for the first time with the Batrachus: they are demons of considerable size, specialized in attacking with spears. The best way to win the level with relative ease is undoubtedly you eliminate these types of opponents first, so they don't cause you excessive damage in a small amount of time. As seen during the previous phase, the use of soldiers and wizards is strongly indicated, being the two groups capable of inflicting the most significant damage to this kind of opponents.
Phase 5: Audience with the Empress
Boss who can be quite complex at first, but who can be easily "tamed" by knowing when and how to attack. The most "sensitive" point of him corresponds to the head of the snakes that rotate around the central "body" of the snake; it will be necessary to attack them as soon as you see a kind of shadow appear near the ground below; after the attack, you can send goblins towards the head itself, so as to separate it from the rest of the snake's body. You will therefore have to repeat the same process against the other "heads" of the snake, finally going to eliminate them all, and then attack its central part, to completely reset the HP at its disposal. Remember that it is strictly necessary to destroy the heads first, and only then to attack the central part! A contrary order would not allow you to obtain maximum effectiveness.
Absolutely avoid approaching the snake as soon as you notice a kind of "gas" (often emitted by the snake's own heads) floating around the figure of the enemy himself: this gas is extremely harmful to your goblins, they would die almost immediately upon contact. with it. Equal attention must be given to the "rays" that will expand from the central part of the snake towards the peripheries of the playing area.
Phase 8: Lords of Heaven
Here you will find yourself facing the first opponent of the "Dragon" type. The most suitable goblins to be able to eliminate this kind of boss are undoubtedly those equipped with a spear & co .: initially, we recommend attacking the enemy's neck, an area that - if hit - allows you to obtain extra objects that you can then successfully insert. in your inventory. So wait for the Dragon to attack you, then move your army sideways, avoiding the blow and making the dragon crash to the ground. So when he is in that position, send your hordes to attack his wings (starting from the right and then moving to the left). Then attack his head to definitively complete the elimination of the enemy. In case you want to use the wizards, you will have on the one hand an advantage (the possibility of attacking from a distance, consequently taking less damage), on the other a considerable disadvantage (the inability to directly hit the enemy's weak points). A strategy based on goblin spearmen is therefore preferable.
Phase 9: The Abyss Barbecue
This is a variation on the type of boss that is considered "standard". He is a boss specializing in the use of the fire element, and is equipped with the ability to bring helpers to the area who can improve his performance during the battle. We therefore strongly recommend that you delete it with the highest priority; the subjects most well versed in the elimination of this kind of adversaries are undoubtedly the goblins specialized in the use of "spears". Quickly create a formation and then launch them into battle. When the boss falls to the ground (since his defenses are rather poor, this will happen shortly after the start of the game), you can repeatedly attack his head to eliminate him permanently.
Stages 11-20
Phase 11: Stellar Dethrone
This is the female version of the dragon that you have dealt with earlier; compared to the male version, she appears to have a greater preference for remaining in flight for long periods, a feature that makes her more difficult for you to hit. From another point of view, she is also equipped with a much more vulnerable defensive system than her male counterpart, consequently a smaller number of hits will be enough to be able to eliminate her. As with other dragons, your goblin spearmen are the most effective in countering this kind of enemy. In the event that you do not have a sufficient number of them (or are - due to a situation of peculiar misfortune - in large numbers eliminated by the dragon itself), you can replace them with wizards - subjects capable of striking from a distance. It is clear that, since wizards have a much lower defensive capacity than goblins spearmen, it will be necessary to pay more attention to dodging the aerial attacks of the dragons!
Phase 12: The Atomic Froza
You will go here to meet the first bug-type boss - named "Spidread". The most effective method to be able to eliminate it consists - as now usual, even for enemies of another kind - in a combination of goblins equipped with spears and wizards. However, given your current progress (which shouldn't see you have a high level of experience, at least for now), we highly recommend using spear-wielding goblins. It would be good to start the game by placing your goblins near the stones, in such a way as to be able to immediately attack the boss's head, thus obtaining bonuses (ie the so-called "hell teeth" of the boss himself). After hitting him in the head these first few times, with the aim of obtaining the objects, we strongly recommend that you change your focus: it will be preferable to focus on attacking his shoulders, which are his weak point. When you have destroyed them, you can finally move on to the central part of the body, thus ending the boss in a "definitive" way. S.
Phase 13: The Diabolic Twins
The main problem in dealing with this kind of opponent is given by the considerable range of his blows. Consequently, you will have to try to jump sideways with a certain frequency, so that you can dodge the blows and almost simultaneously counterattack without problems. So try to move towards the sides of the initial position of the boss, thus minimizing your problems (he is not in fact able to reach you when you are placed in that area). In case you want to get some extra items, we recommend that you hit him in the neck.
Phase 15: The Lord of Shadows
This will be your second encounter with an insect-type boss, this time he will look like a fly. He will be accompanied by some mosquitoes, who flee from him "assistants" of him, if they can be called that. The goblins who are best suited to successfully complete this fight are undoubtedly the wizards: they are able to attack from a distance, thus easily eliminating the insects that surround the main boss and aim to protect them. In practice, you will have to immediately try to "charge" the magic bar of your wizards to the maximum, and then quickly release the energy as soon as it reaches the red area. In this way you will get rid of a large amount of insects in a very short time.
Not being able to protect himself anymore, the boss will therefore be completely defenseless to the damage that you can cause; therefore wait for it to rest on the ground, and then create a formation made up of goblin spearmen and proceed quickly towards the sides of the boss, preferably attacking him near his abdominal wall, the most sensitive area. When he begins to sway dangerously, then move on to attack the head to eliminate him definitively.
Phase 16: Access to Hell
You will find yourself here facing two bosses at the same time; although this may seem apparently very difficult, almost impossible to "handle", we recommend instead to use the strategy already seen in the fight against Gigadon, replicating it slavishly: with a certain surprise, you will not encounter any problems.
Stage 20: The Return of the King
You will find yourself facing an Angel-type opponent for the first time. This boss is more "complex" to deal with than the previous ones (note: complex is not the same as "difficult"!). The peculiarity is connected to its wide availability of electric-type attacks, as well as the "halo" -type effect that will hit the entire game area, as soon as its life-point level drops below 40% of the total. . It is also capable of summoning assistants. The most dangerous attack, however, remains undoubtedly the halo, since it allows you to hit practically all your goblins placed on the playing area.
As far as your attack is concerned, the goblins best suited to the elimination of this subject are undoubtedly the wizards: their speed in creating a formation and attacking from a distance allows you to counter the electrical attacks of the Angel-type enemy; Additionally, the range of mages may, in some cases (ie, when their experience level is high enough), be greater than the range of the king's halo. As a result, he will not be able to attack you but you will be able to attack him without problems. Despite this, it is always best to try to keep your characters in constant motion by dissolving and recreating the lineup. When / if he gets close to the ground, you can easily attack his wings, for extra items - we highly recommend doing so, they are rare items that can be recovered almost exclusively during this battle! Finally, a tip regarding the optimal equipment for wizards: if possible, it would be good to provide them with sticks not associated with any type of element!
Video - Goblin Trailer
Stages 21-30
Stage 25: The Devil's Army
You will have to deal with an enemy troop consisting of 2 Gigadons and 2 Magflares. We strongly recommend the use of wizards to be able to pass the level without particular problems. It will be good to equip them through the use of non-elemental sticks, as well as with fire resistant armor. A rather simple method to be able to put the Gigadons in difficulty is to try to move them to one of the corners of the game area, then try to understand the moment in which they will proceed to jump to quickly reach your goblins, and move sideways as soon as it it will happen, so that their strike fails and you can then attack them in the back. Therefore, follow the same strategy to defeat the two Magflares - remembering however that they are less powerful than the Gigadons, and that consequently it will not be necessary to pay the same amount of attention.
Phase 26: The Putrefied King
This opponent is nothing more than a "version 2.0" of Beelzeboon. Fortunately, the main improvement focuses on a higher availability of health points, without the addition of new moves and / or peculiar abilities. Therefore, the general strategy will have to remain the same, that is, first hit the boss's wings to try to recover as many objects as possible; therefore, when he has fallen down in your direction, you will have to try to hit his head - which is also their weak point. By repeating this strategy on an ongoing basis, you will be sure to win.
Stage 29: Heaven of Dragons
You will notice from the beginning two dragons that will enter the game area. Although their entry takes place separately, you will then have to face them at the same time. The challenge could be complex if your goblins aren't fast enough; therefore, we recommend the use of wizards. Their attacks will preferably be focused on the dragon wings and their legs; use your equipment to protect the wizards from fire, and remember not to use elemental-type wands in any case, which would be ineffective against dragons!
Reached the final stage of the level, you will therefore have to face Blue Ray, an electric type dragon. Although his elemental characterization is different, the most effective strategies for defeating him remain the same - given your extreme familiarity with this type of tactics, you shouldn't run into any problems whatsoever.
Stage 30: The Three Fallen Angels
As you can also guess from the title of the level, you will find yourself facing a total of fallen angels equal to 3. Although they are considered to be "dark" angels, their damage pattern is often equivalent to "normal" angels - which means that each of their hits will undoubtedly cause you a lot of damage. They are in fact able to fire electric beams, as well as summon various followers ready to assist them during the battle.
When starting the fight, we highly recommend the use of wizards, given their remarkable speed which allows them to dodge the attacks of the enemy. In addition to dodging, we recommend concentrating your shots on the enemy's abdomen, a much more sensitive area than the alternatives. When his HP has reached 50% of the initial total, the opponents will start throwing "halo" that will cover the entire play area; to be able to dodge them you will have to try to create a formation of goblins that follow a kind of "circle", and then make it rotate progressively - the "halo" in fact follow a spherical pattern, and if you manage to create a larger circle than that partner , the direct consequence will be the inability of the enemy to inflict damage on you.
So repeat these two strategies - first an attack by the wizards, then a spherical type formation - to be able to obtain victory without suffering excessive losses among your men.
Stages 31-40
Stage 36: The True Lord of the Earth
The initial stages of the battle will be very simple. Instead, the difficulty will tend to increase as soon as the two Spidreads arrive on the scene: in fact, they will bring with them a large number of "subordinates", or - in other words - other spiders. The best way to get rid of them is to avoid contact with the bosses during the initial stages, preferring instead to eliminate all these "minor" spiders from the map; only later will you have to resume your attacks.
Stage 38: The Demons of Vengeance
This is one of the last levels; consequently, the fights will take place only against bosses, without involving opponents so to speak "intermediate". The ideal group to be able to eliminate this kind of enemies is composed largely of wizard-type goblins. Within your inventory, there should also be a stick called "'???", that is three consecutive exclamation points - we highly recommend equipping it, despite the 100 points needed it is capable of inflicting very powerful elemental damage to all kinds of bosses. In case you also own the "???" - even better, you will be able to both neutralize most of the enemy hits, and to inflict huge amounts of damage in a very short time.
Using wizards, the enemies that could potentially cause you the most trouble are lizards. They are in fact able to "summon" a considerable amount of spiders, which can often interrupt your attacks, and slowly decrease your defenses, almost to zero. The ideal game conduct sees you always trying to hit the "lateral" part of the enemies - that is their ribs and / or lateral part of the chest -, attacking instead from the front only when they are anchored to the ground, perhaps following their own same attack failed, and therefore very vulnerable. It is also clear that, when using mages, the general game strategy will always see you attacking from a certain distance - this is one of the reasons why the head-on collision is not particularly valuable, nor advisable.
Phase 39: The War between Wars
The same as seen for the previous level, even if the elemental typology of the bosses will be "inverse" compared to that seen for - in fact - the previous level. Among the various bosses, the most annoying is undoubtedly the snake accompanied by a series of spiders; however, it can easily be "tamed" by resorting to wizards - as always, their attacks from afar will surely challenge any foe who tries to base his strategy on close-range strikes and / or physical attacks from his underlings.
The final enemy will therefore belong to the lineage of angels; consequently, he will have a tendency to attack repeatedly and - above all - to use his fearsome "halo" move. As seen for many other bosses of a similar nature, there is an easy solution to counter a regime of this kind, that is the use of a circle formation, which will periodically have to be "enlarged" to ensure that your characters do not come. invested by the halo itself. Also try to push the opponents towards the electric and / or fire traps that you can see scattered around the game area.
Phase 40: The Crossroads of Heaven and Hell
The bosses in this level - as befits a final level - are capable of inflicting some truly remarkable amounts of damage. The wizards, who you have often used successfully during the previous levels, could encounter various problems due to the high amount of damage they would be forced to endure. It will therefore be important to always keep an eye on all your goblins, trying to avoid them incurring additional damage caused by the peculiarities of the game area (eg avoiding that they impact with electric traps !!).
We also recommend to use during the battle - with a certain frequency - of the objects able to increase the strength of your soldiers, as well as to always keep "aside" some object that is able to bring them back to life; the latter must be used mainly in case you make serious mistakes, and not to revitalize the subjects in the area in a more or less "casual" way.